# Web前端
# 新手入门:HTML5+CSS3+实战项目-----移动web
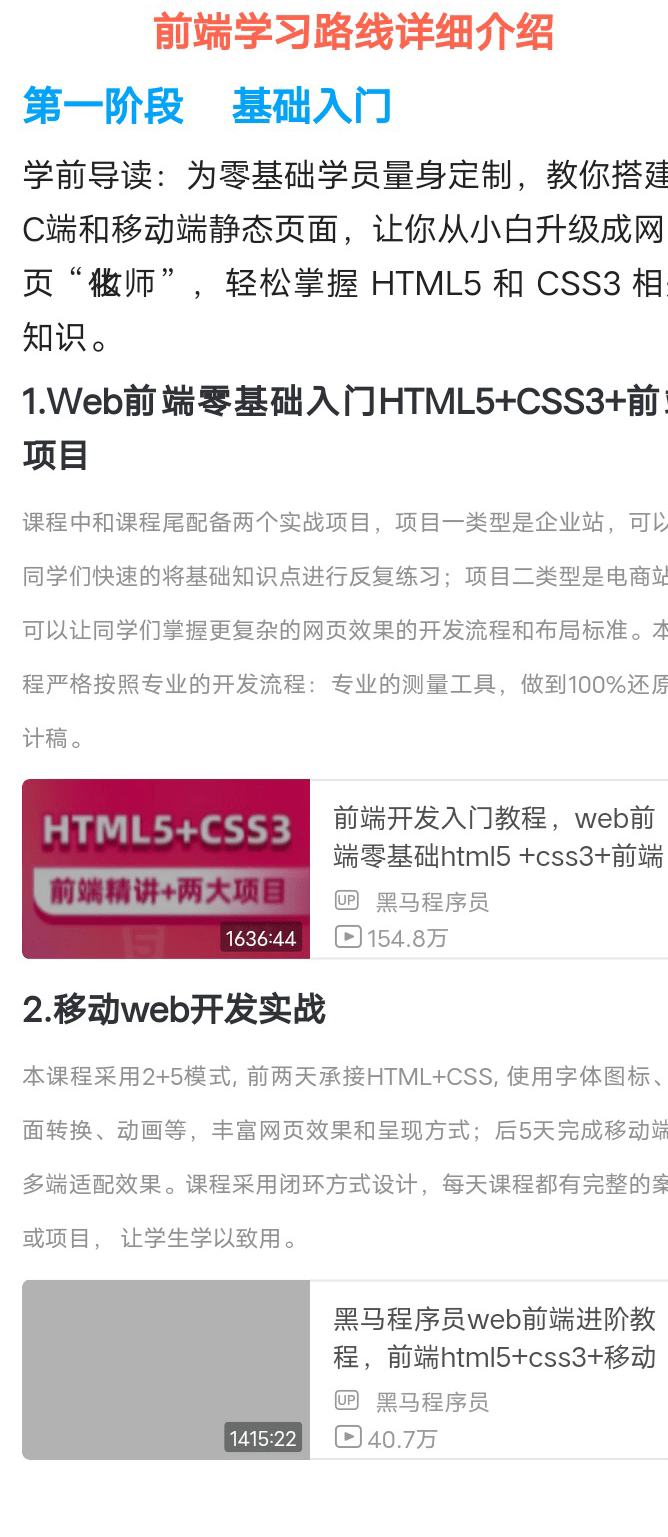
# 第一阶段 基础入门
# web前端HTML+CSS3+前端项目
# 一、基础认知
# 1.基础概念铺垫
# 1.1.1 认识网页
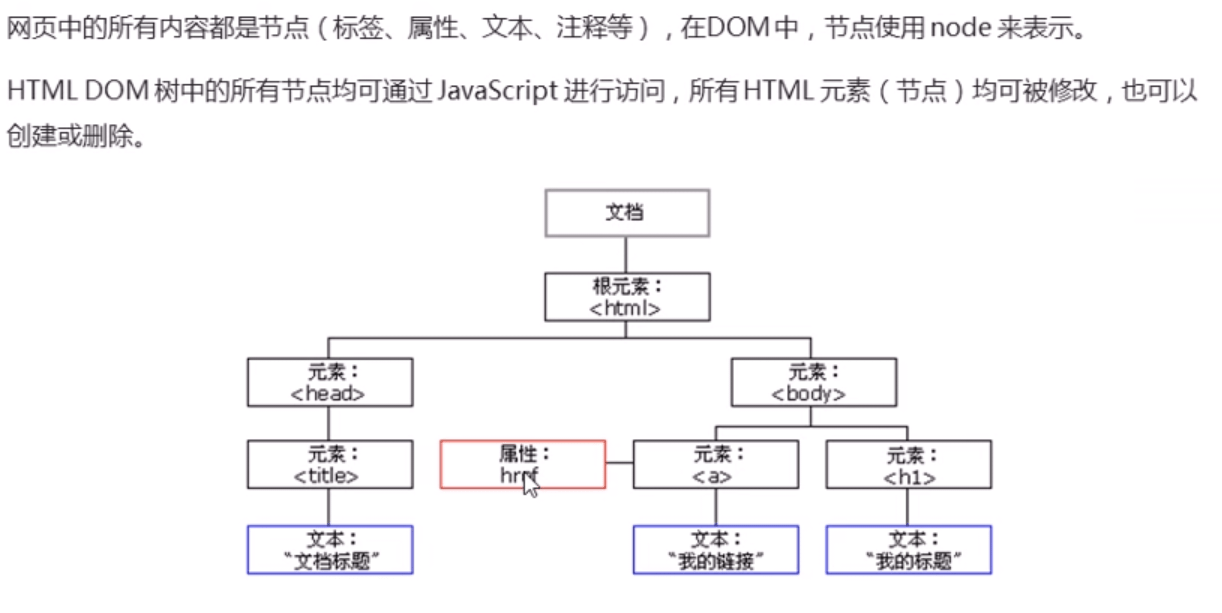
网页组成部分:文字、图片、音视频、超链接
网页背后本质:前端程序员写的代码
前端代码通过浏览器转化(解析和渲染)成用户看到的网页
# 1.2.1 五大浏览器
常见的五大浏览器:IE浏览器、火狐、谷歌、Safari、欧朋
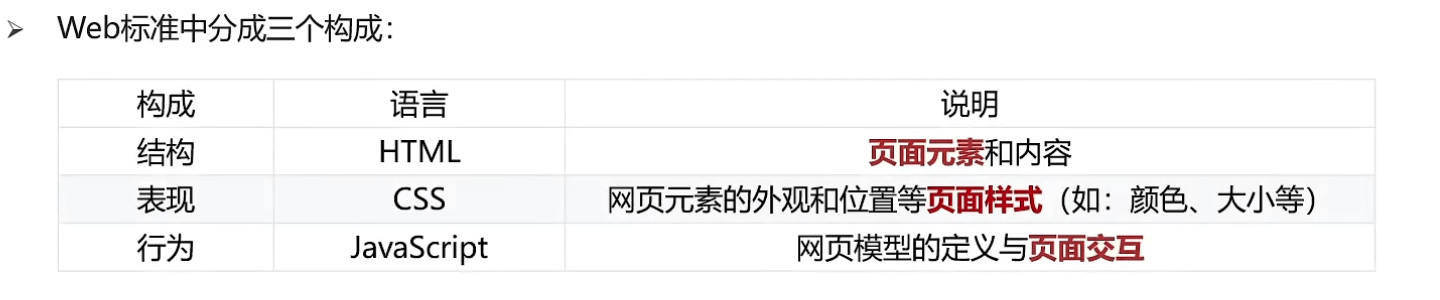
# 1.3.1 web标准的构成
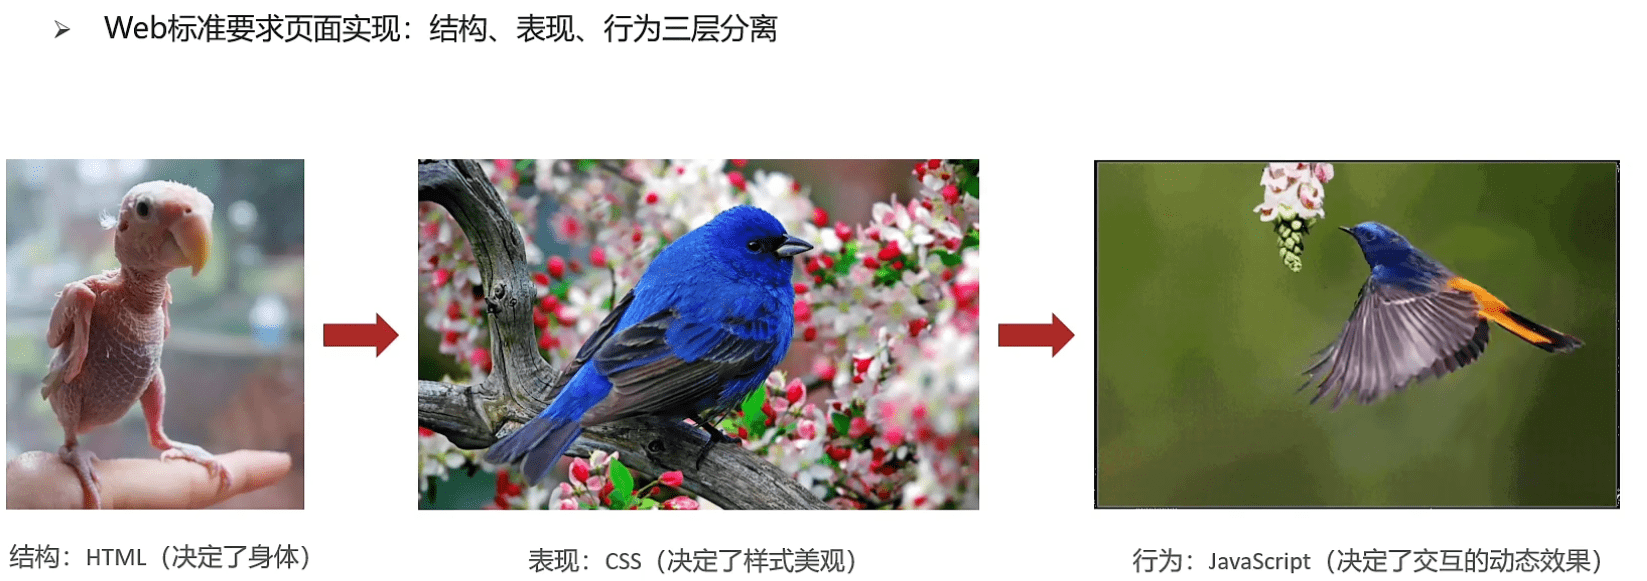
# 1.3.2 Web标准的记忆方法
# 2.HTML初体验
# 2.1.1 HTML的概念
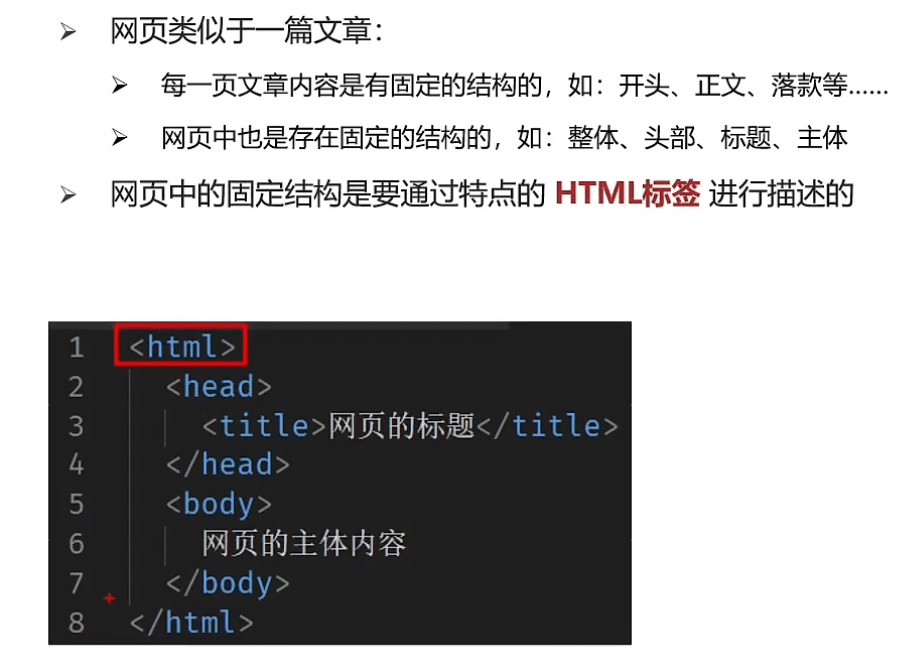
HTML(Hyper Text Markup Language), 即超文本标记语言
专门用于网页开发的语言,主要通过HTML标签对网页中的文本、图片、音视频等内容进行描述
# 2.2.1 HTML页面固定结构
# 3.语法规范
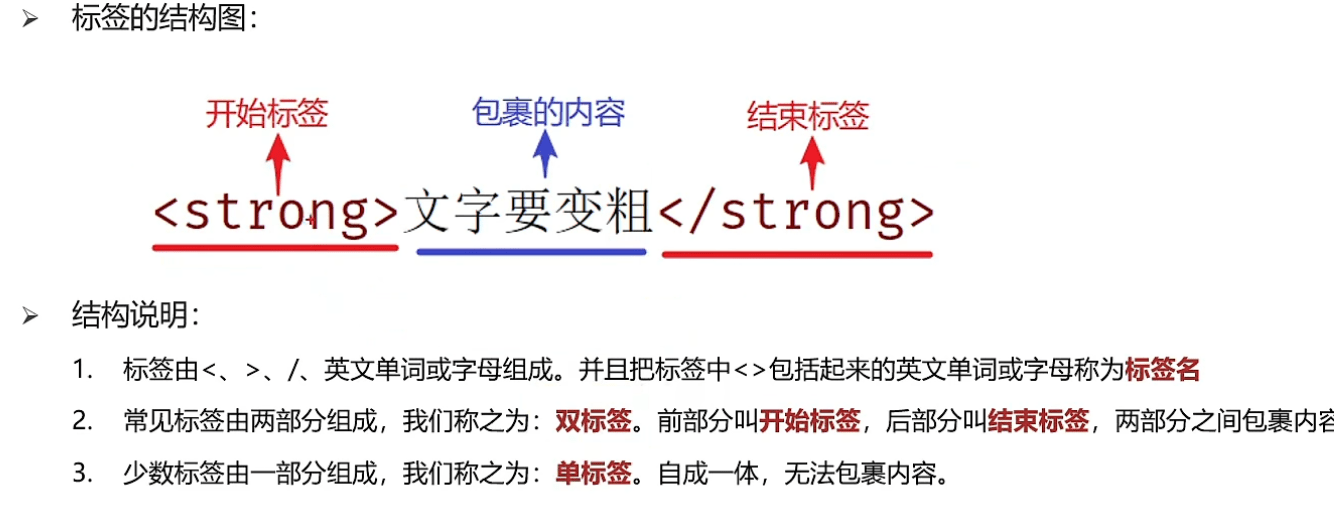
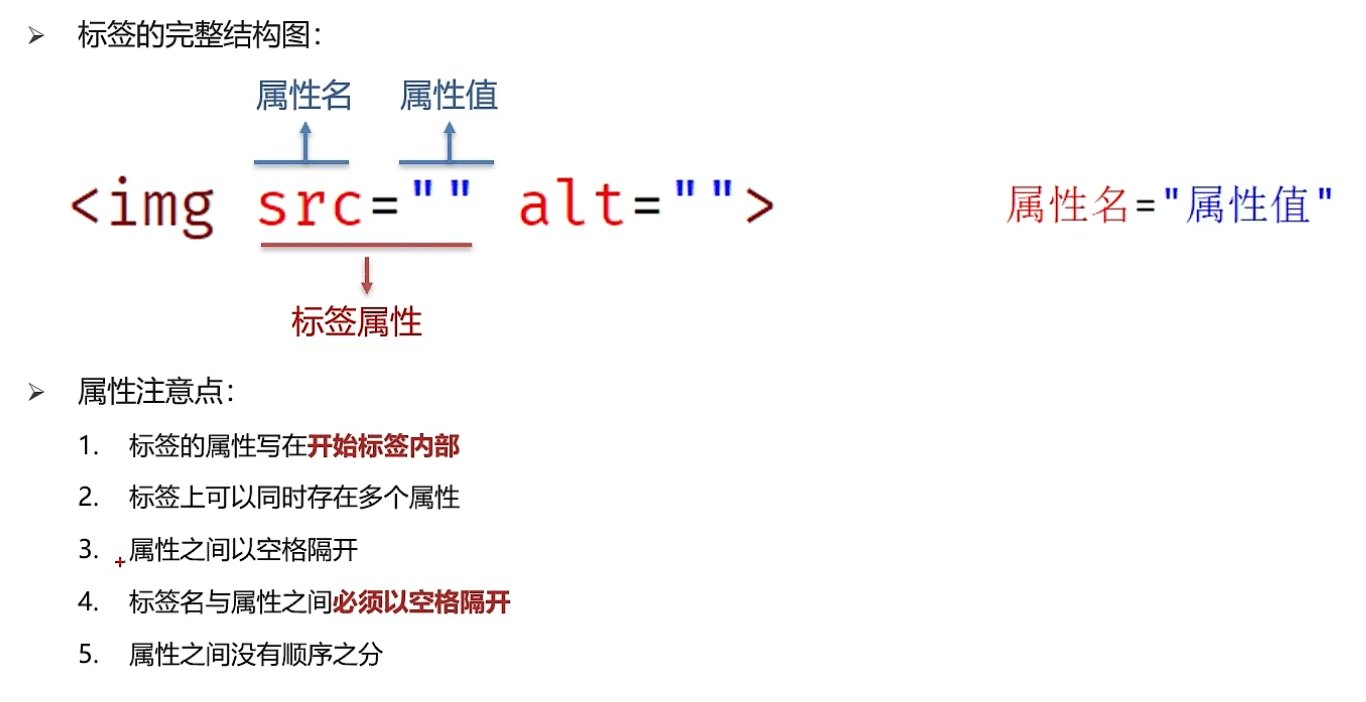
# 3.1.1 HTML标签的结构
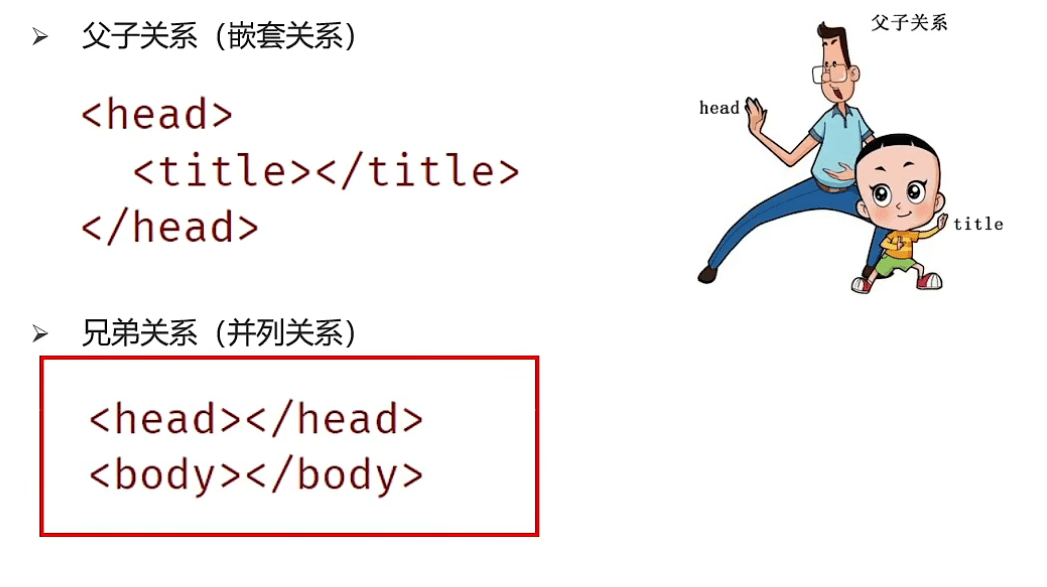
# 3.2.1 HTML标签与标签之间的关系
# 二、HTML标签学习
# 1.排版标签
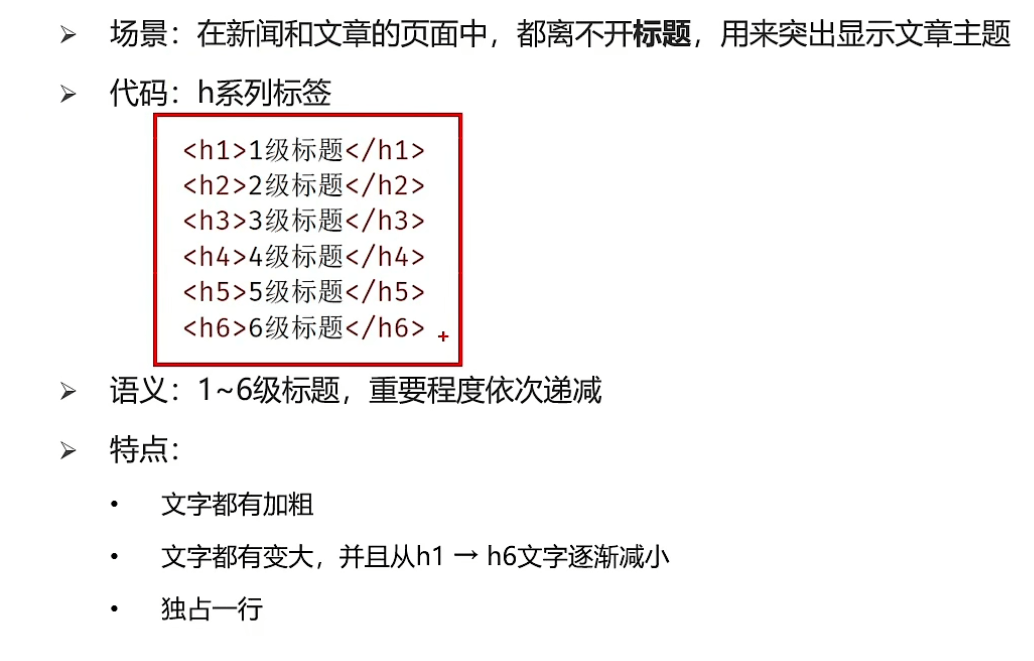
# 1.1.1 标题标签
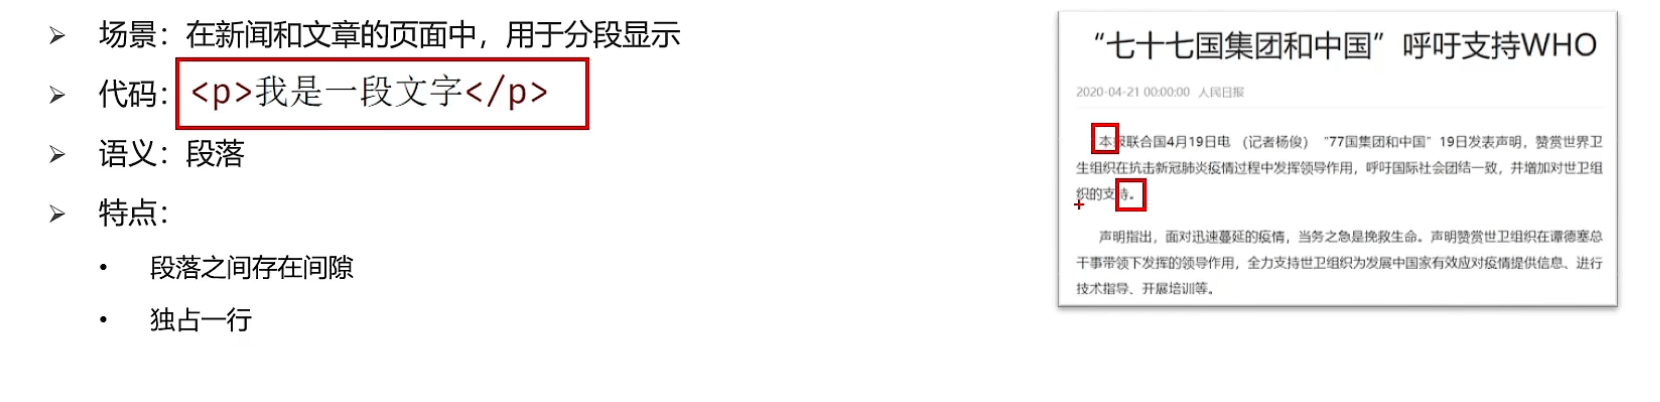
# 1.2.1 段落标签
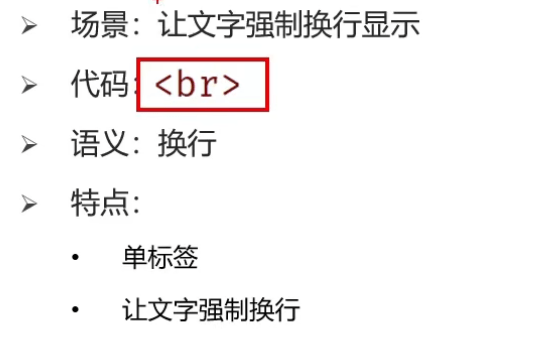
# 1.3.1 换行标签
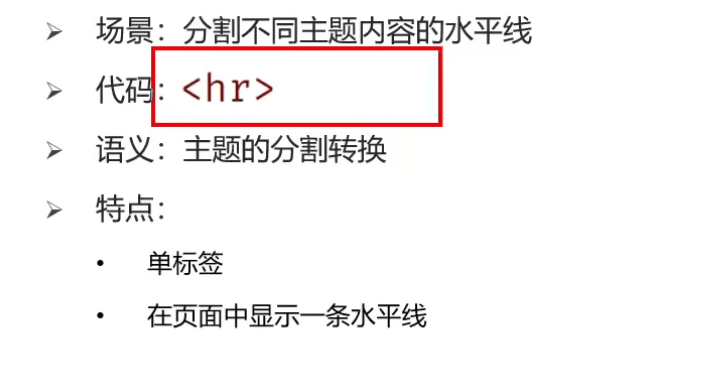
# 1.4.1 水平线标签
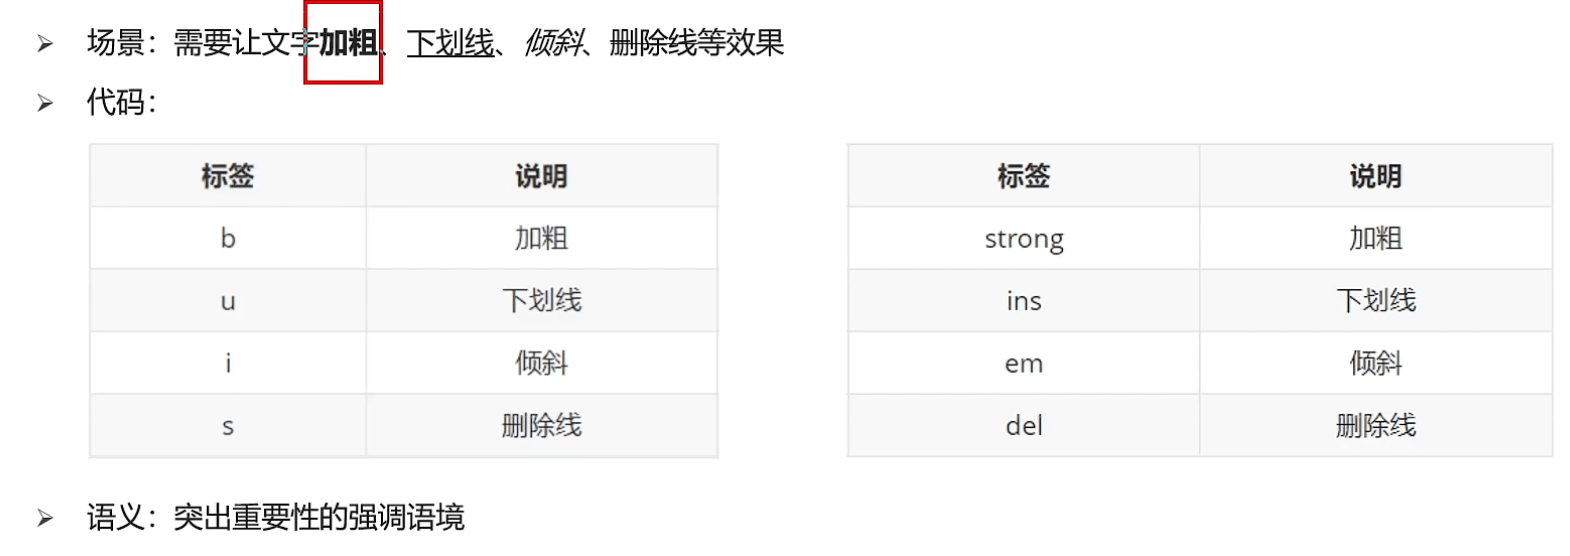
# 2.文本格式化标签
# 2.1 文本格式化标签的介绍
# 3.媒体标签
# 3.1 图片标签
# 3.1.1 图片标签的介绍
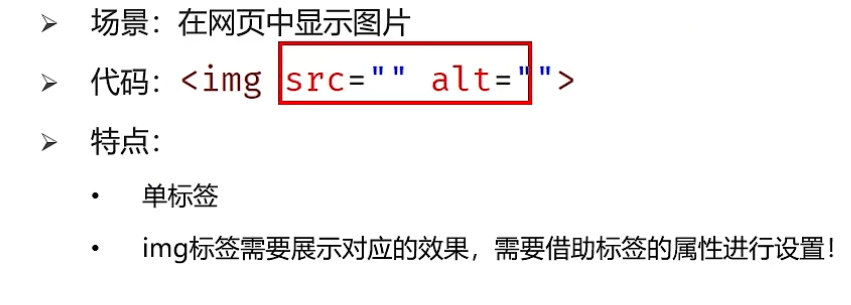
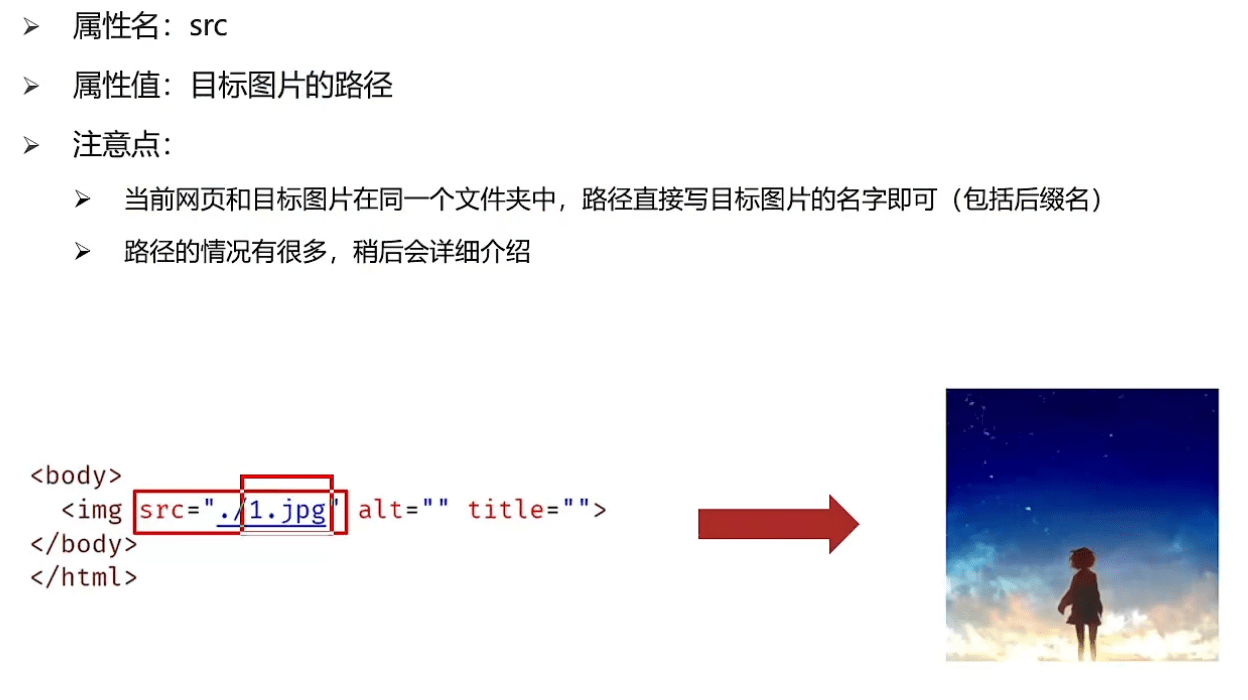
# 3.1.2 图片标签的src属性
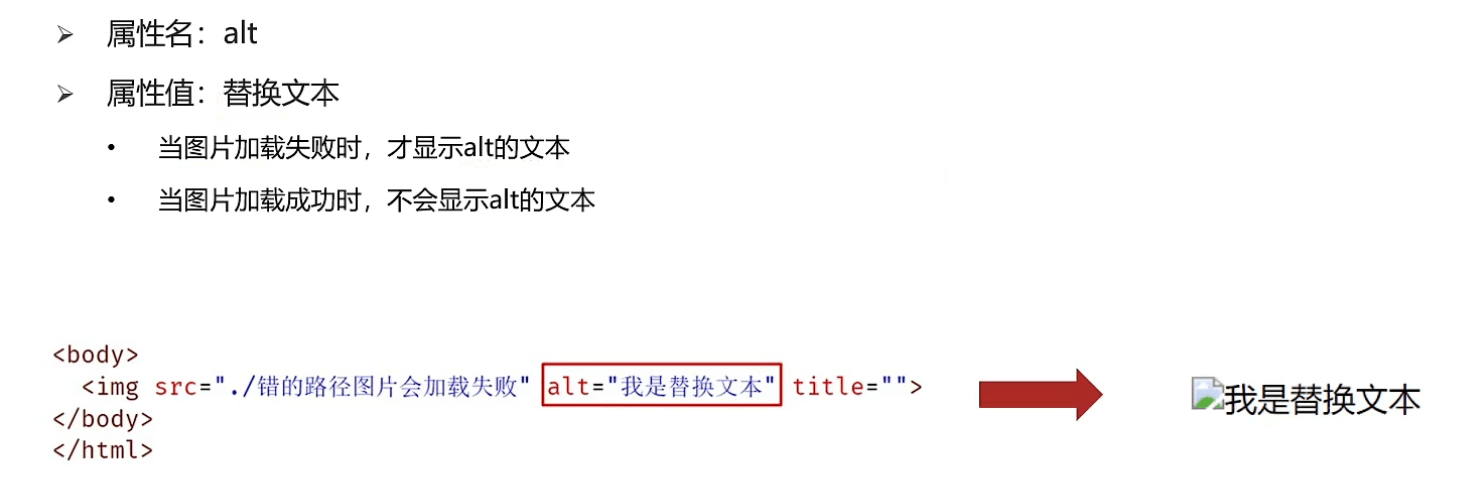
# 3.1.3 图片标签的alt属性
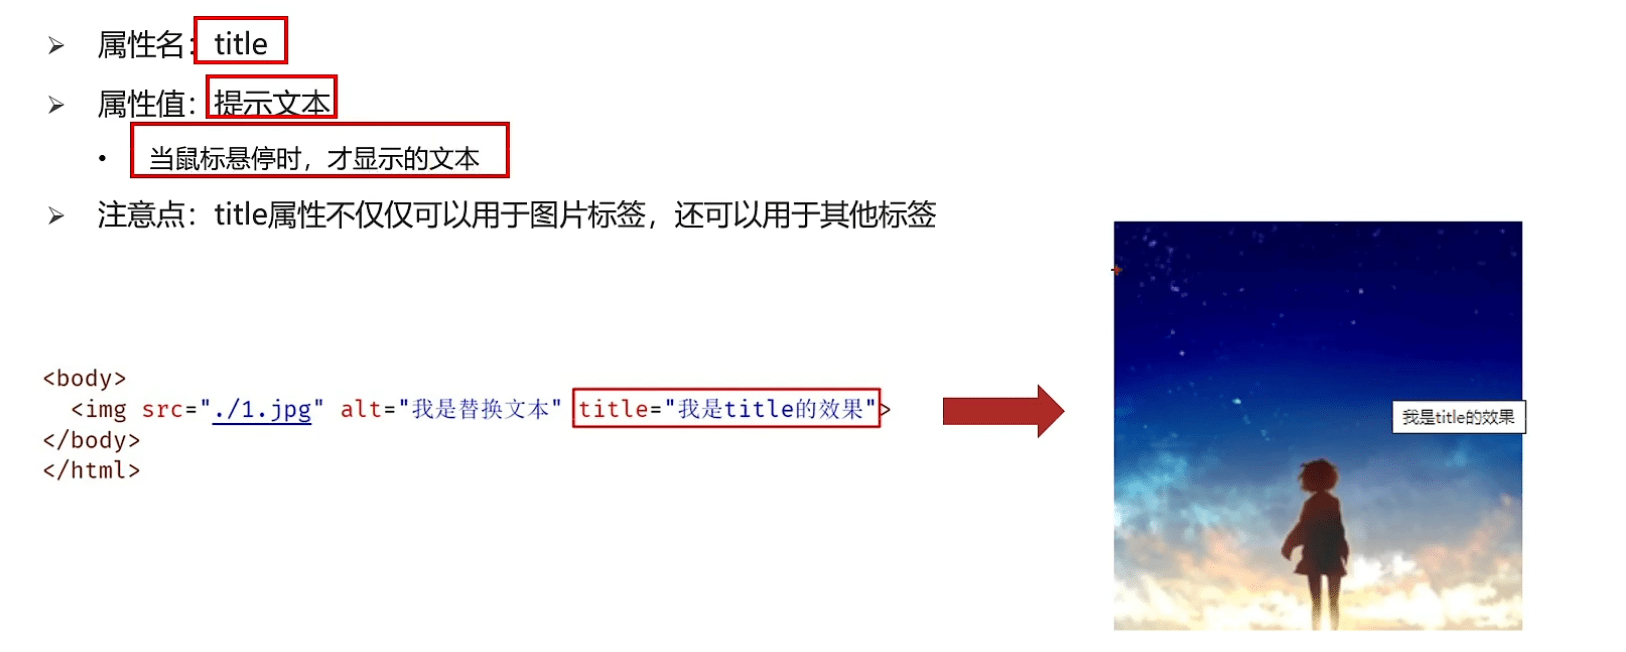
# 3.1.4 图片标签的title属性
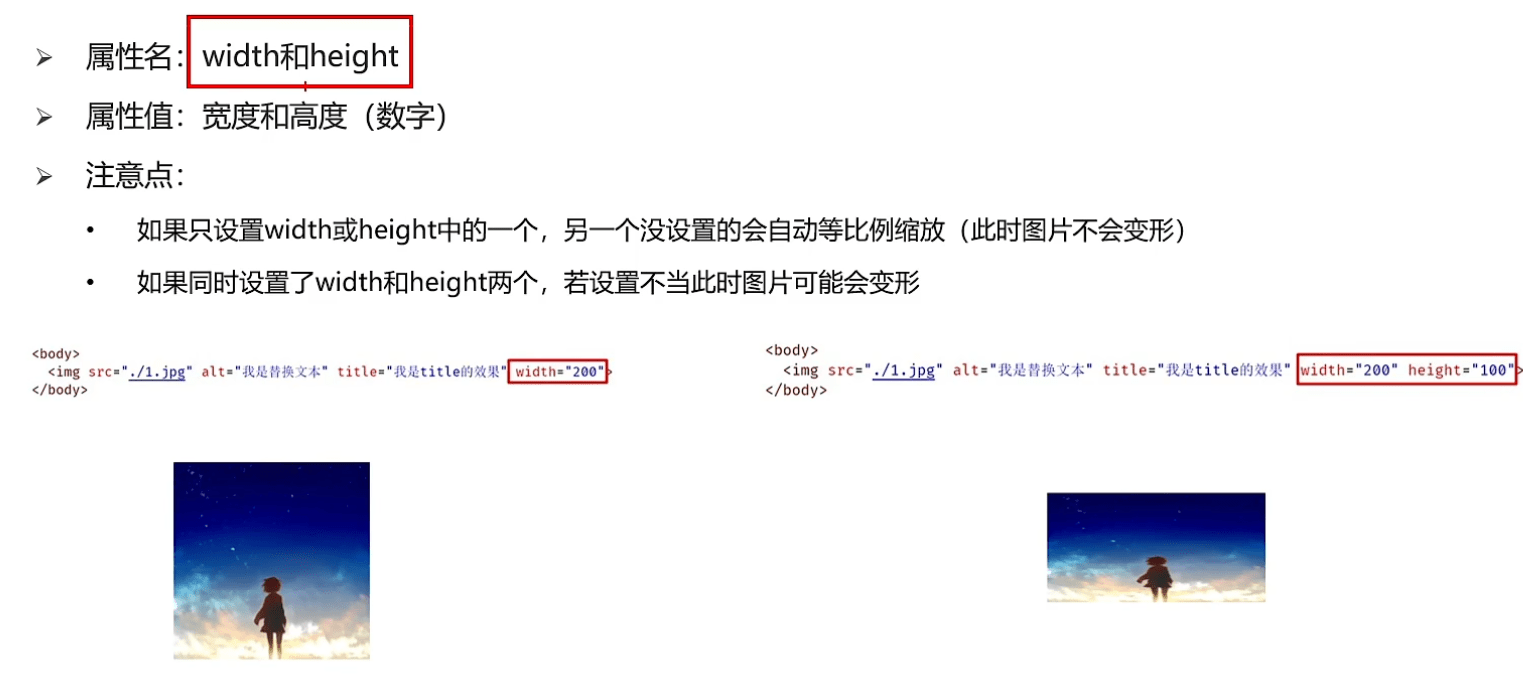
# 3.1.5 图片标签的width和height属性
# 3.2 路径
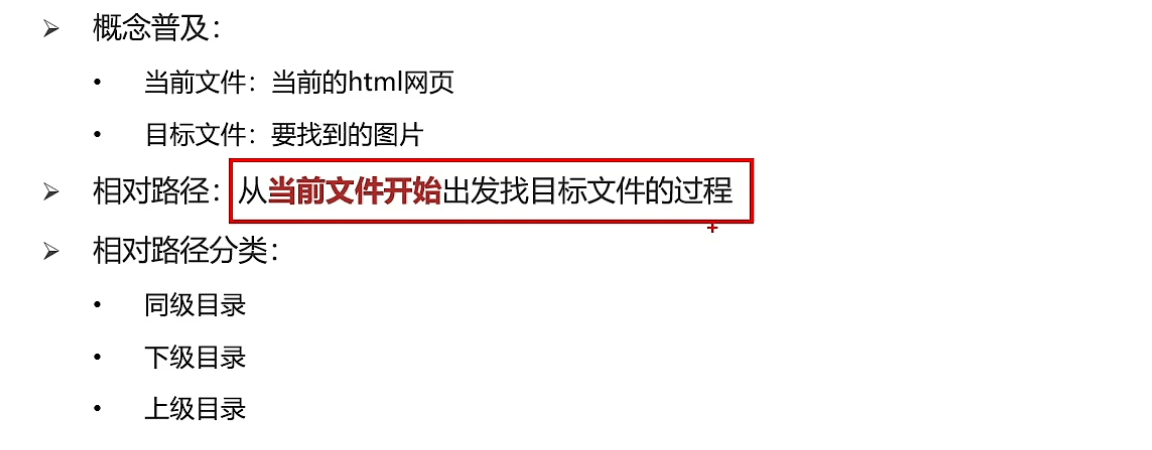
# 3.2.1 路径的介绍
路径可分为:绝对路径、相对路径
# 3.2.2 相对路径
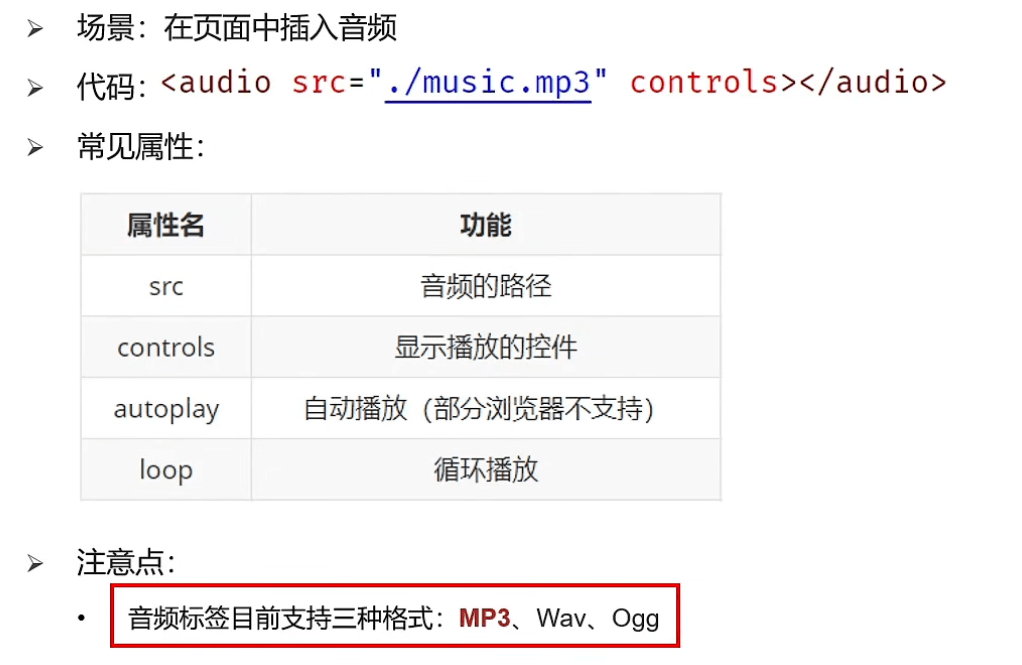
# 3.3.1 音频标签的介绍
# 3.4.1 视频标签的介绍
# 4.链接标签
# 4.1 链接标签的介绍
 href : 跳转地址
# 4.2 链接标签的target属性

# 三、HTML基础
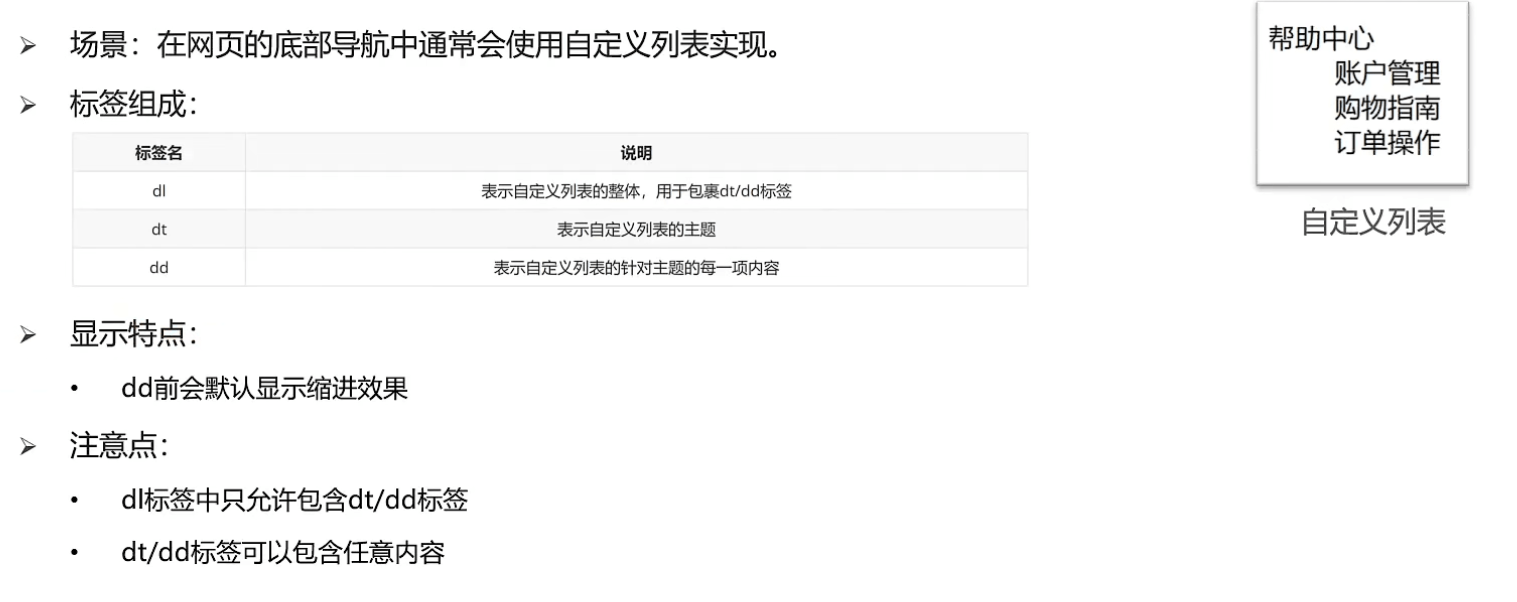
# 一、列表标签
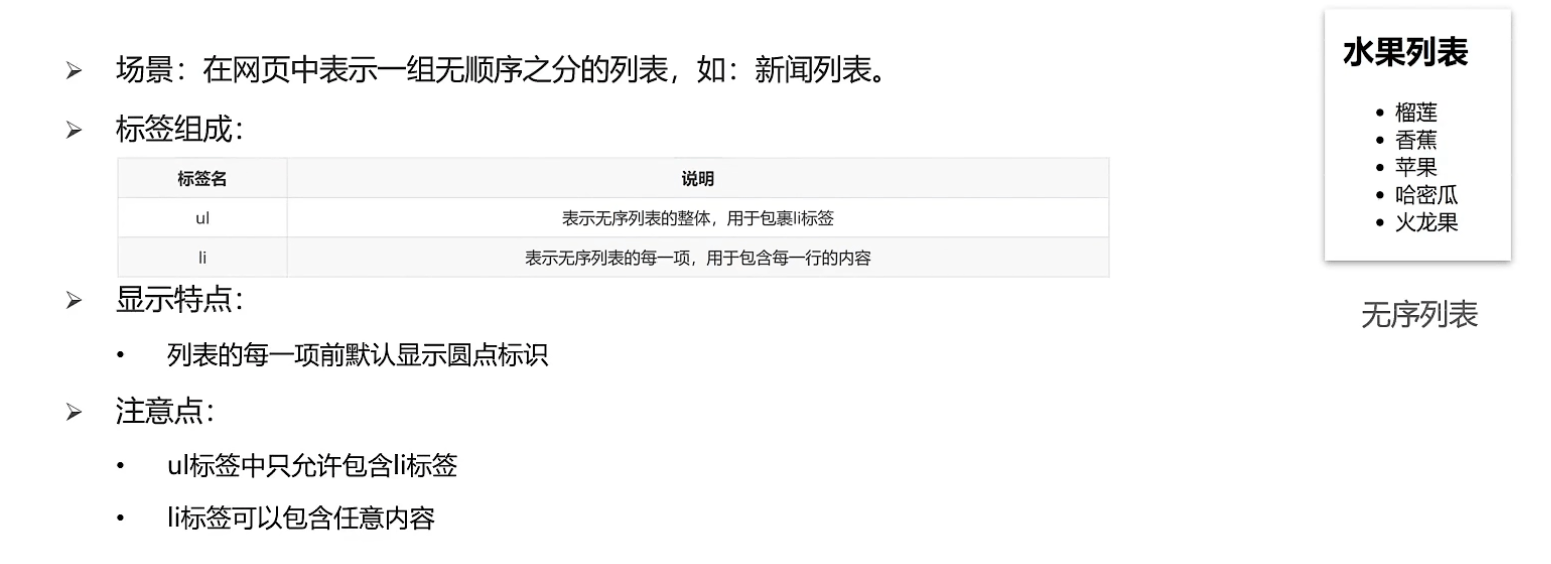
# 1. 列表的应用场景

# 2. 无序列表
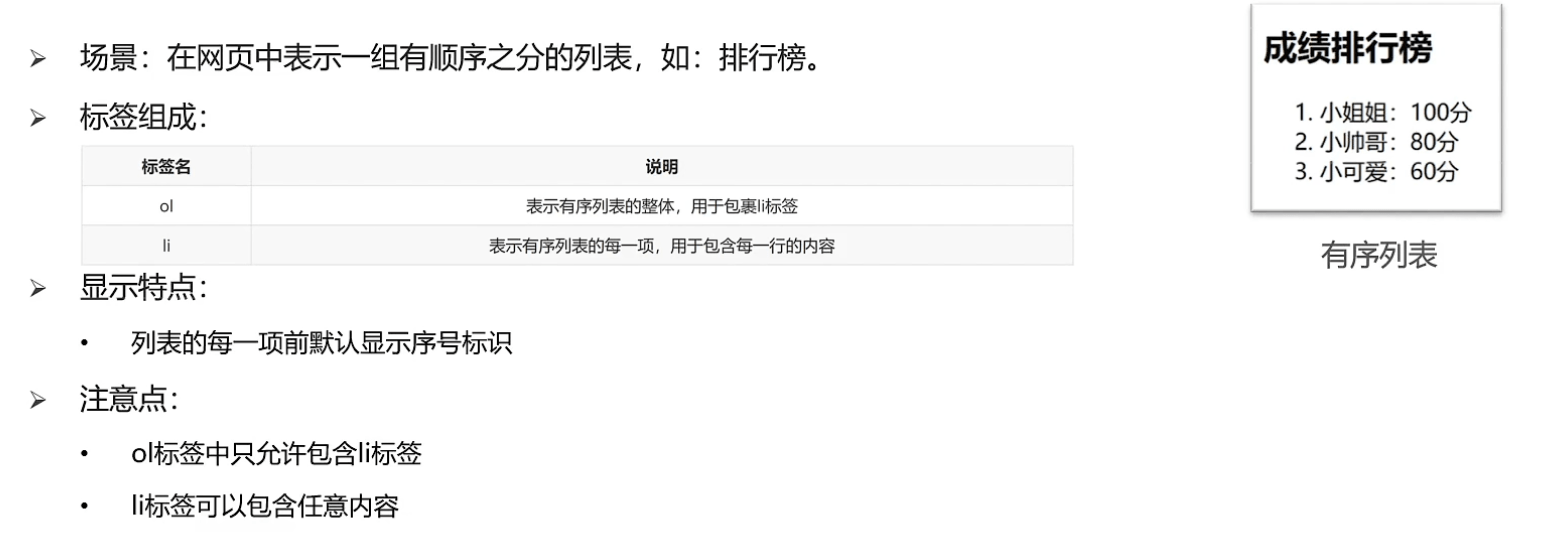
# 3. 有序标签
# 4.自定义列表
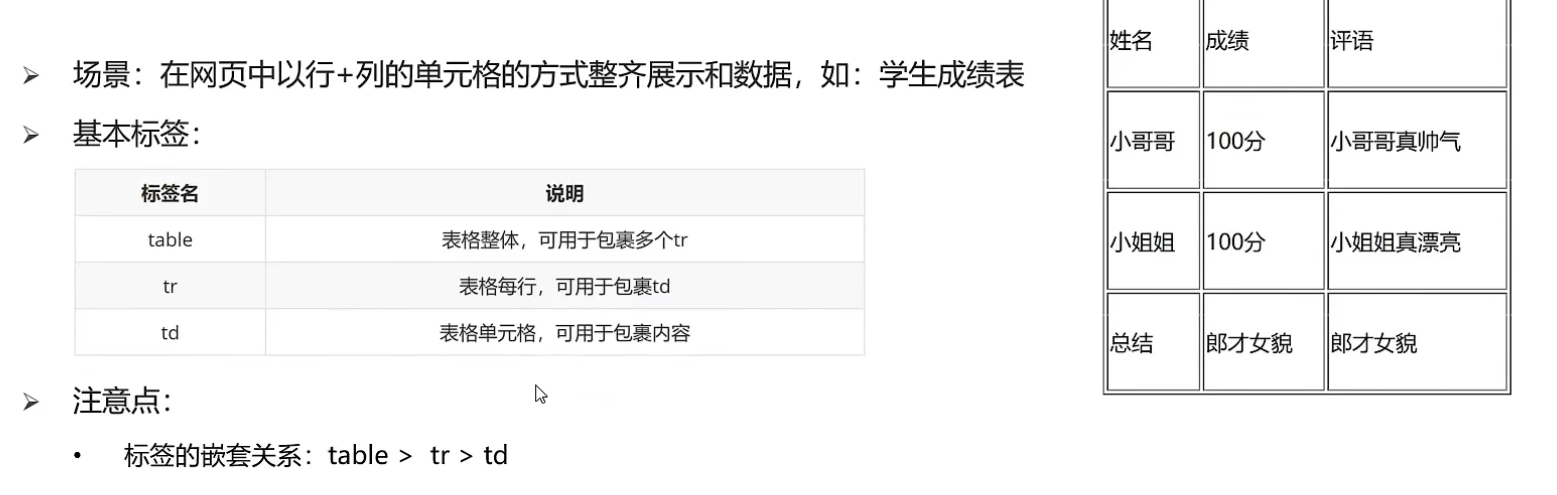
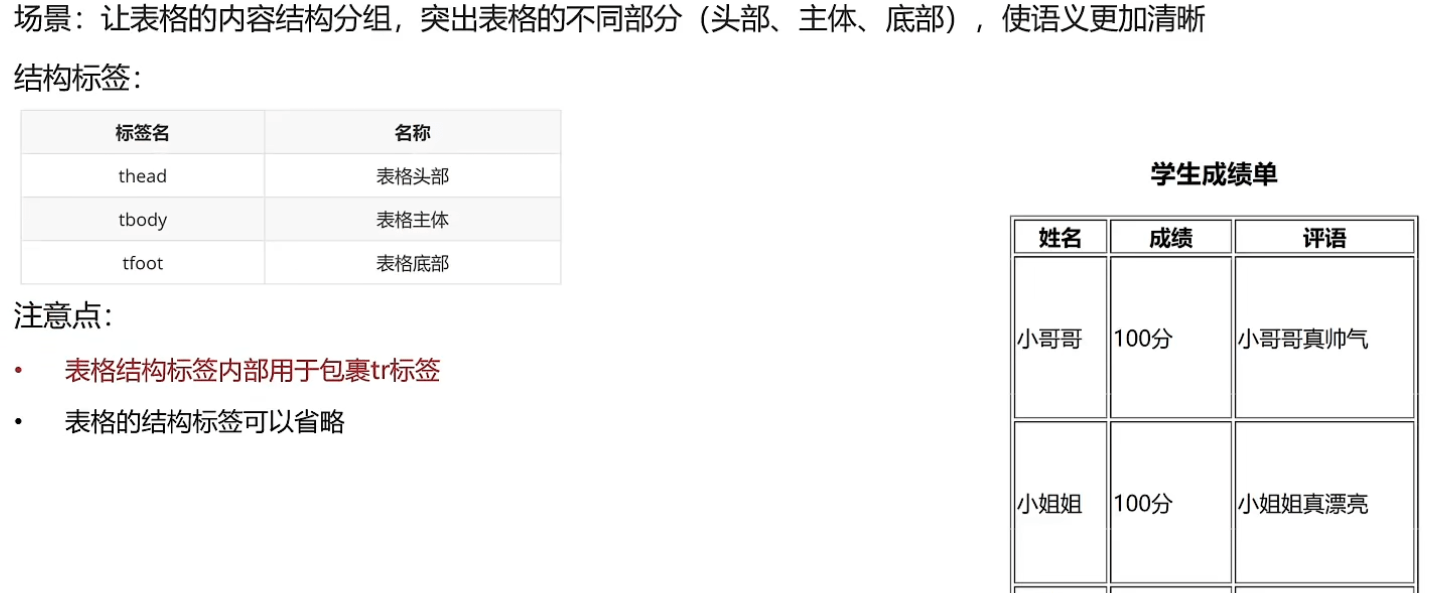
# 二、表格标签
# 1.1 表格的基本标签
# 2.1 表格相关属性
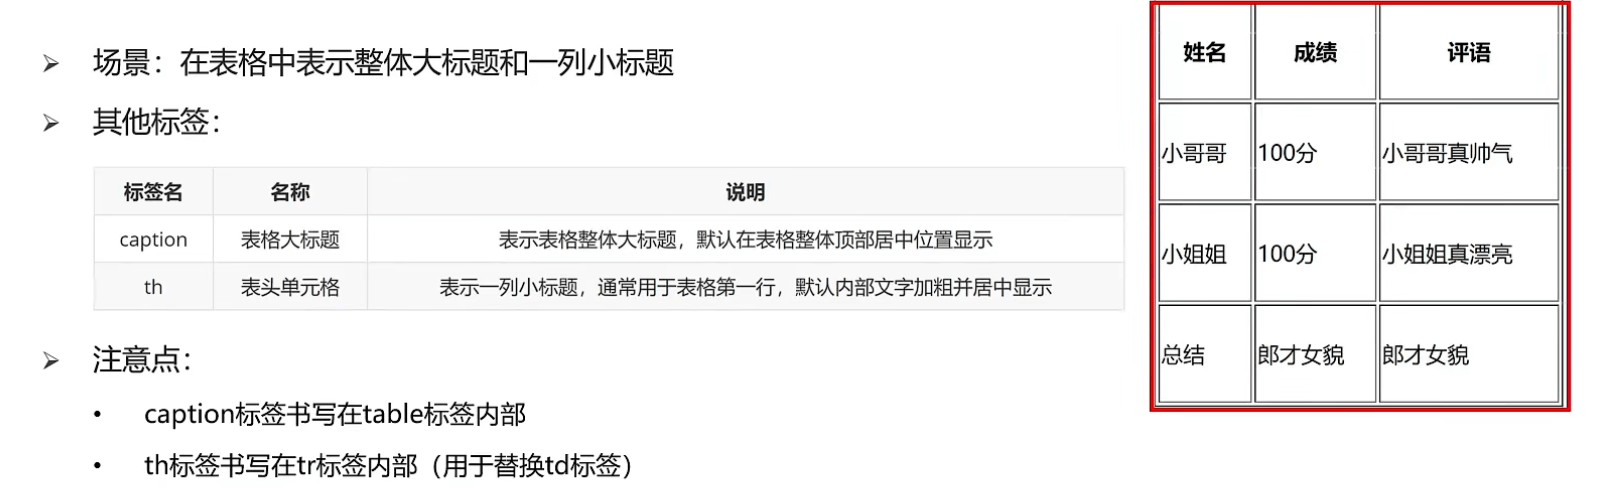
# 3.1表格标题和表头单元格标签
# 4.1表格的结构标签(了解)
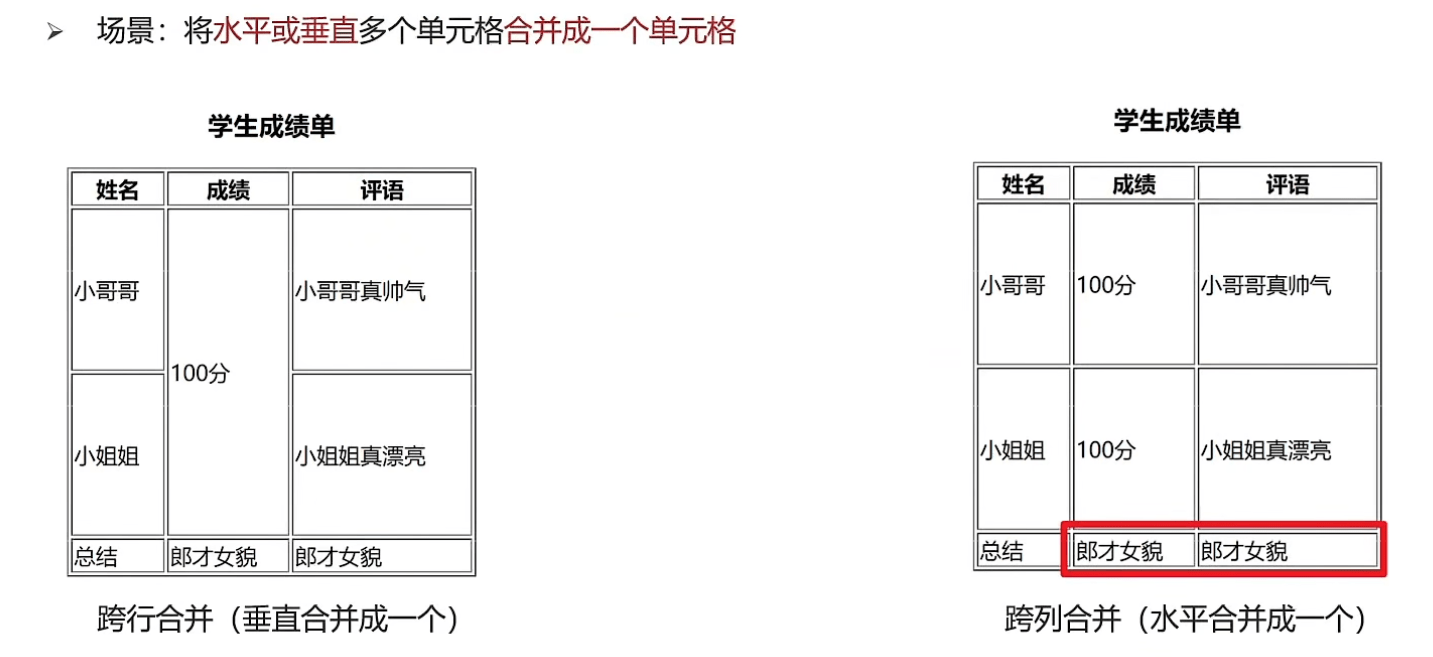
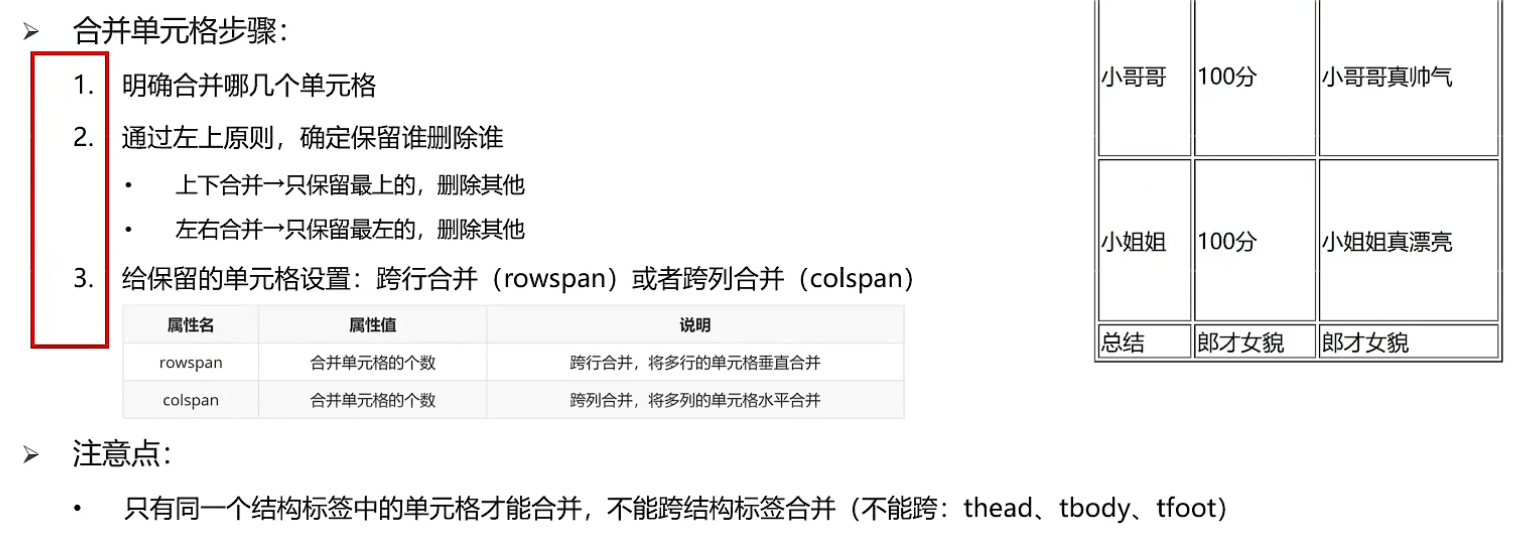
# 5.1合并单元格-思路
# 5.2合并单元格-代码实现
# 三、表单标签
# 1.input系列标签
# 1.1 input系列标签的基本介绍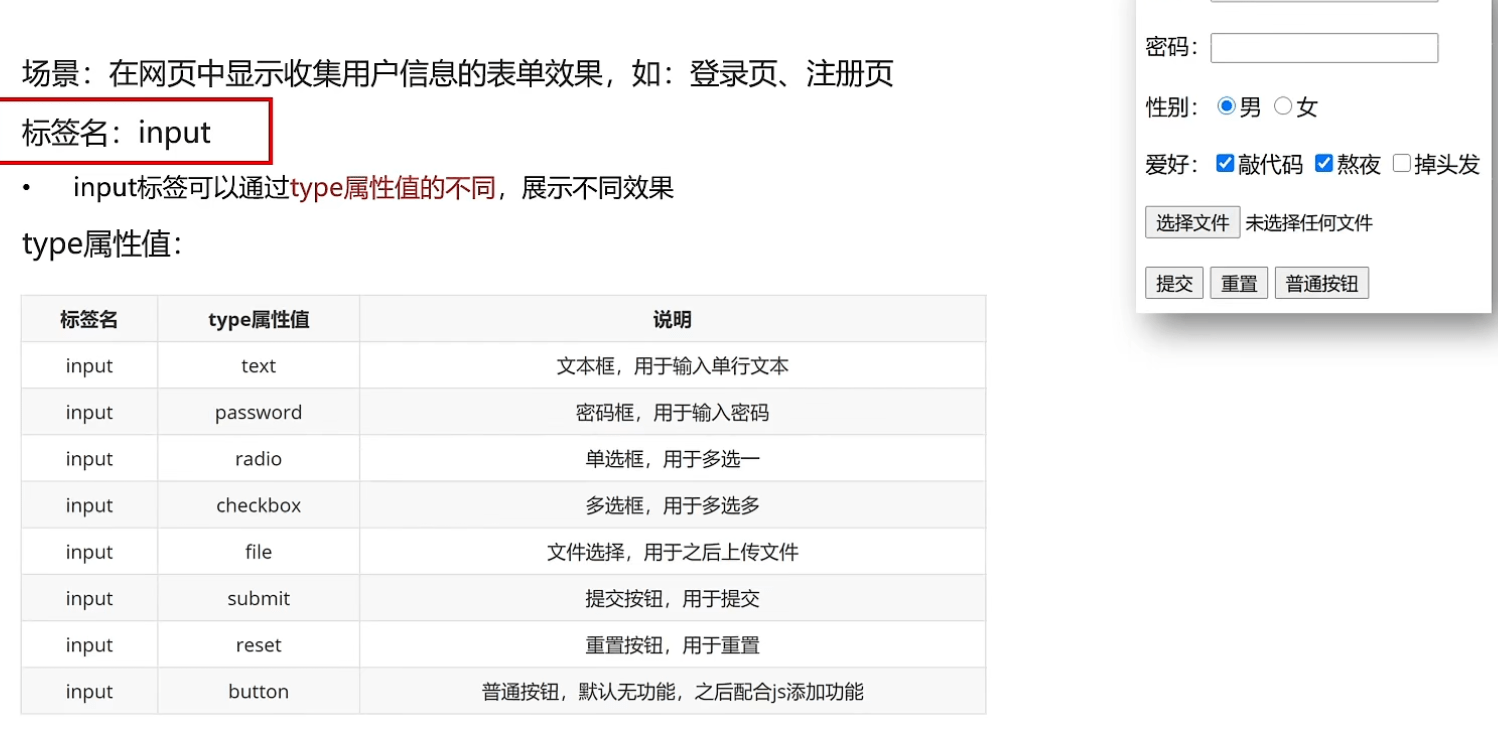
# 1.2 input系列标签-文本框
# 1.3 input系列标签-单选框
# 1.4 input系列标签-文件选择
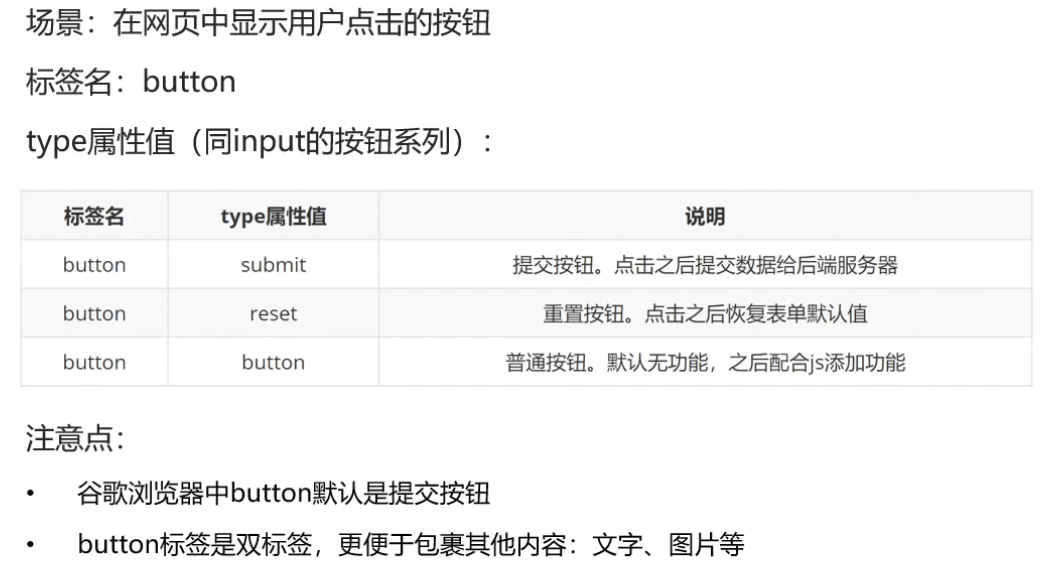
# 1.5 input系列标签-按钮
# 2 button按钮标签
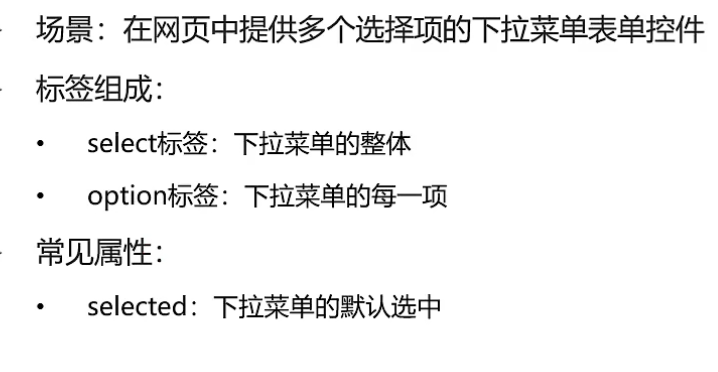
# 3.select下拉菜单标签
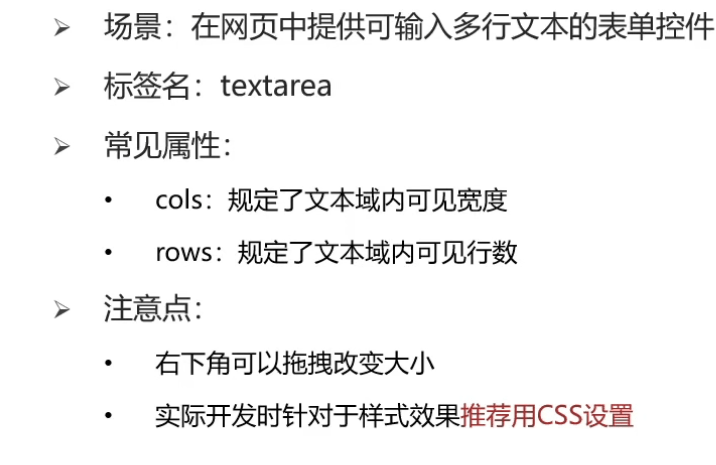
# 4.textarea文本域标签
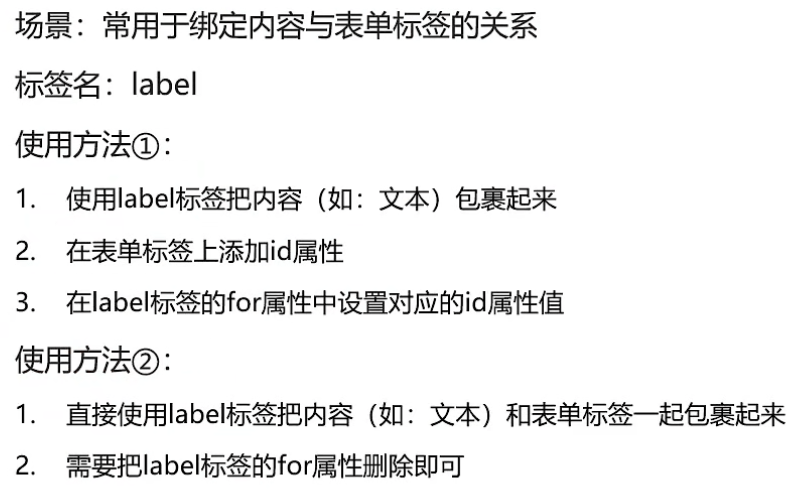
# 5.Label标签
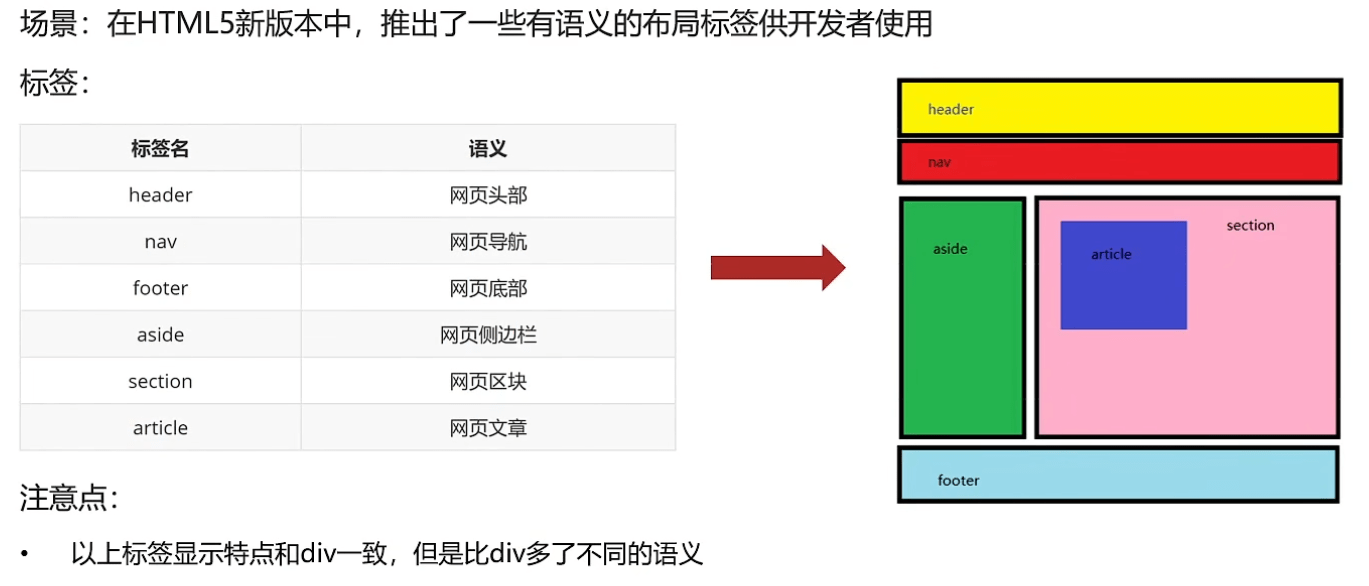
# 四、语义化标签
# 1. 没有语义的布局标签-div和span

# 2.有语义的布局标签(了解)
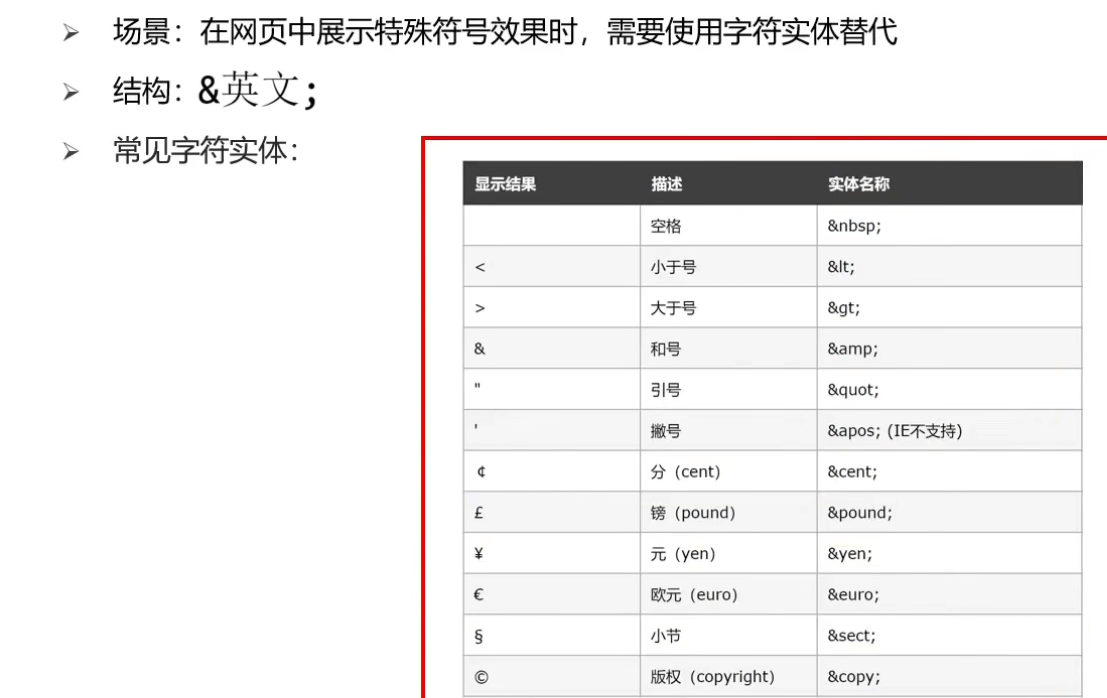
# 五、字符实体
# 1.常见字符实体
# 四、CSS基础
# 一、基础认知
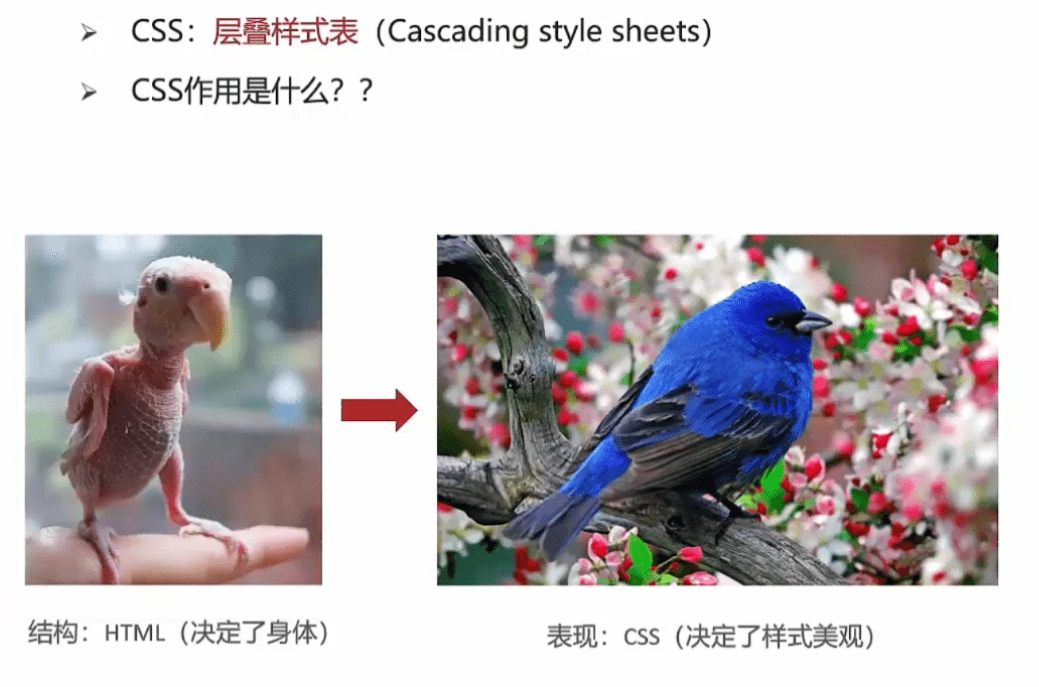
# 1.1 CSS的介绍
# 1.2 CSS语法规则
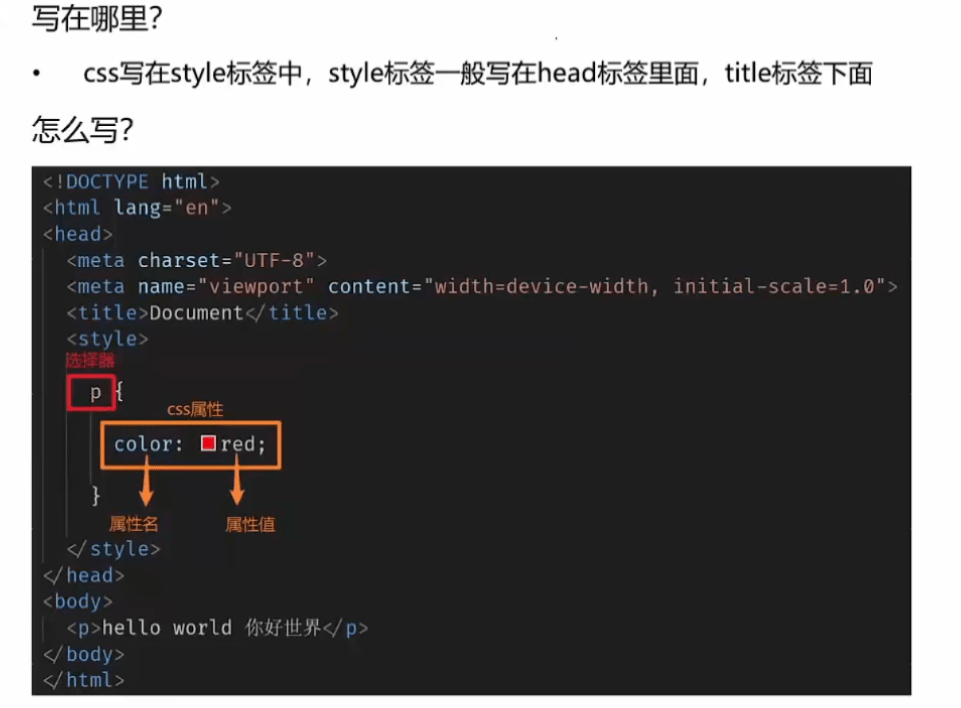
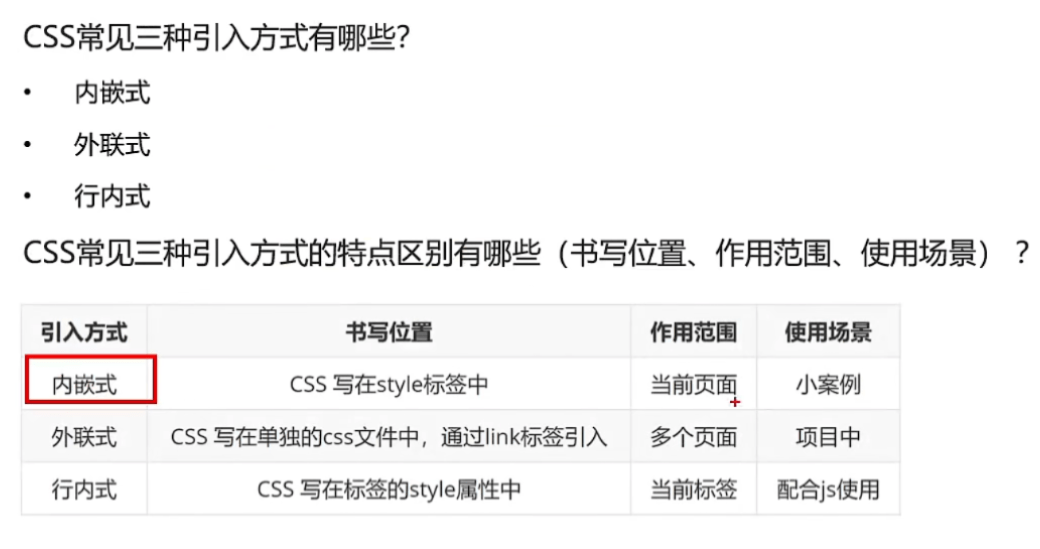
# 2.1 CSS引入方式
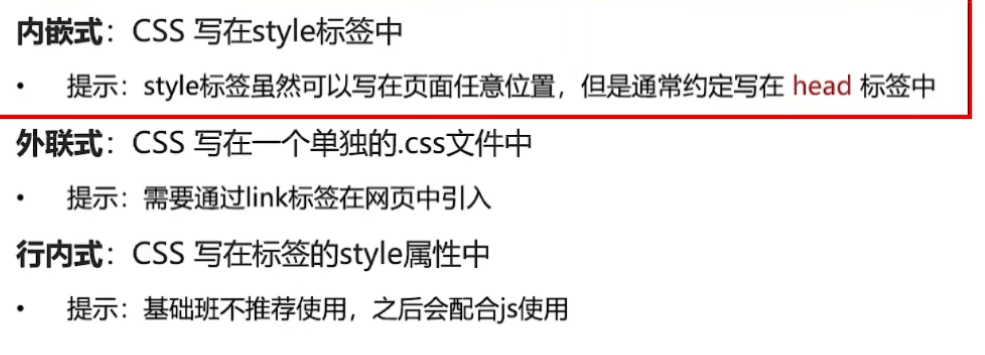
# 2.2 CSS引入方式-小结
# 二、基础选择器
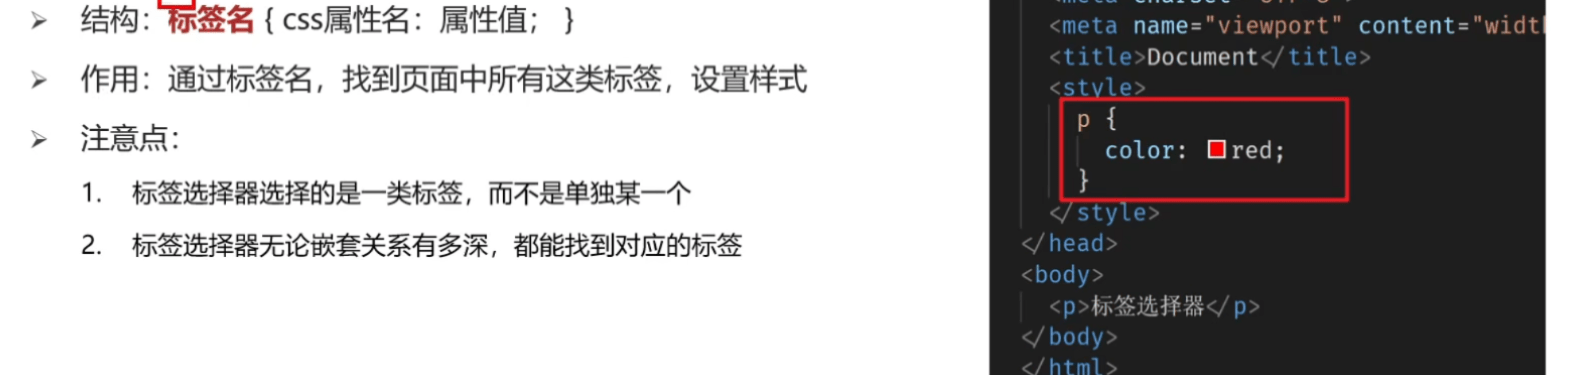
# 1.标签选择器
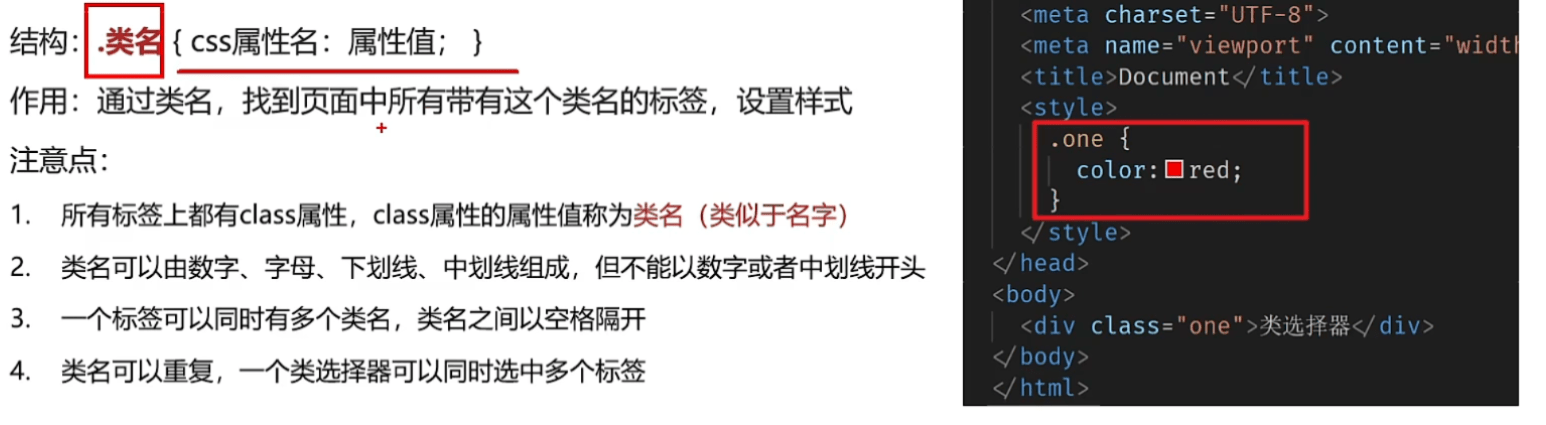
# 2.类选择器
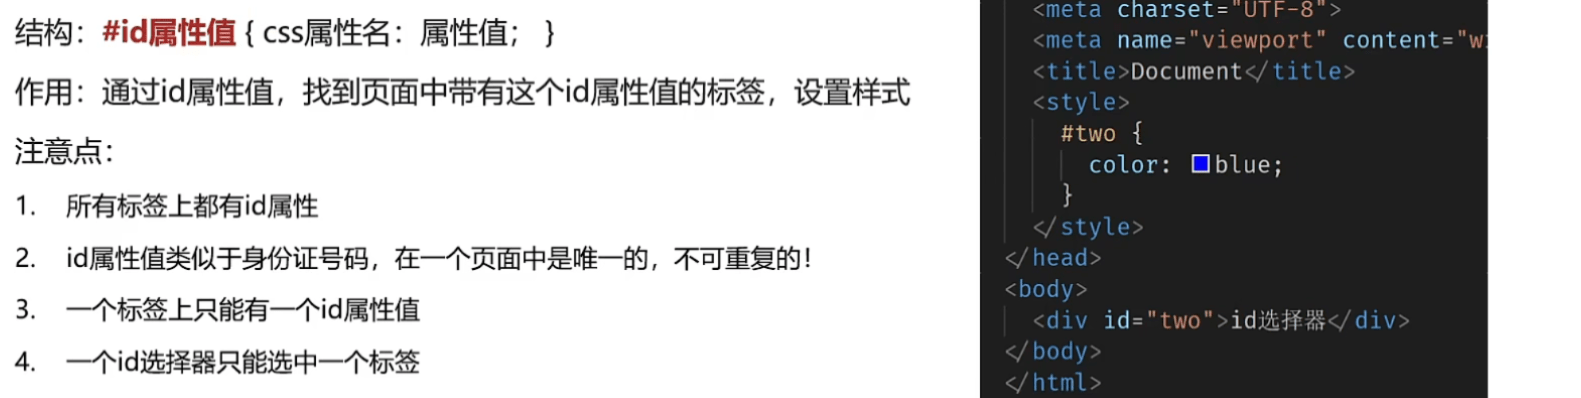
# 3.id选择器
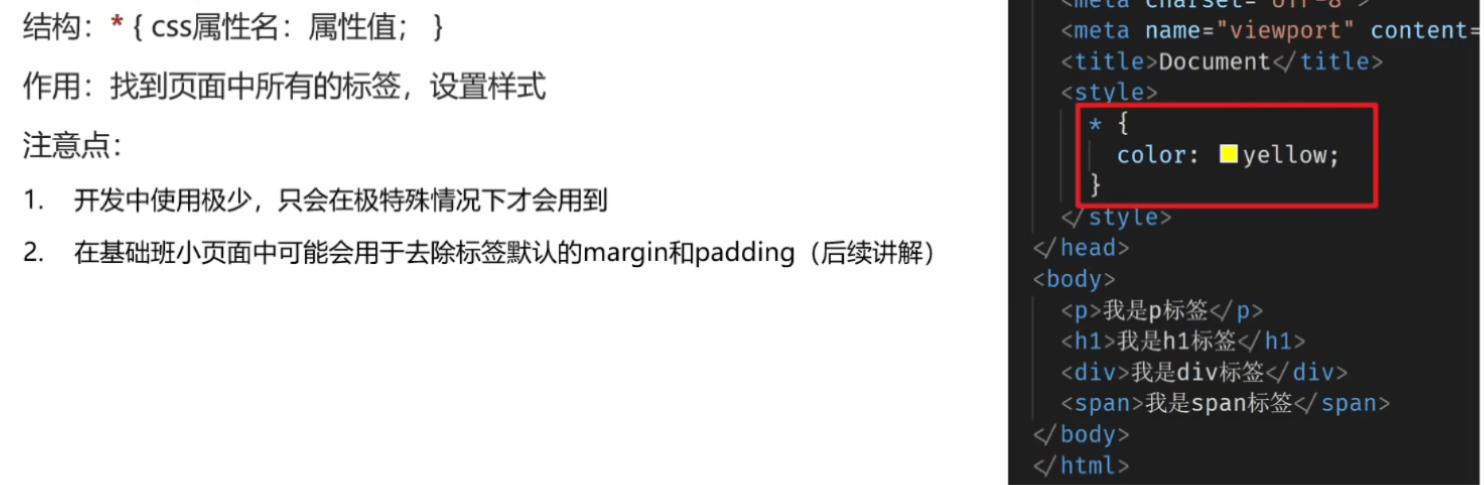
# 4.通配符选择器
# 三、字体和文本样式
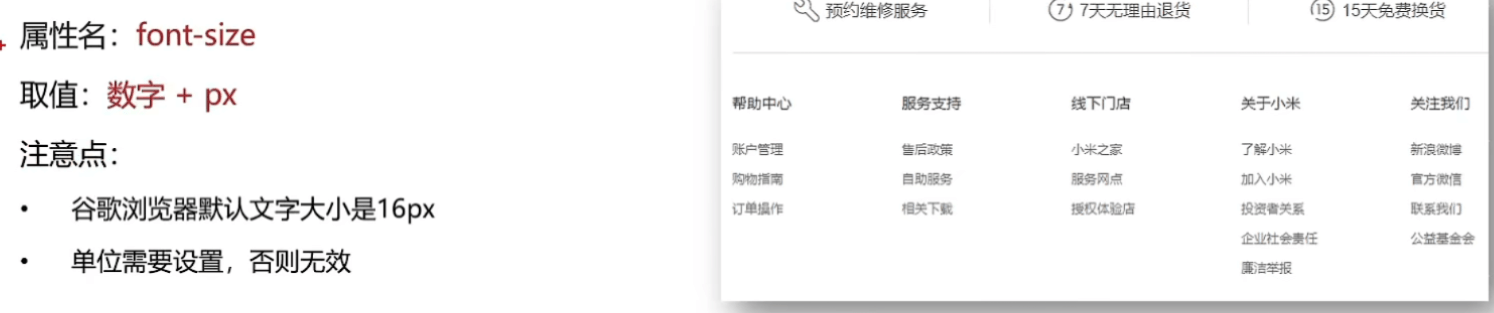
# 1.1字体大小
# 1.2字体粗细
# 1.3字体样式(是否倾斜)

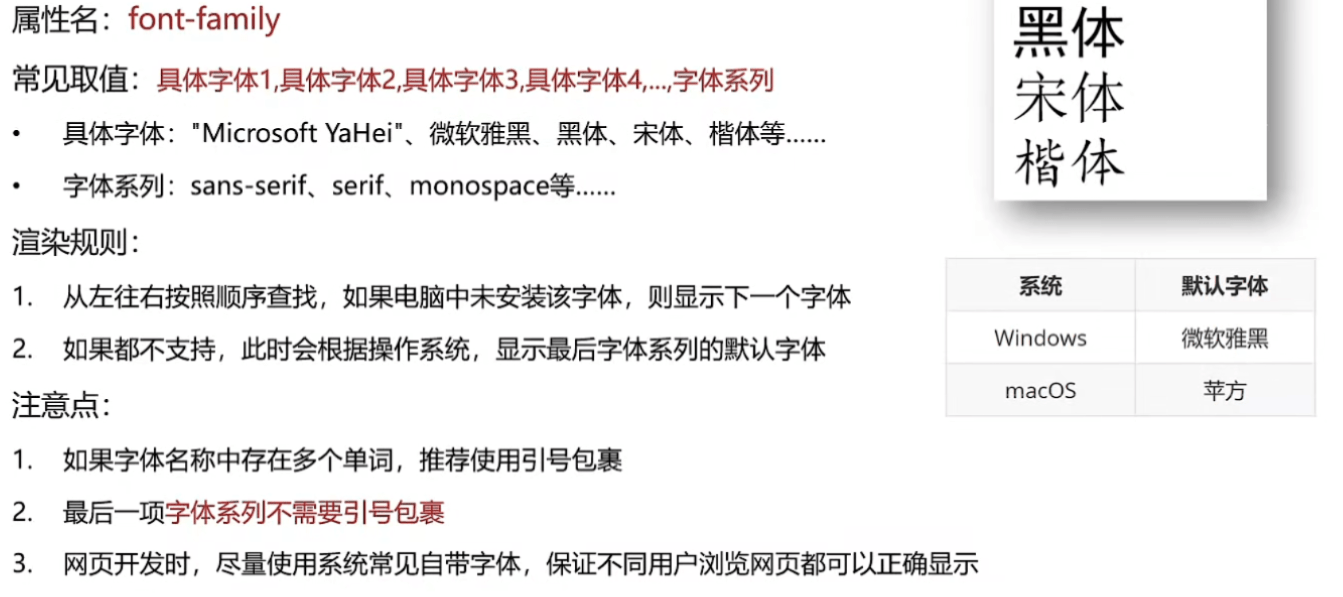
# 1.4字体系列font-family
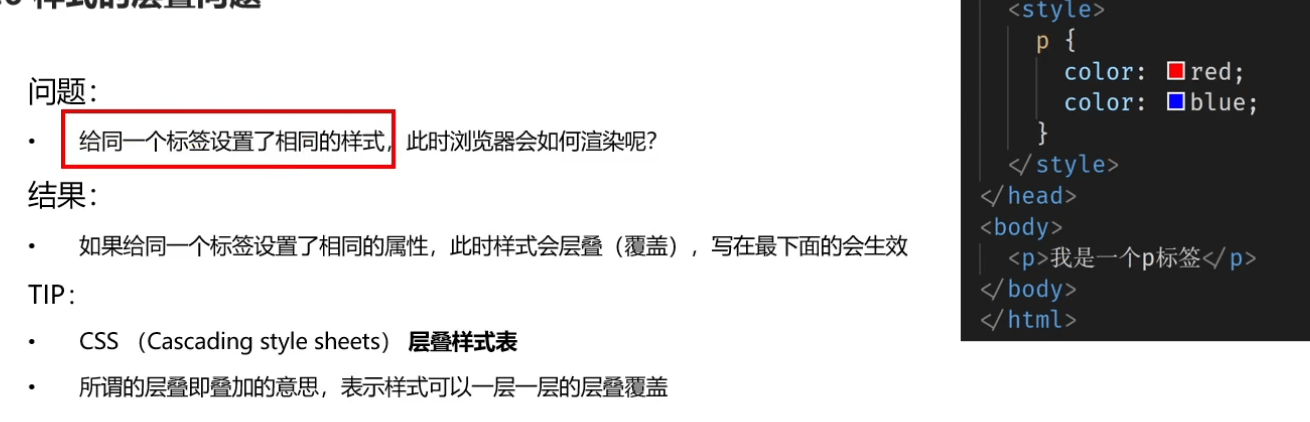
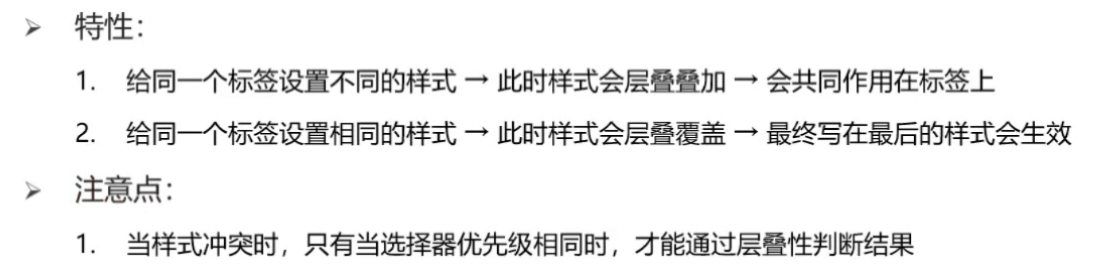
# 1.5样式的层叠问题
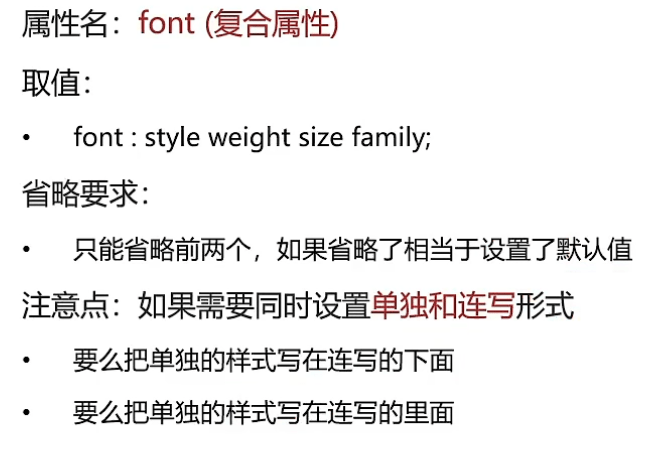
# 1.6字体font相关属性的连写
# 2.1文本缩进

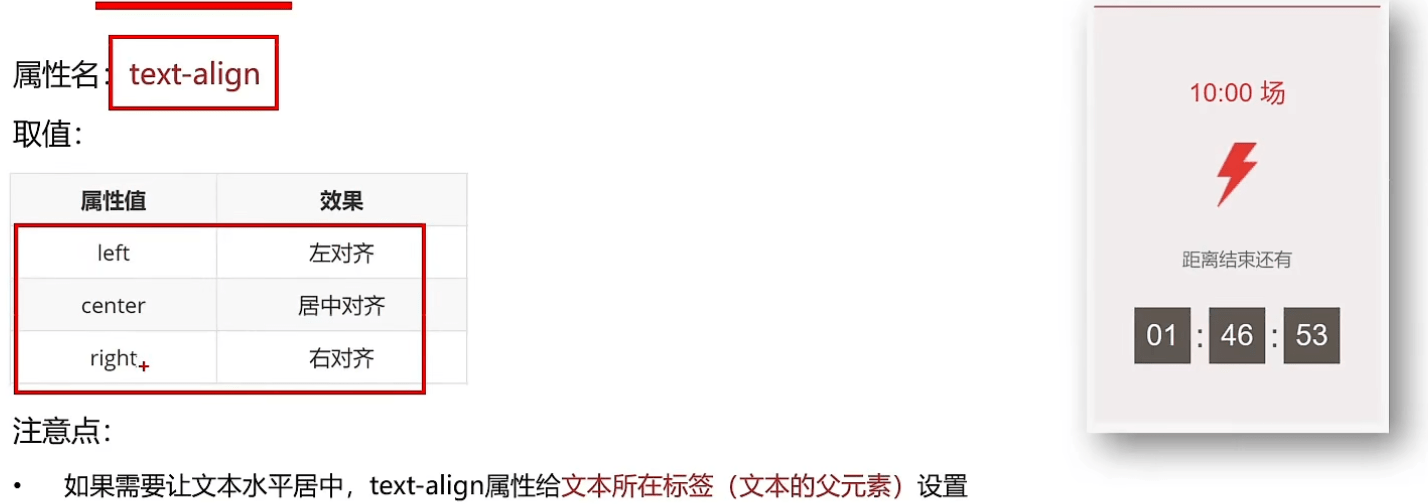
# 2.2文本水平对齐方式
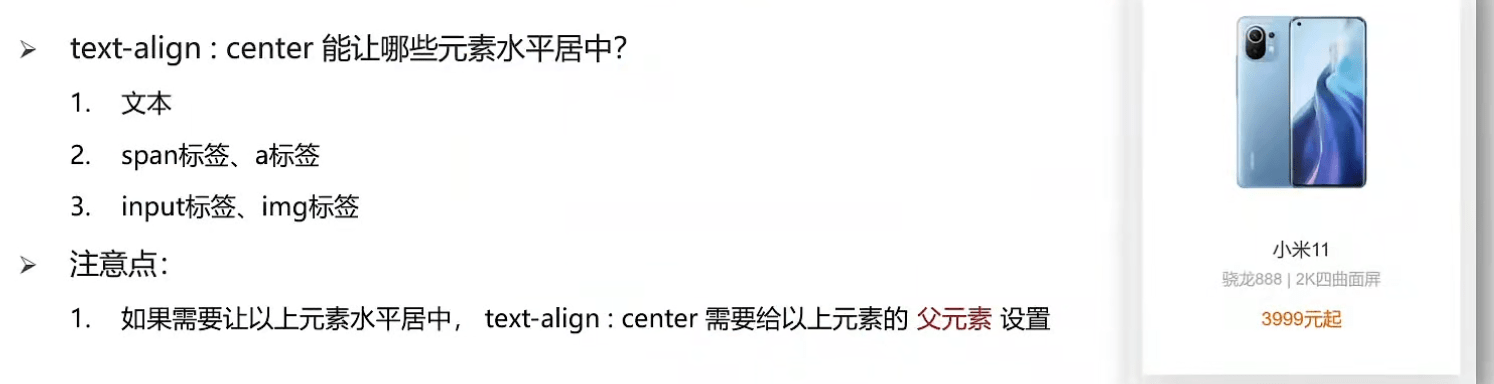
# 2.3水平居中方法总结
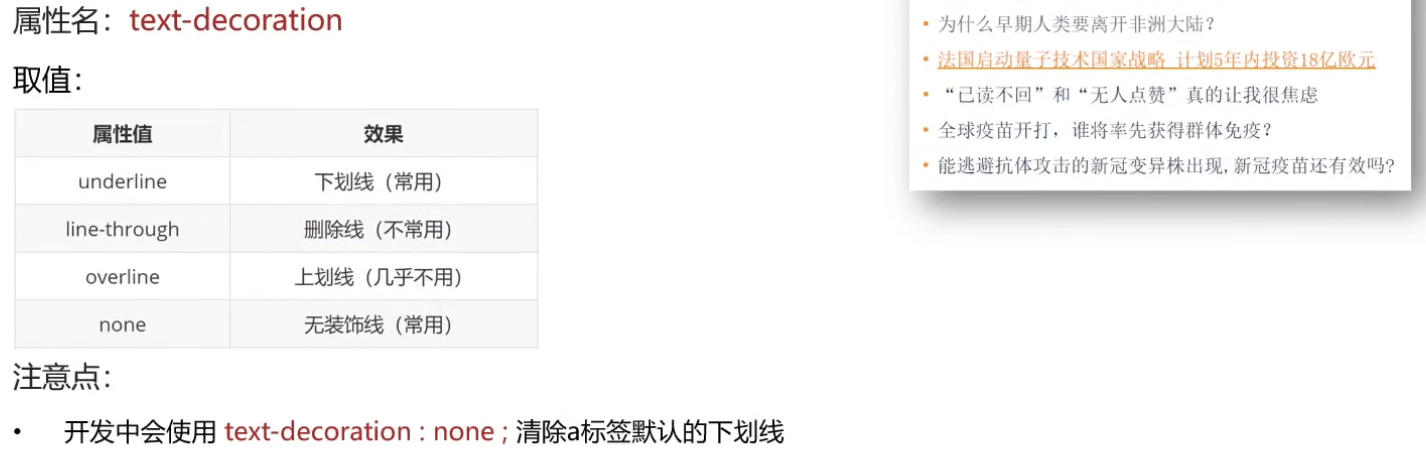
# 2.4文本修饰
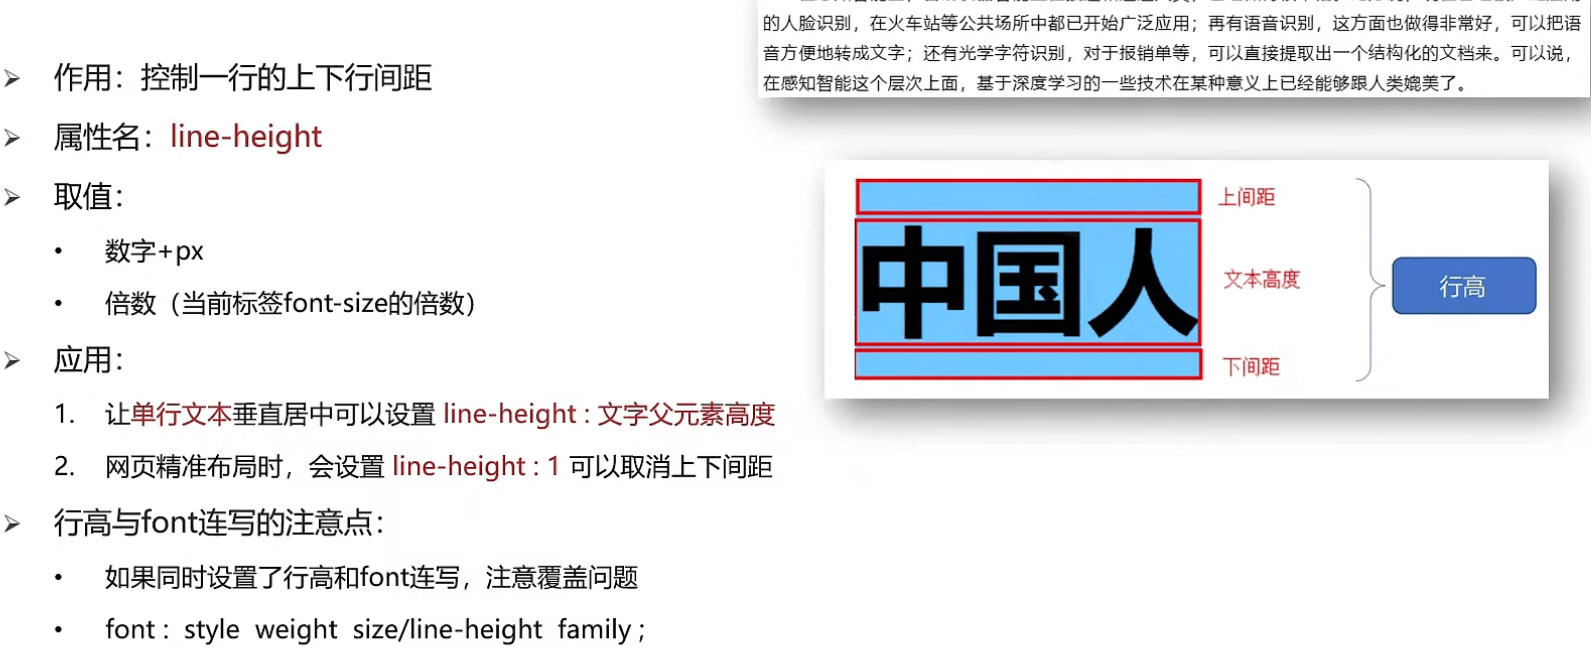
# 3.1行高
# 五、CSS进阶
# 一、选择器进阶
# 1.1后代选择器:空格
# 1.2子代选择器

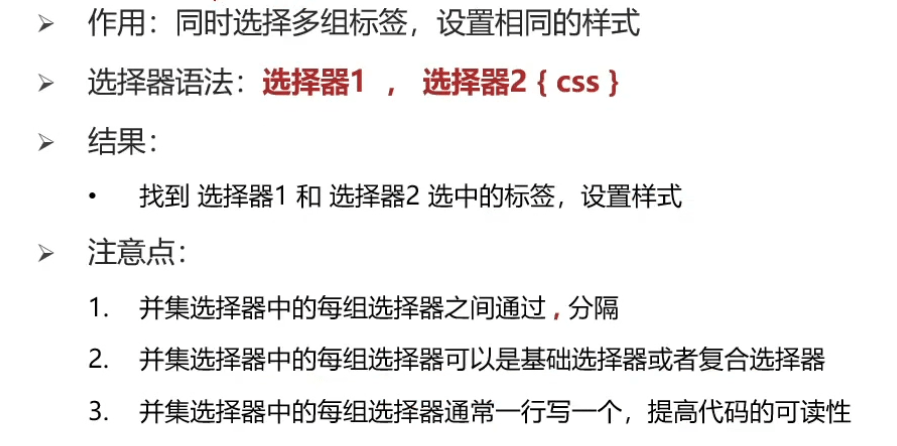
# 2.1并集选择器
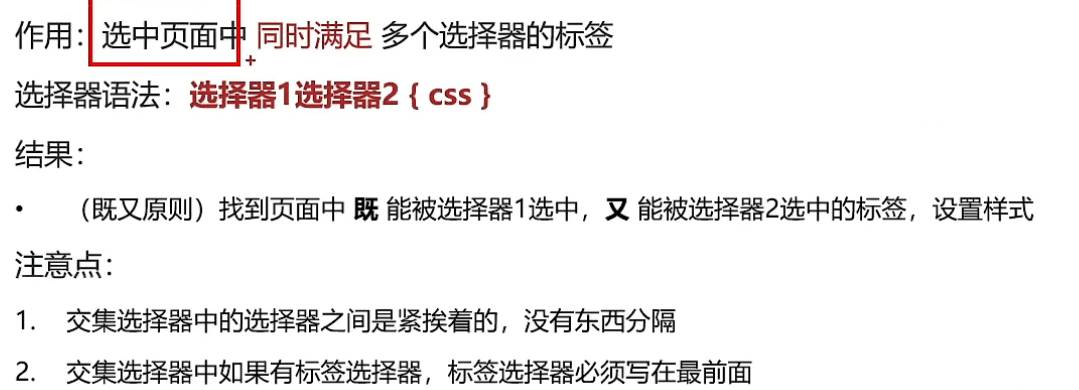
# 3.1交集选择器:紧挨着
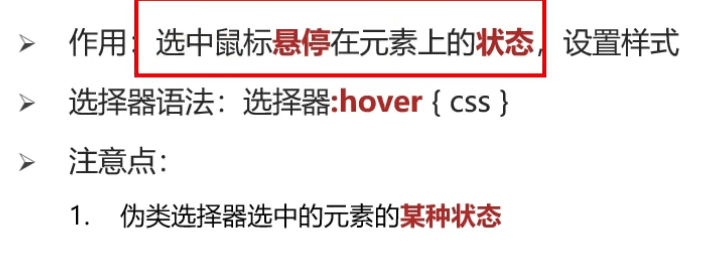
# 4.1 hover伪类选择器
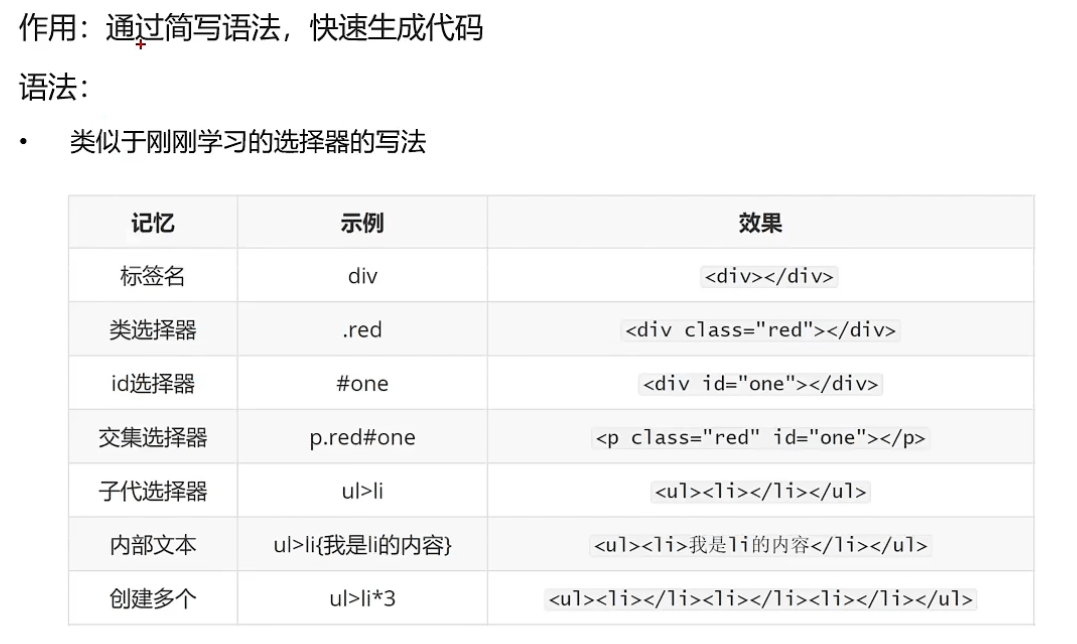
# 5.1 Emmet语法
# 二、背景相关属性
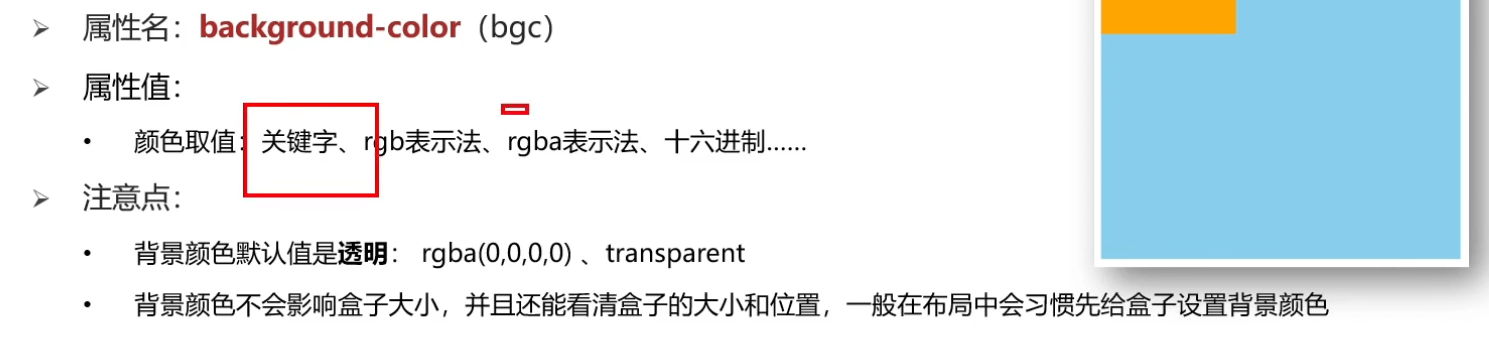
# 1.1背景颜色
# 2.1背景图片

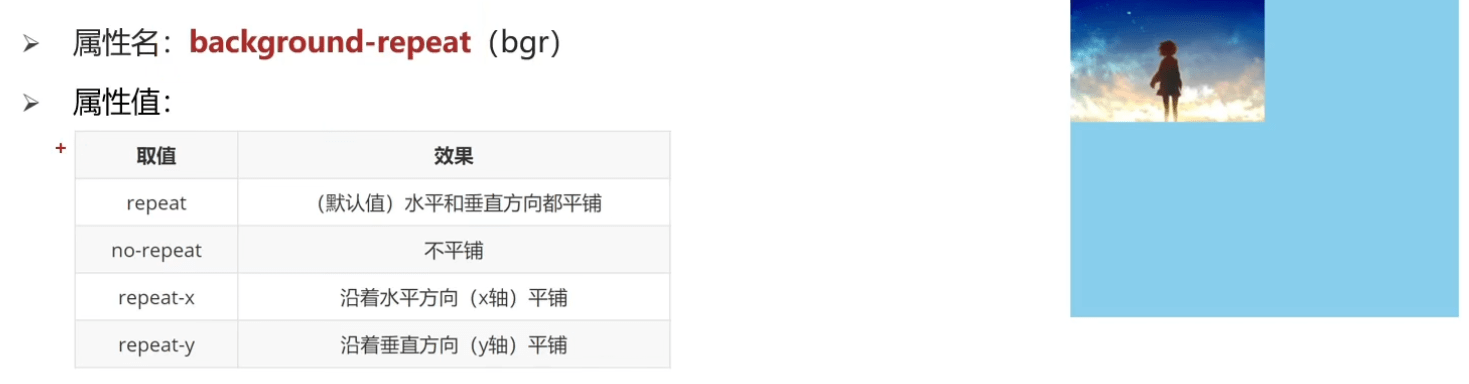
# 3.1背景平铺
# 4.1背景位置

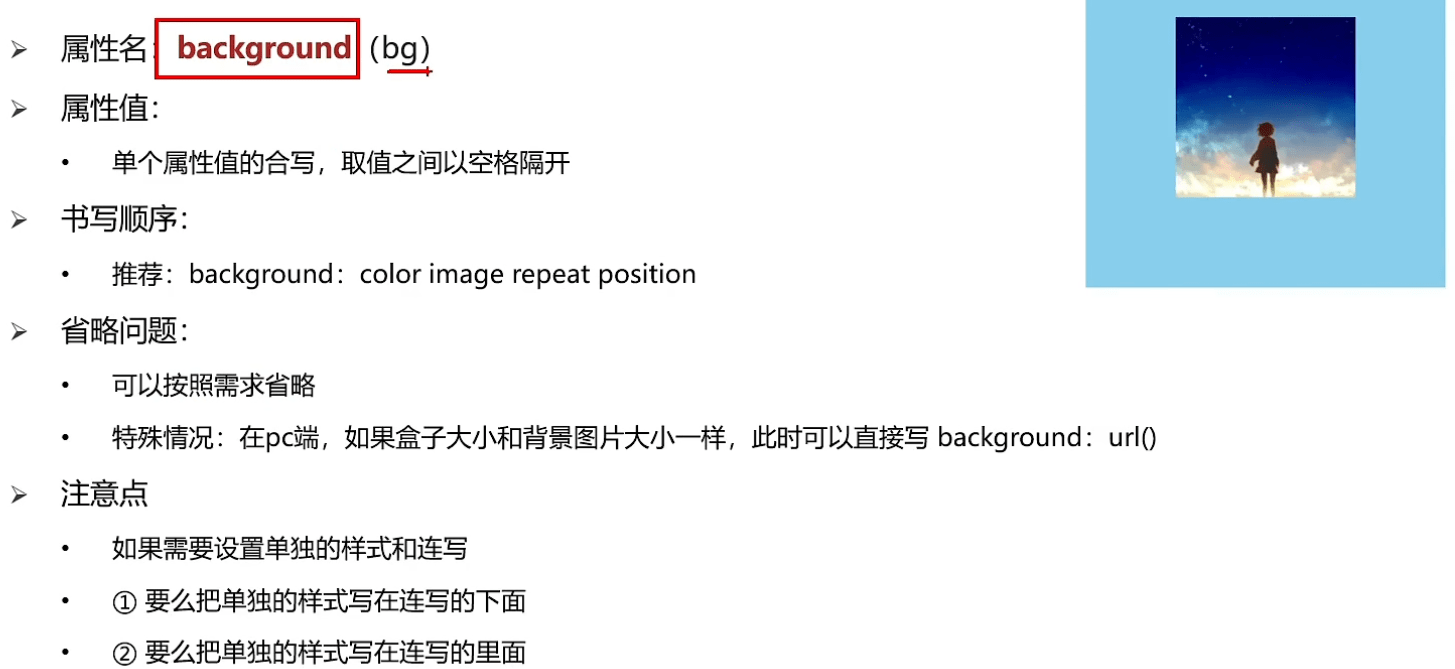
# 5.1背景相关属性的连写
# 三、元素显示模式
# 1.块级元素
# 2.行内元素
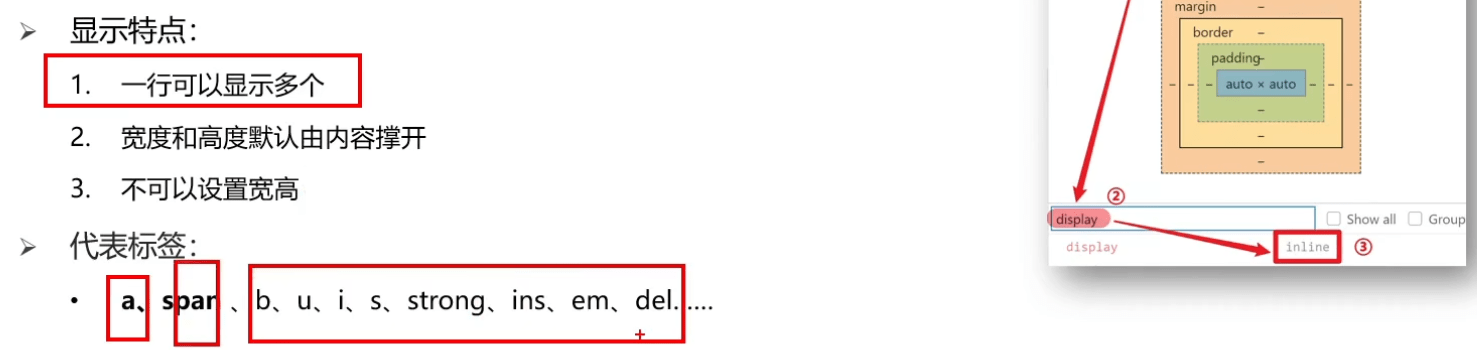
# 3.行内块元素
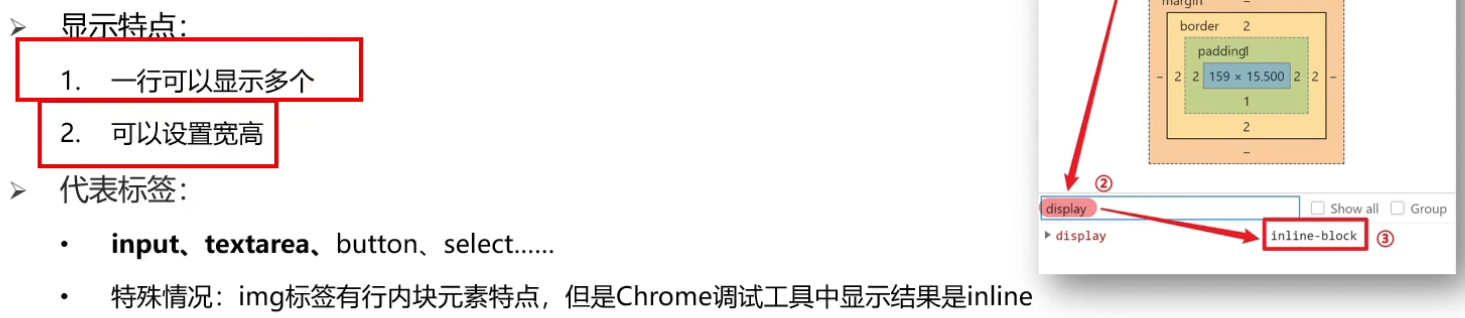
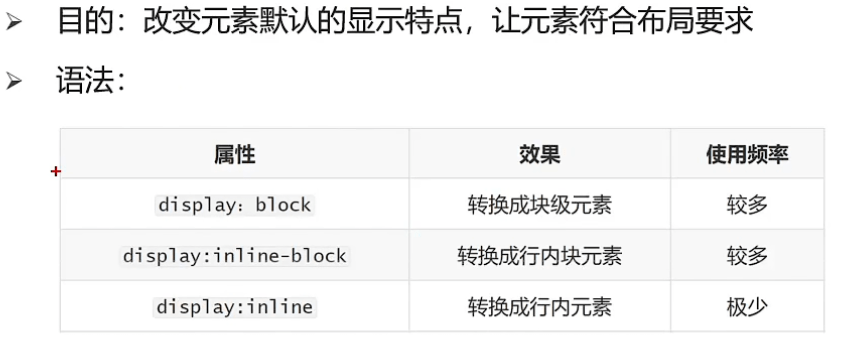
# 4.元素显示模式转换
# 拓展1: HTML嵌套规范注意点

# 四、css三大特性
# 1.继承性的介绍
# 2.层叠性的介绍
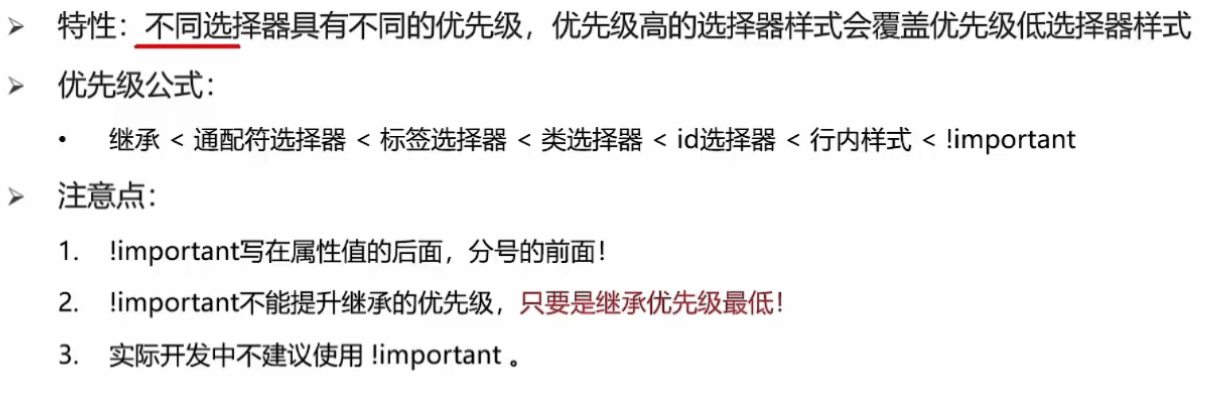
# 3.1优先级的介绍
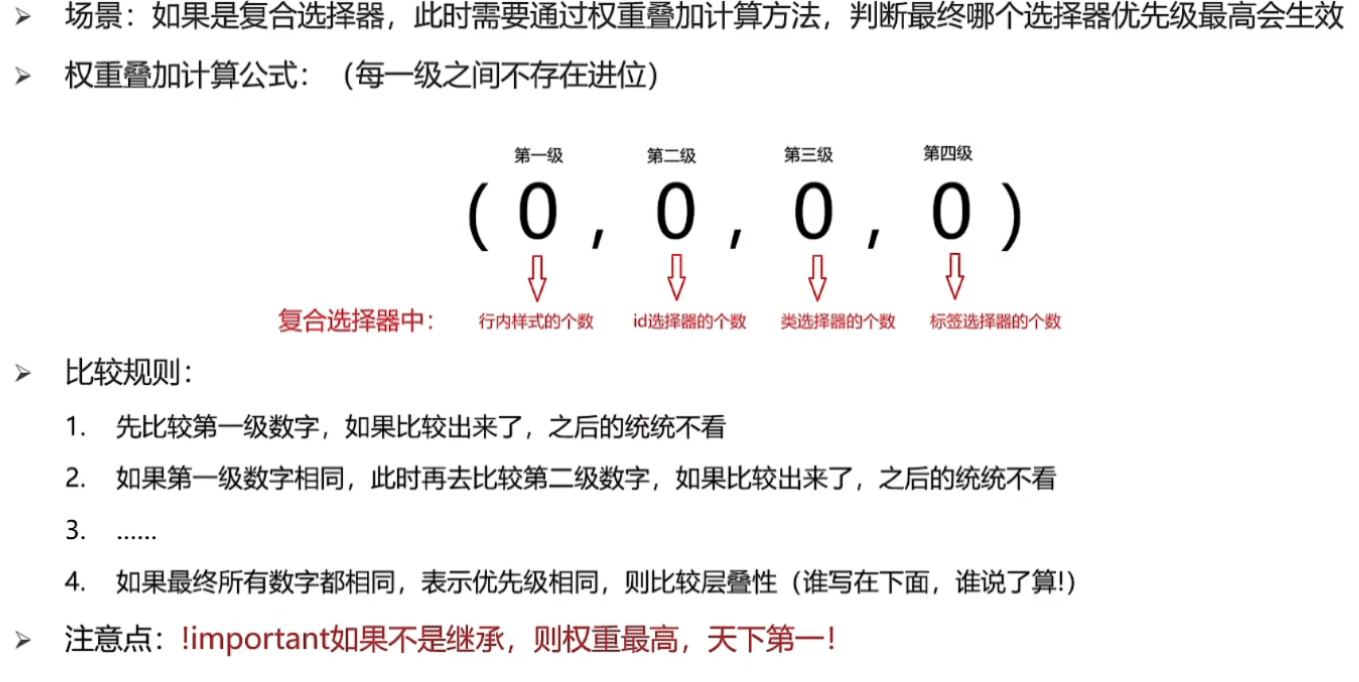
# 3.2权重叠加计算
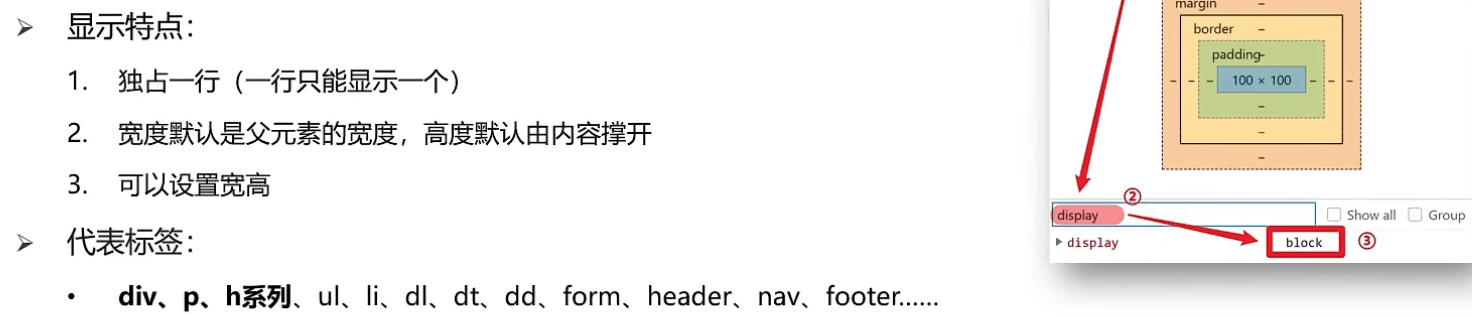
# 六、盒子模型
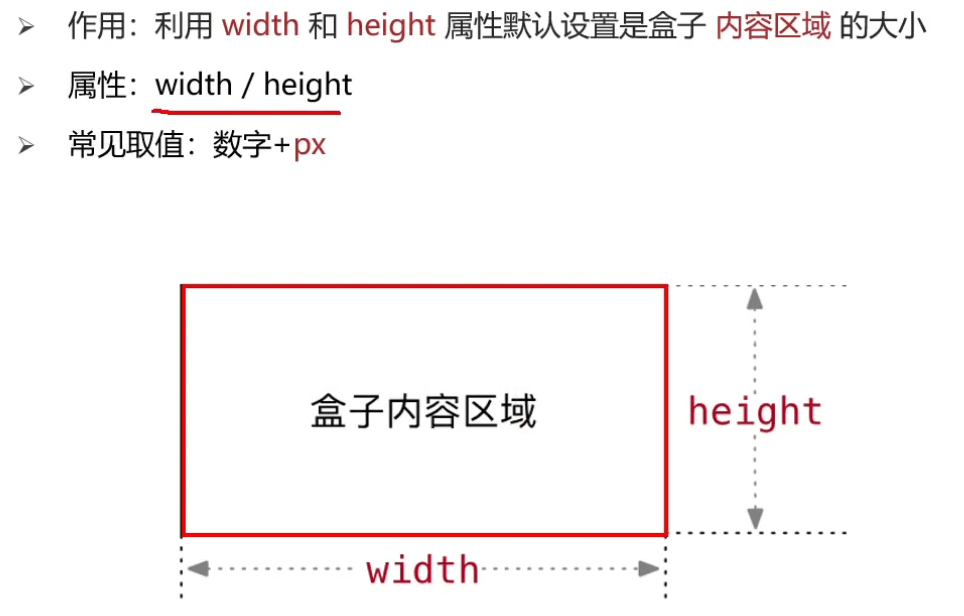
# 1.1盒子模型的介绍

# 2.1内容的宽度和高度
# 3.1边框(border)--连写形式
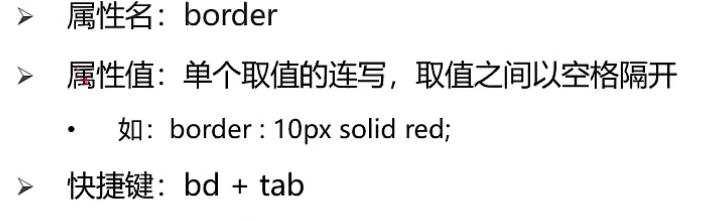
soild:实线 dttted:点线 dashed: 虚线
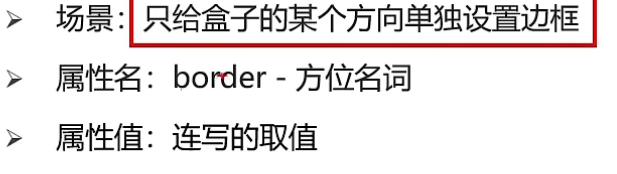
# 3.2边框(border)--单方向设置
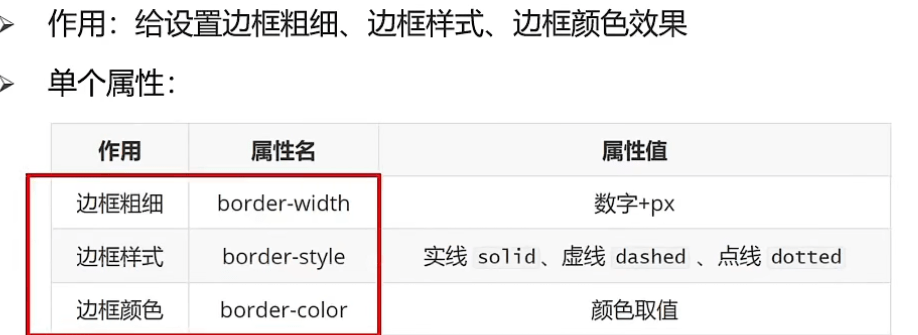
# 3.3边框(border)--单个属性
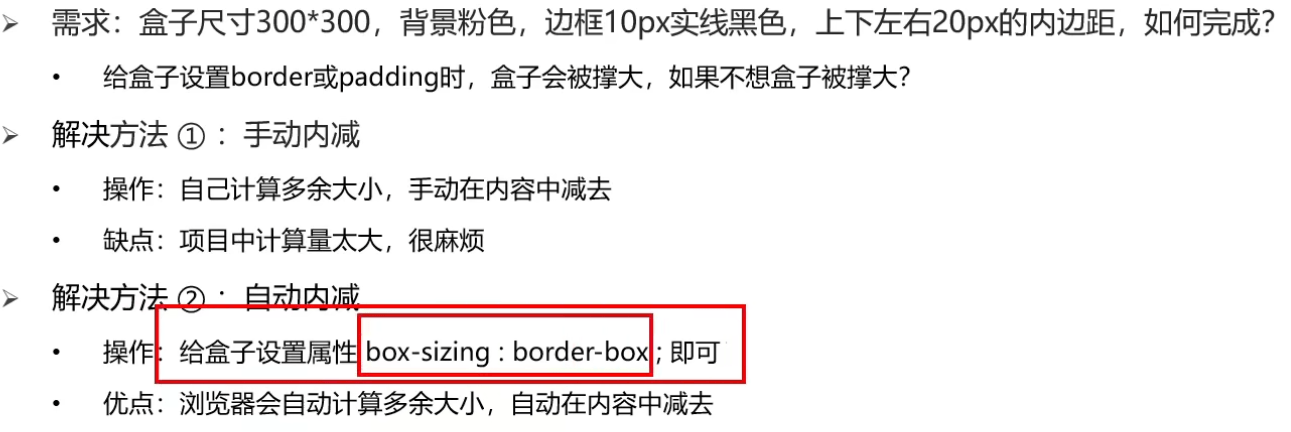
# 4.1 CSS3盒模型(自动内减)
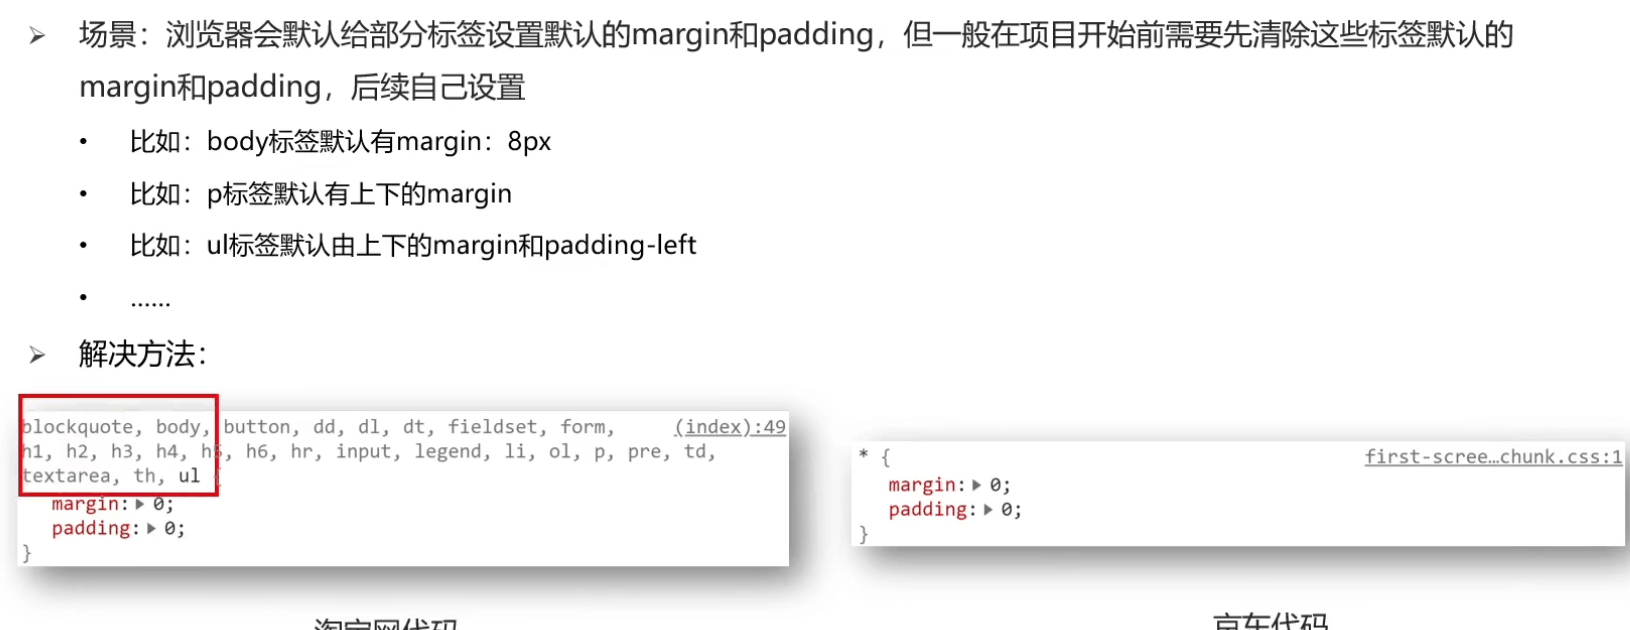
# 5.1清除默认内外边距
# 七、CSS浮动
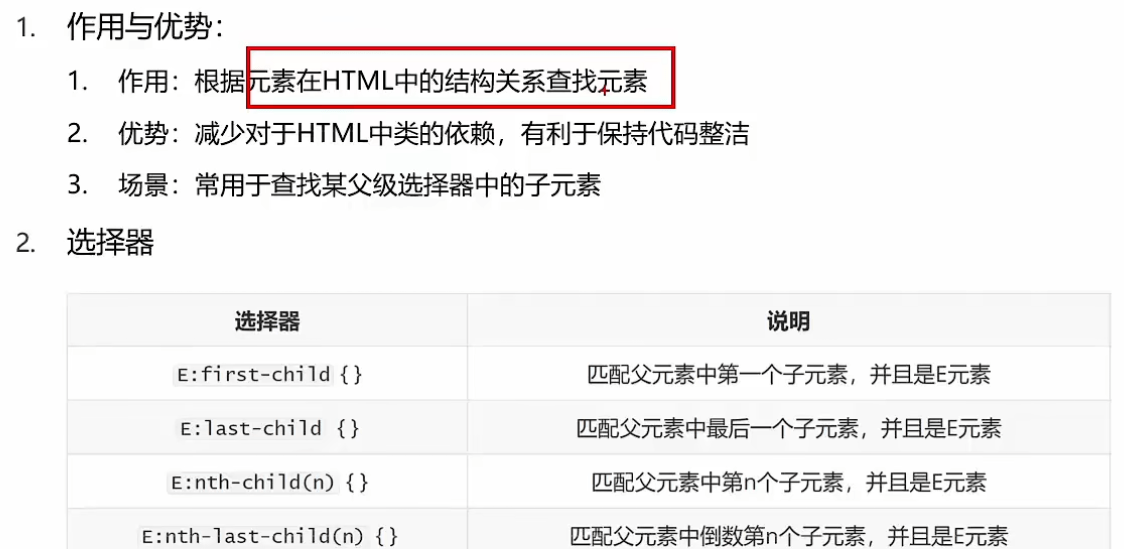
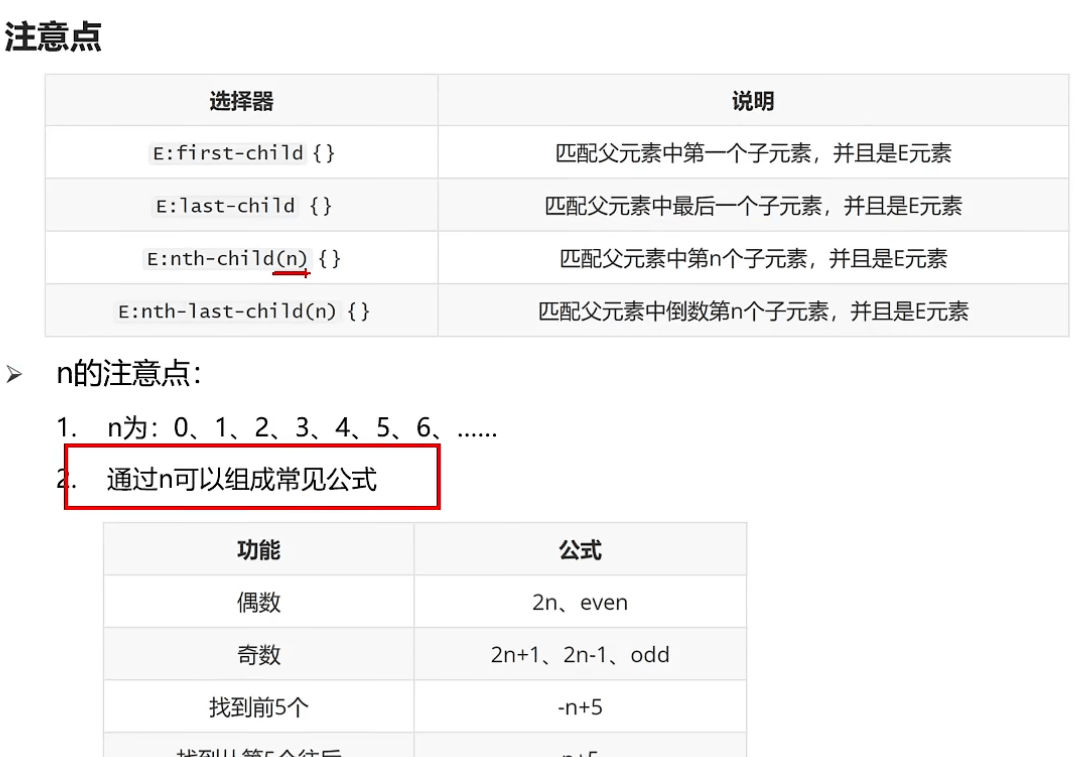
# 一、结构伪类选择器
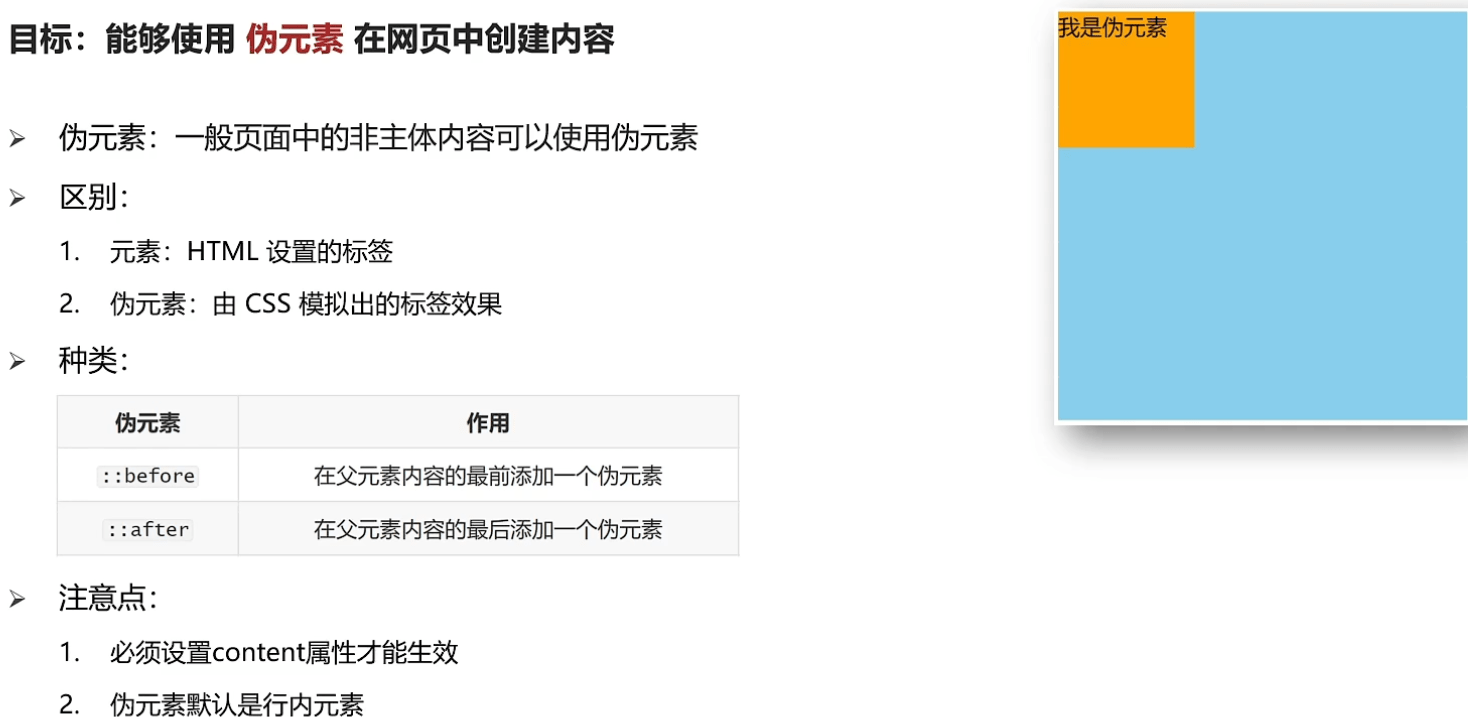
# 二、伪元素
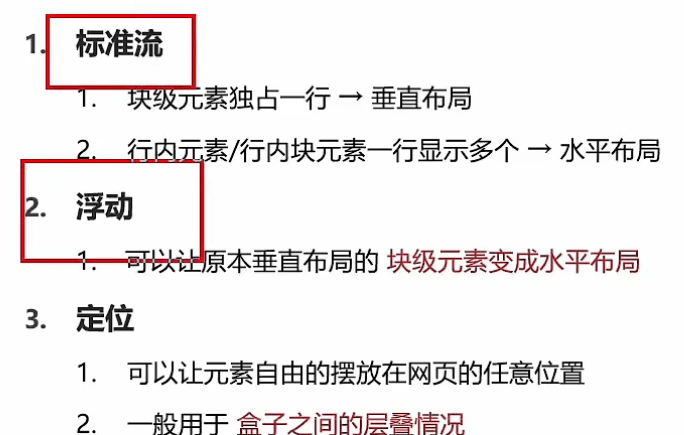
# 三、标准流

# 四、浮动
# 1.1浮动的作用
# 2.1浮动代码
float: right/left;
# 3.1浮动的特点

# CSS书写顺序:使浏览器执行效率更高
1.浮动/display;
2.盒子模型: margin border padding 宽度高度背景色
3.文字样式
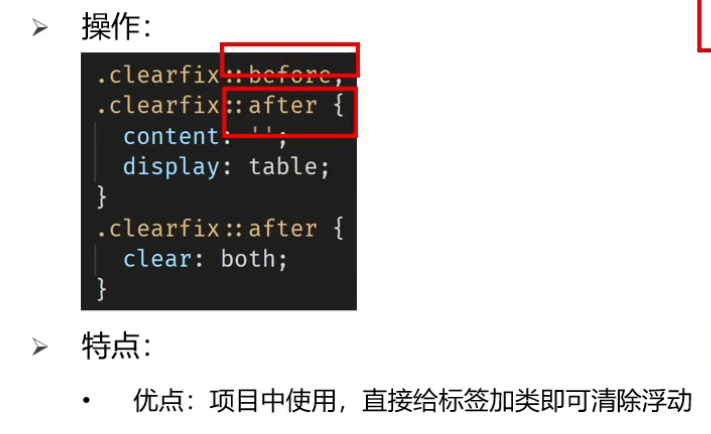
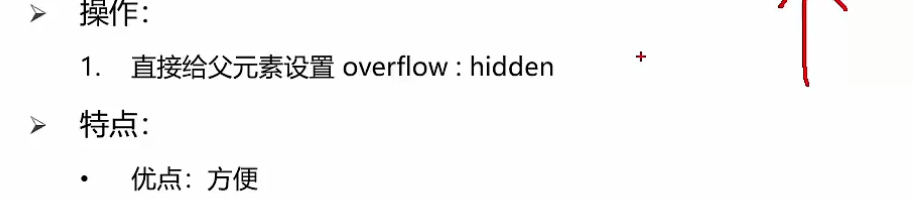
# 五、清除浮动
# 1.1清除浮动的介绍
# 2.1清除浮动的方法
# 1)直接设置父元素高度

# 2)额外标签法
# 3)单伪元素清除法
# 4)双伪元素清除法
# 5)给父元素设置:overflow:hidden
# 八、CSS定位装饰
# 一、定位
# 1.1 网页常见布局方式
# 2.1 使用定位的步骤

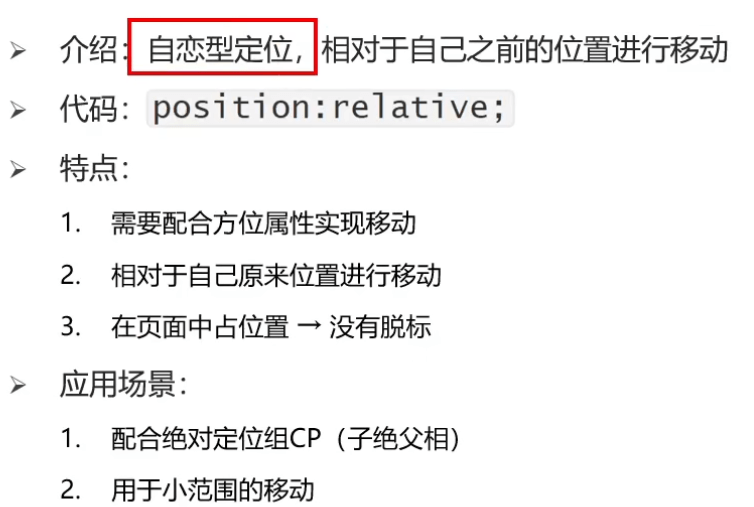
# 3.1 相对定位
# 4.1 绝对定位
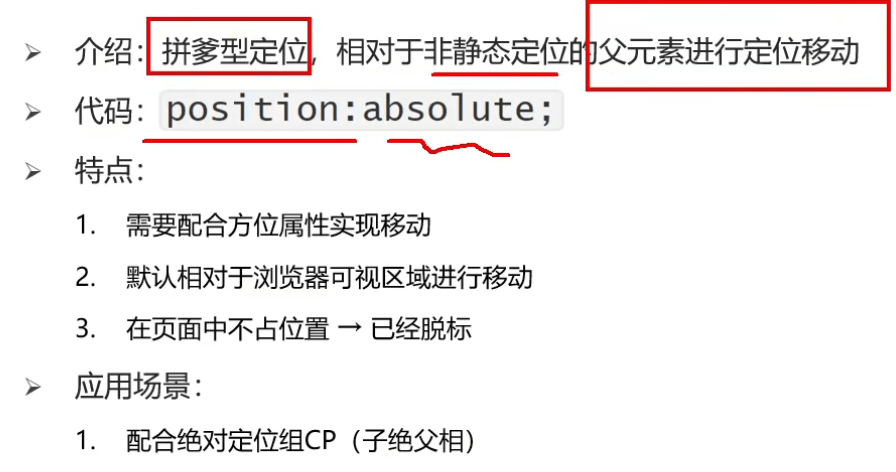
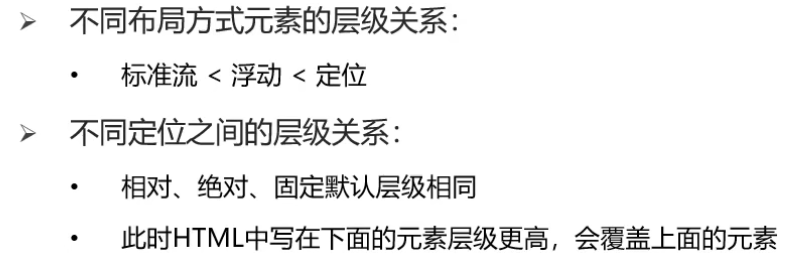
# 5.1 元素层级问题
# 二、装饰
# 1.1 文字对齐问题

# 1.2 垂直对齐方式

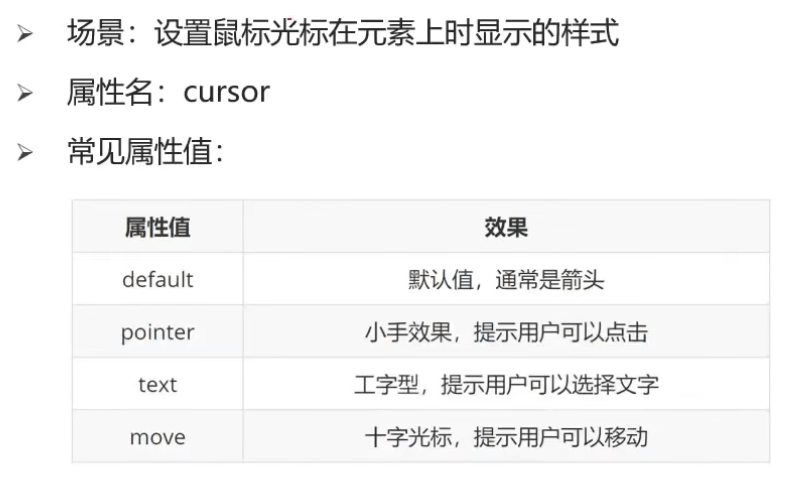
# 2.1光标类型
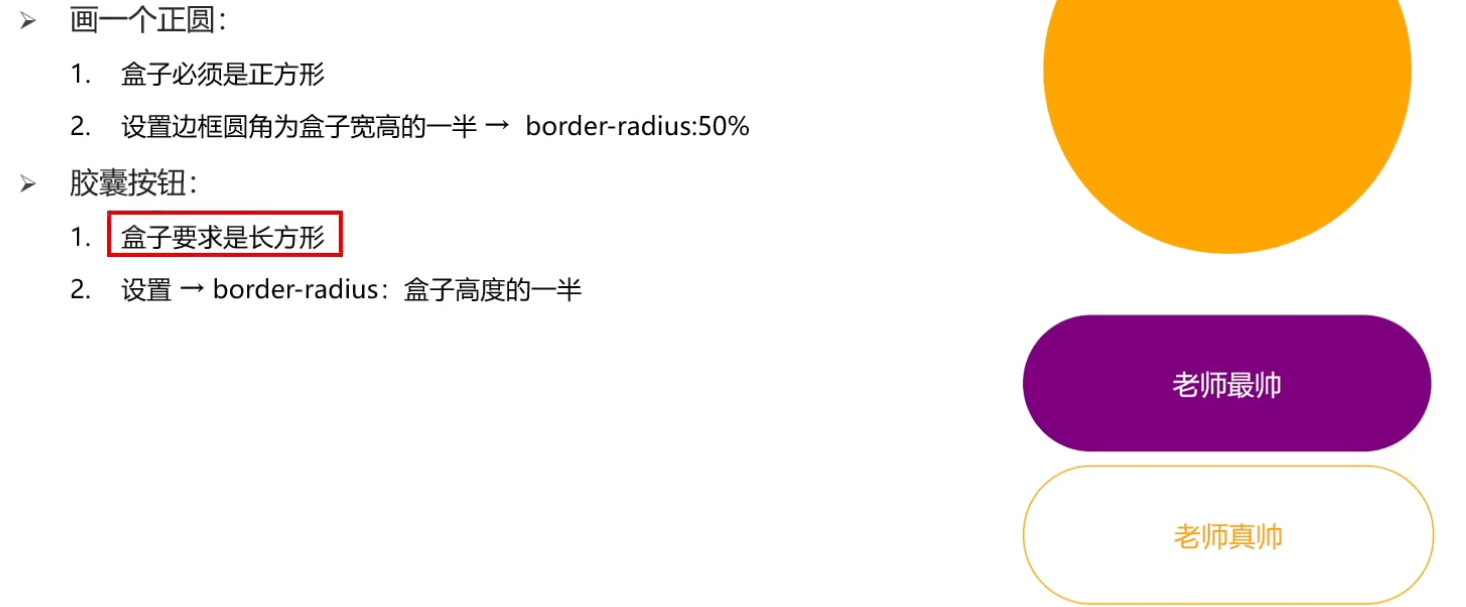
# 3.1 边框圆角
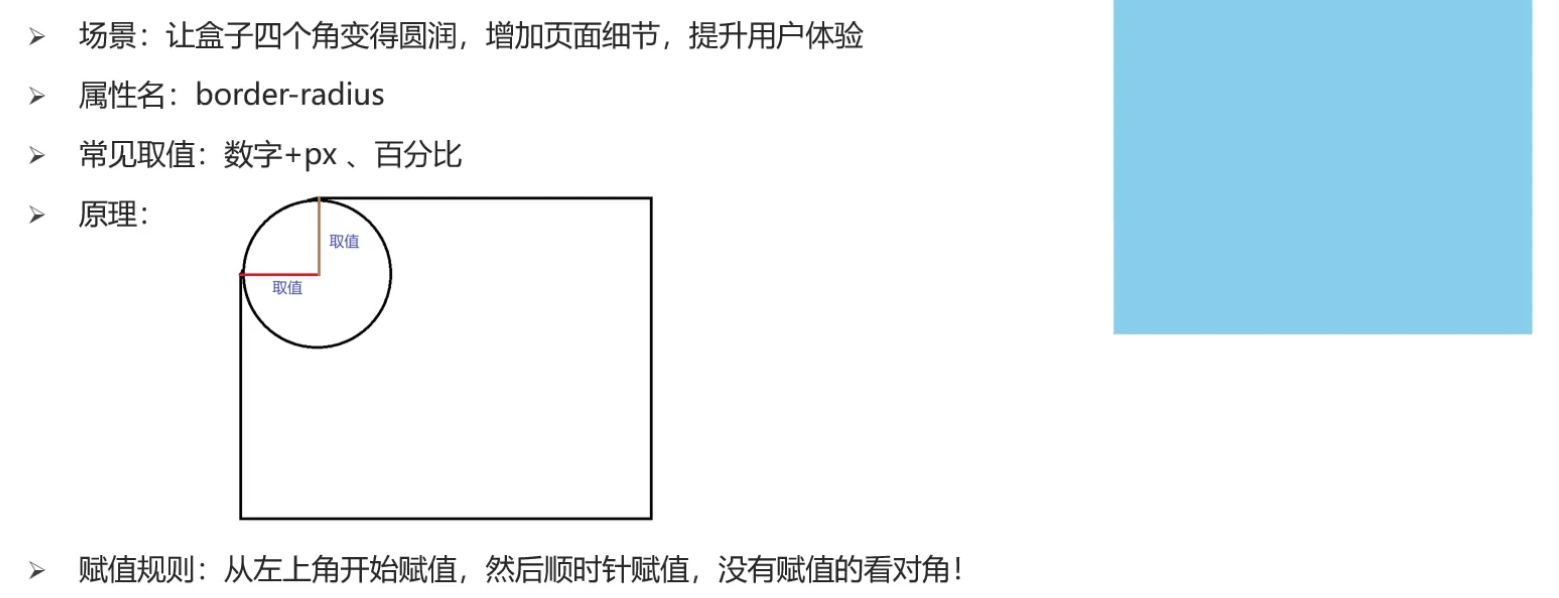
# 3.2 边框圆角的常见应用
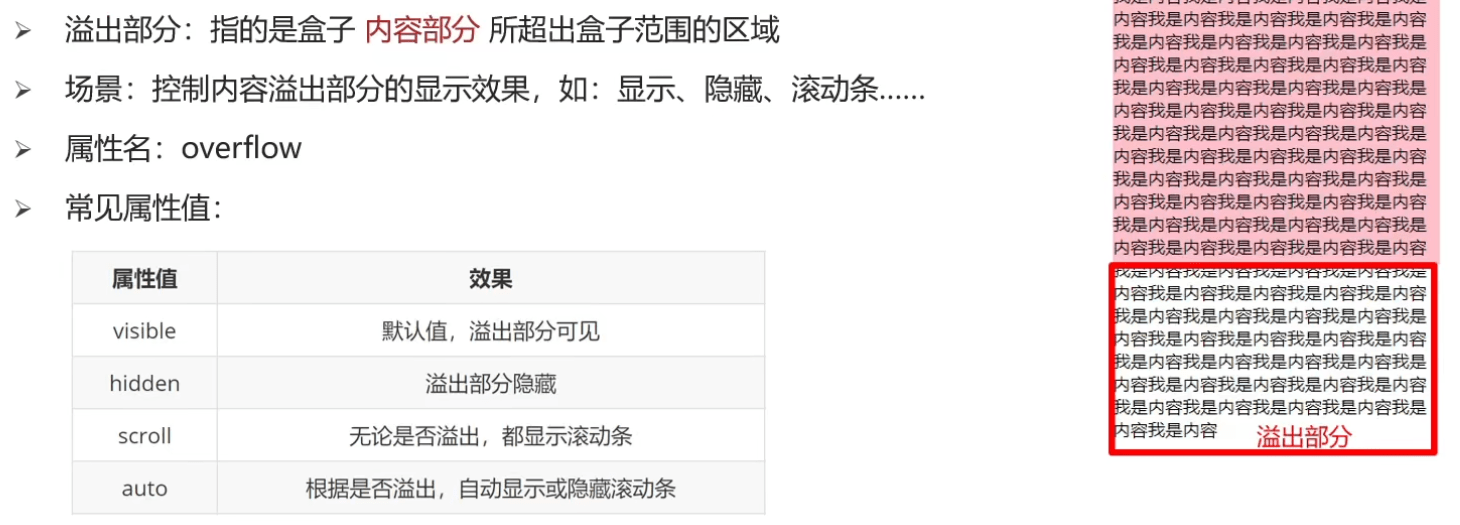
# 4.1 溢出部分显示效果
# 5.1 元素整体透明度
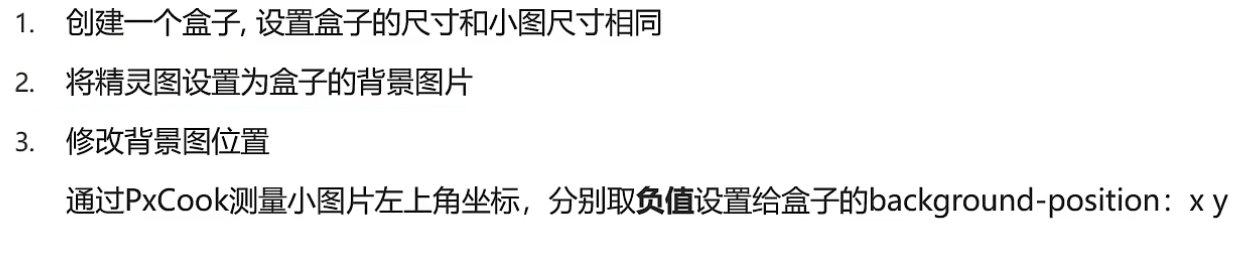
# 九、CSS精灵图
# 1.1 精灵图的介绍
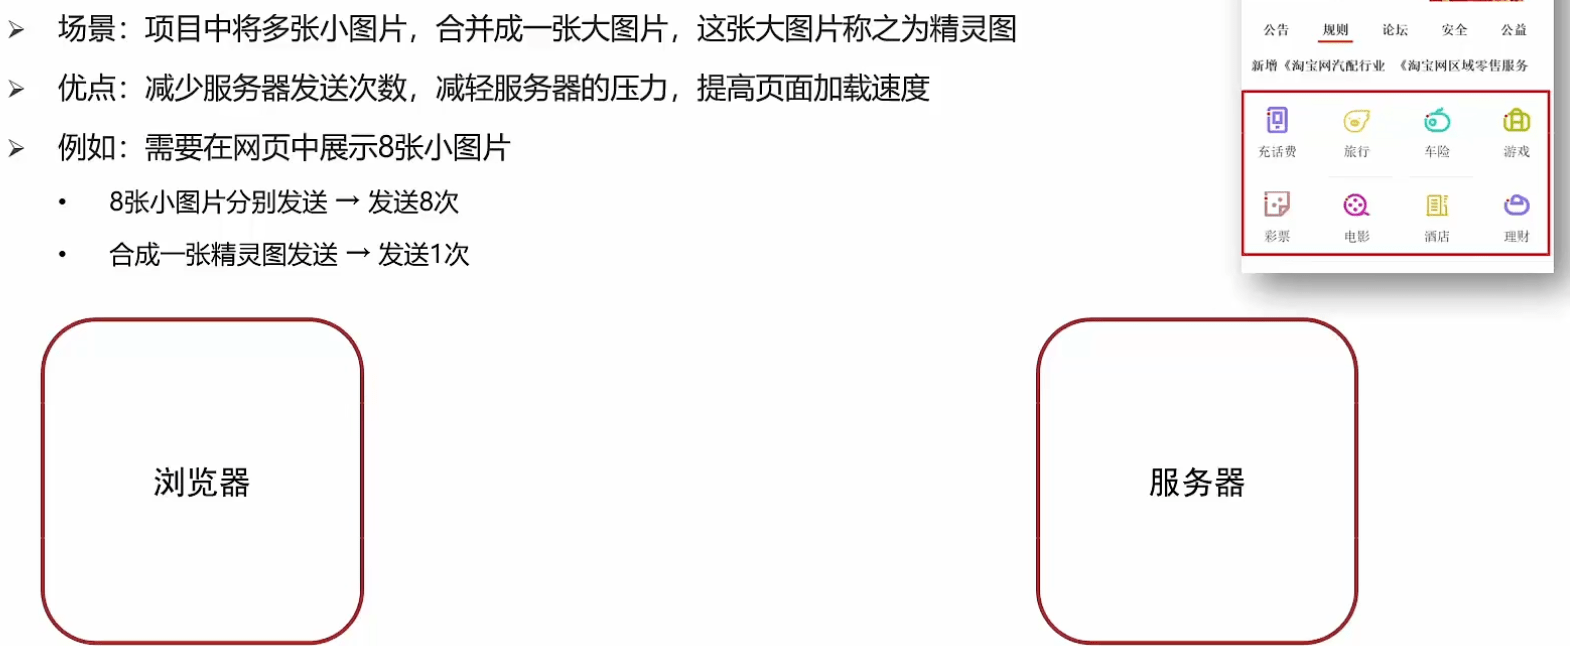
# 1.2 精灵图的使用步骤
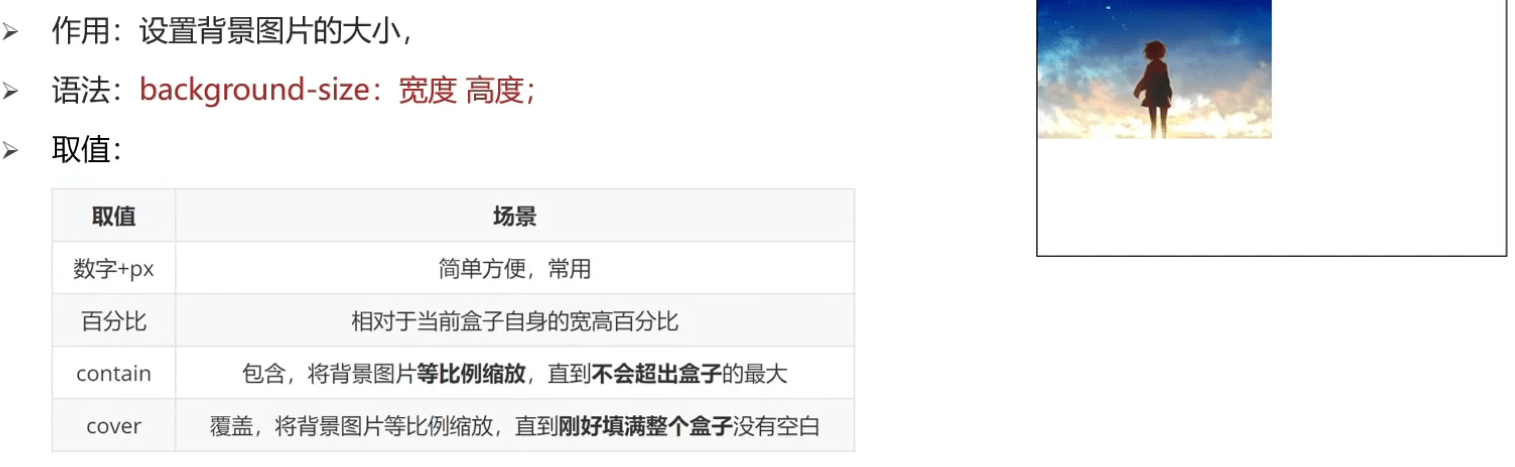
# 2.1背景图大小
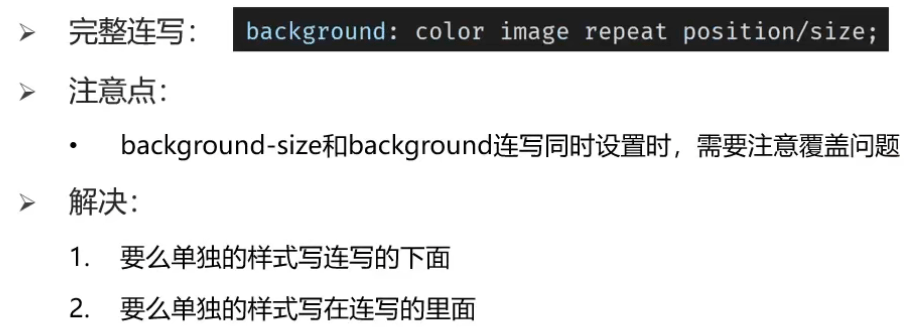
# 2.2background连写拓展
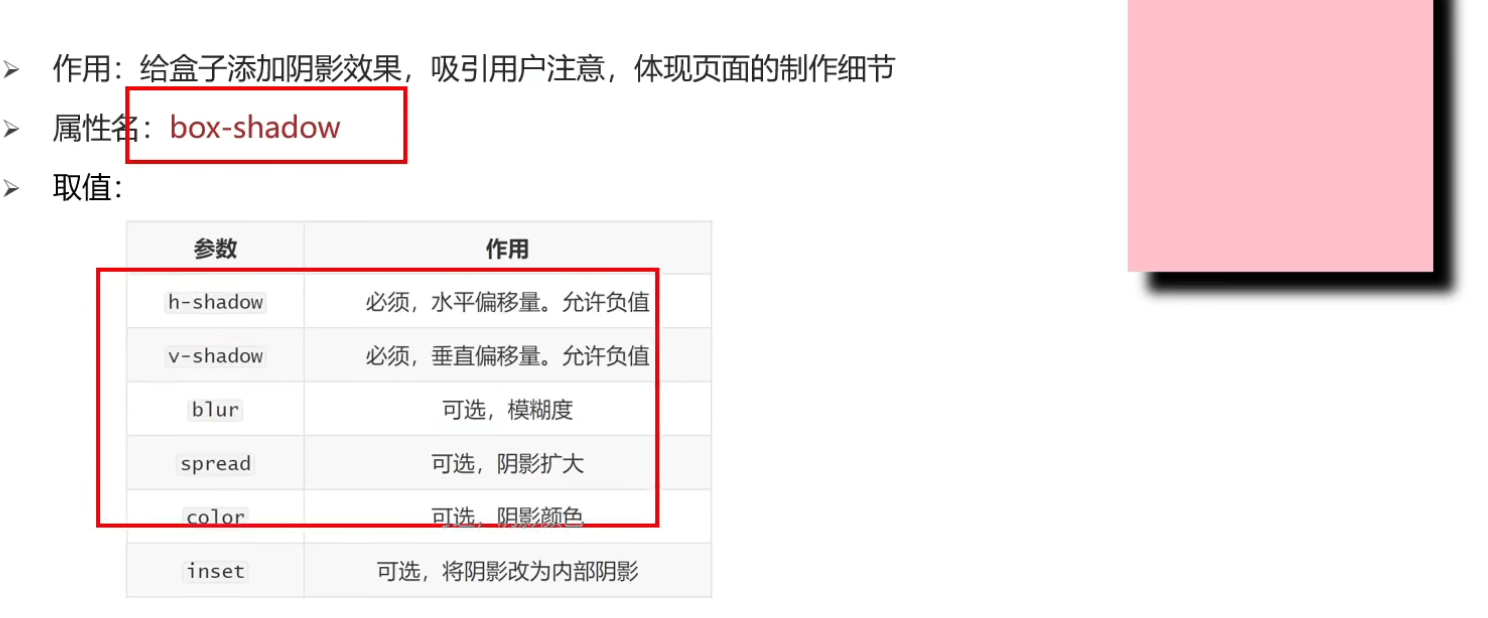
# 3.1 盒子阴影
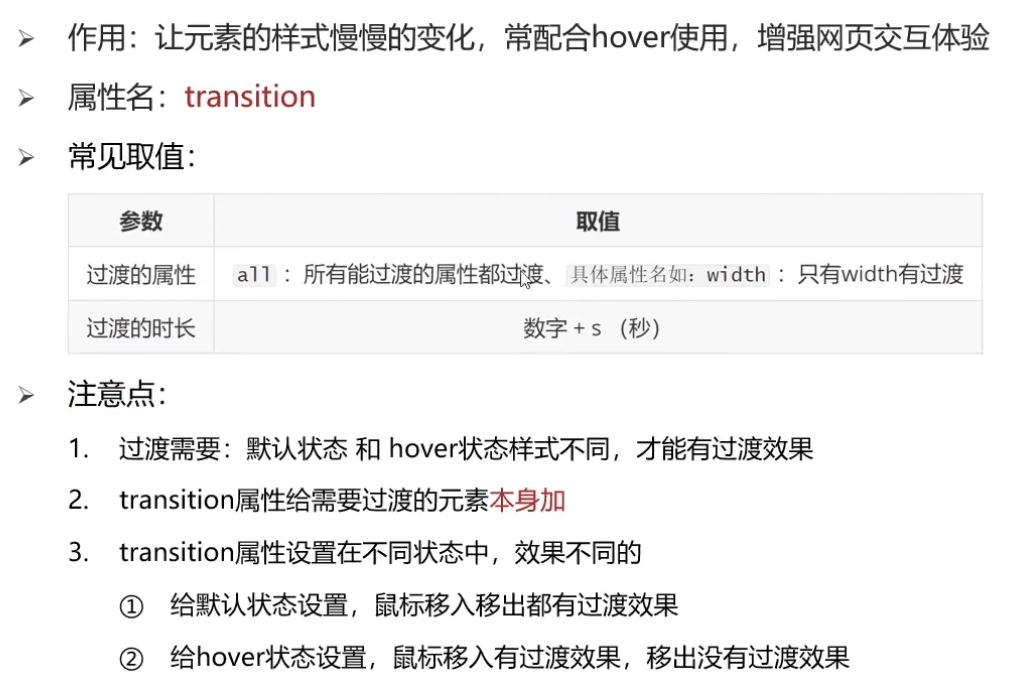
# 4.1 过渡
# 项目前置认知
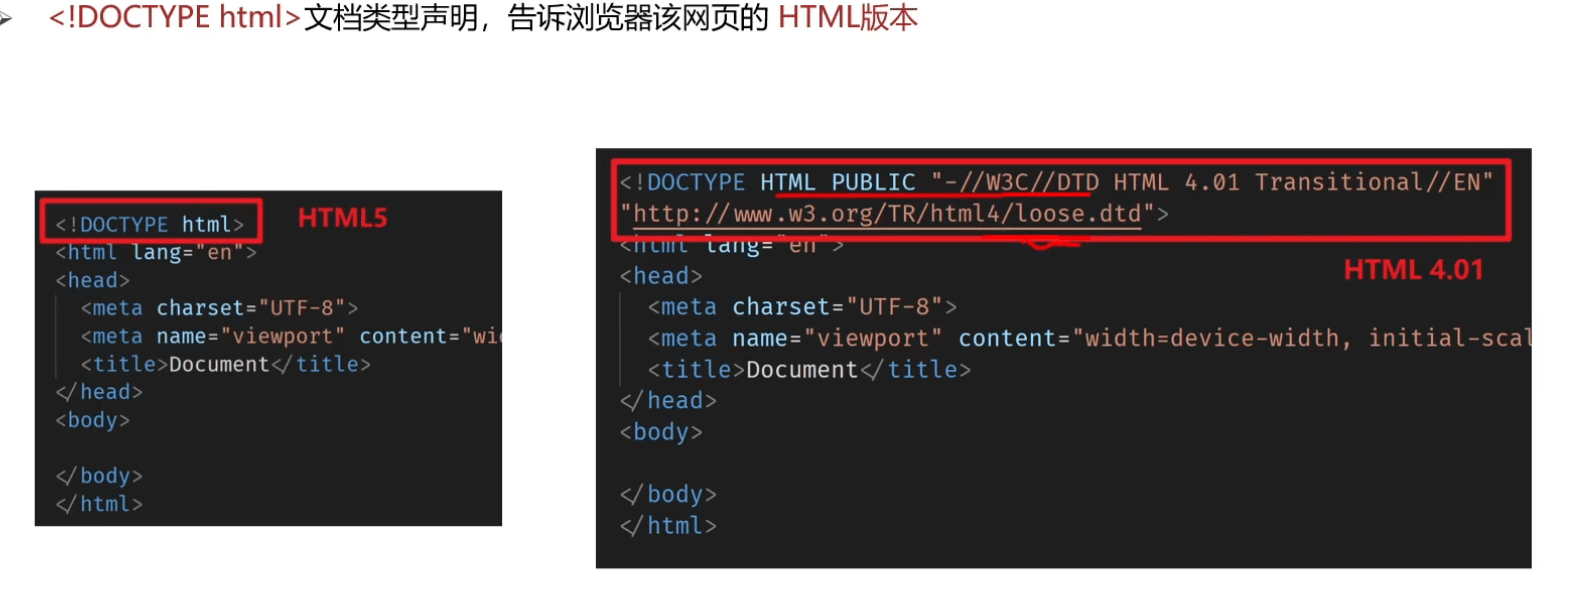
# 1.1 DOCTYPE文档说明
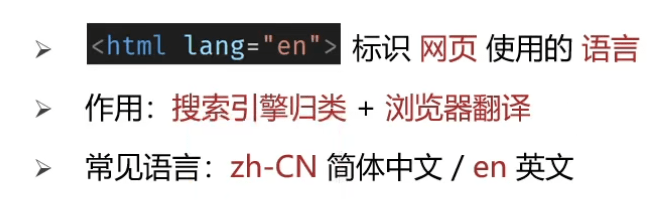
# 2.1 网站语言
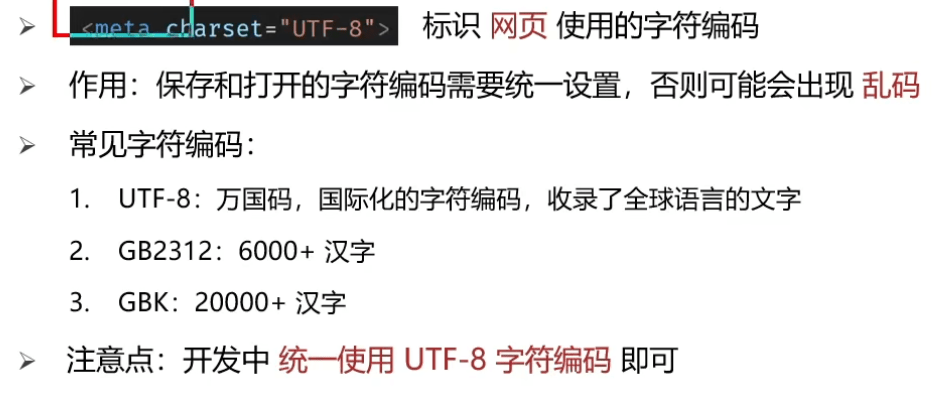
# 2.2 字符编码
3.1 SEO简介
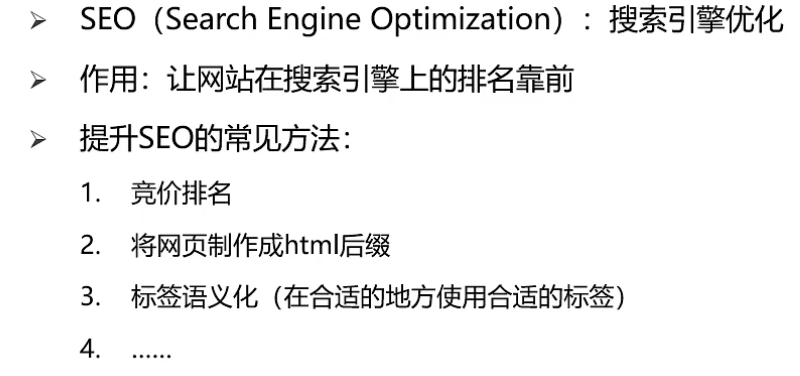
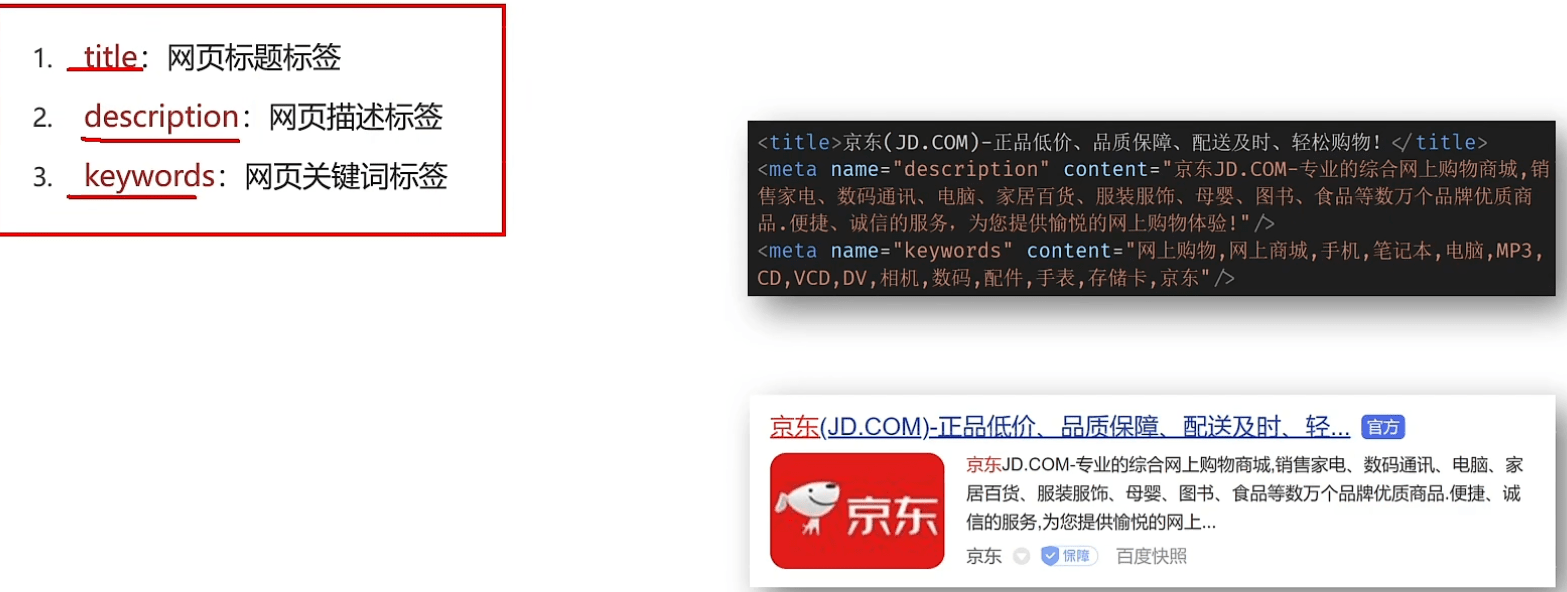
# 3.2 SEO三大标签
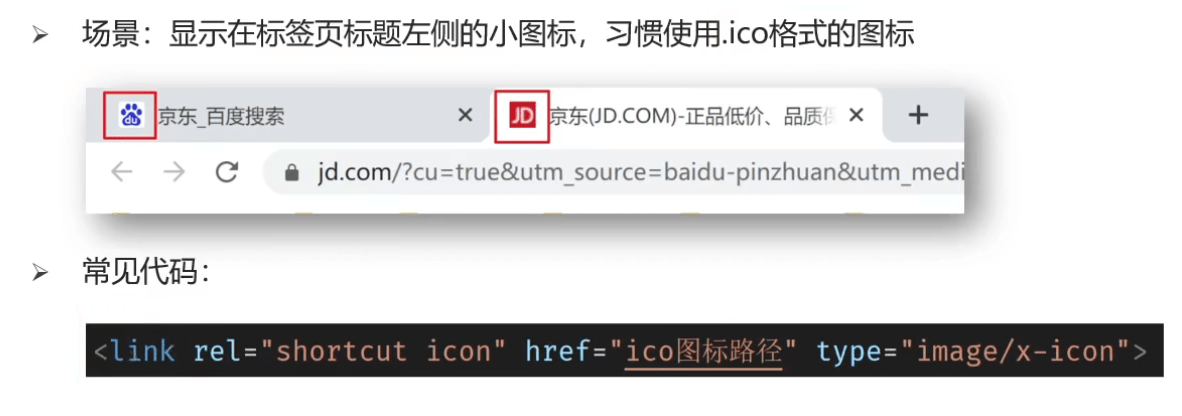
# 4.1 ico图标设置
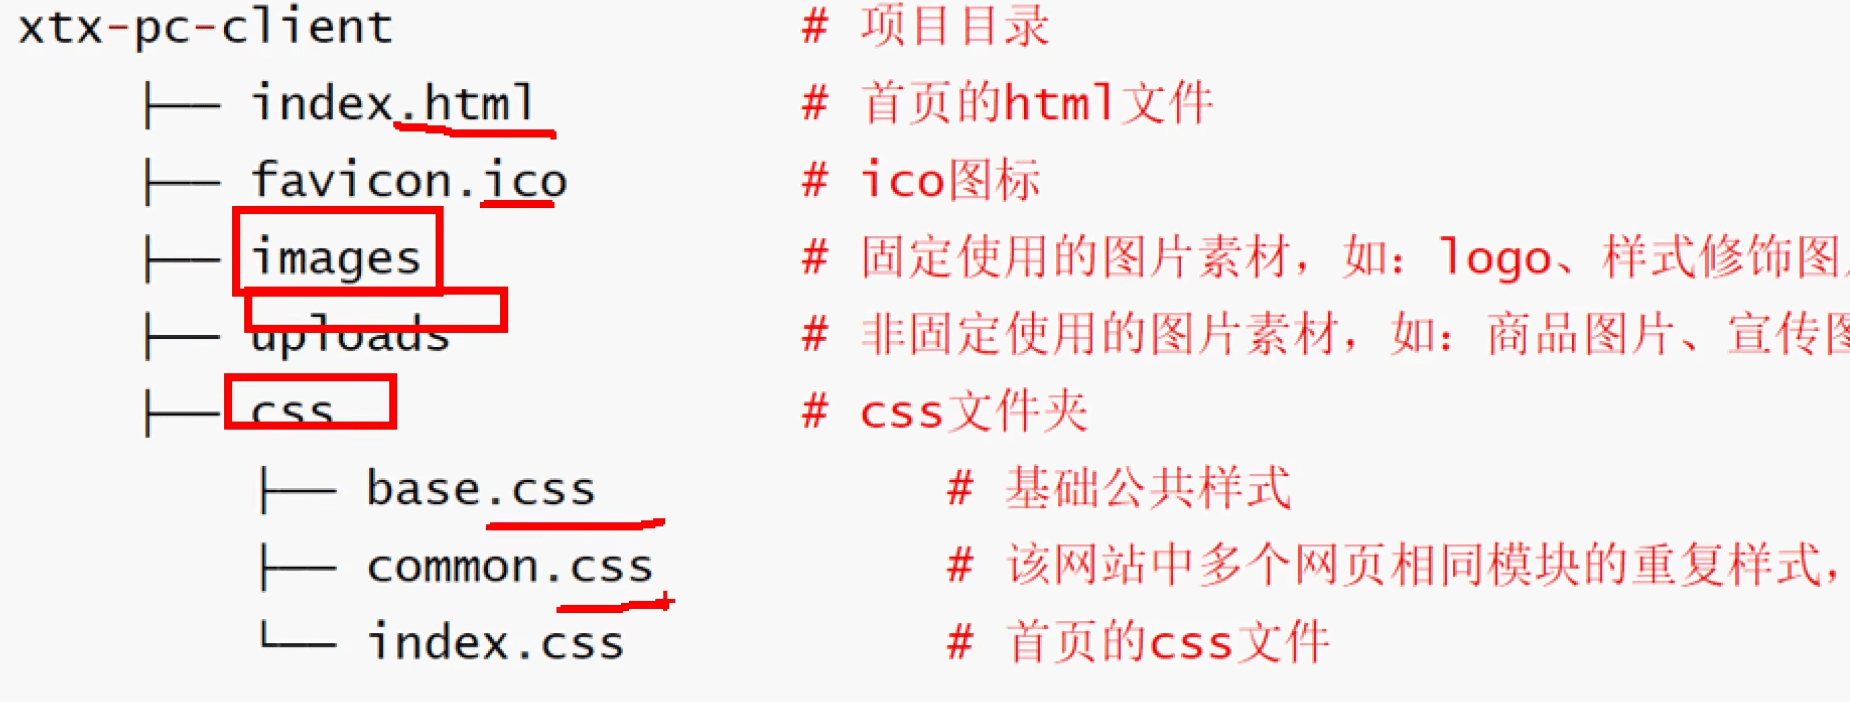
# 项目结构搭建
# 1.1 文件和目录准备
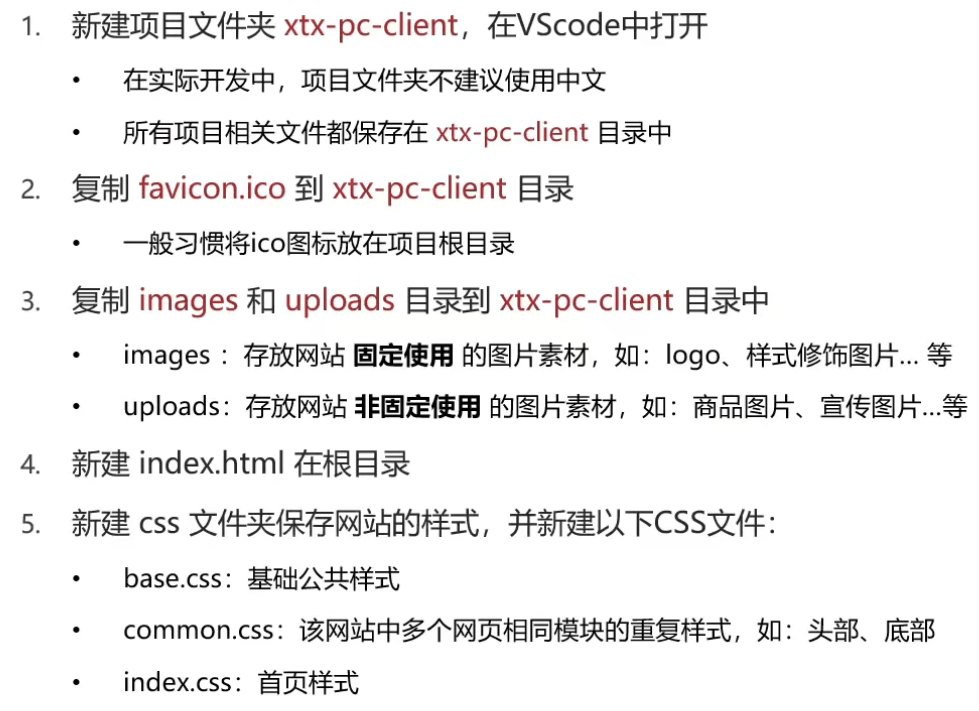
# 1.2 完成后的目录和文件
# web开发进阶知识
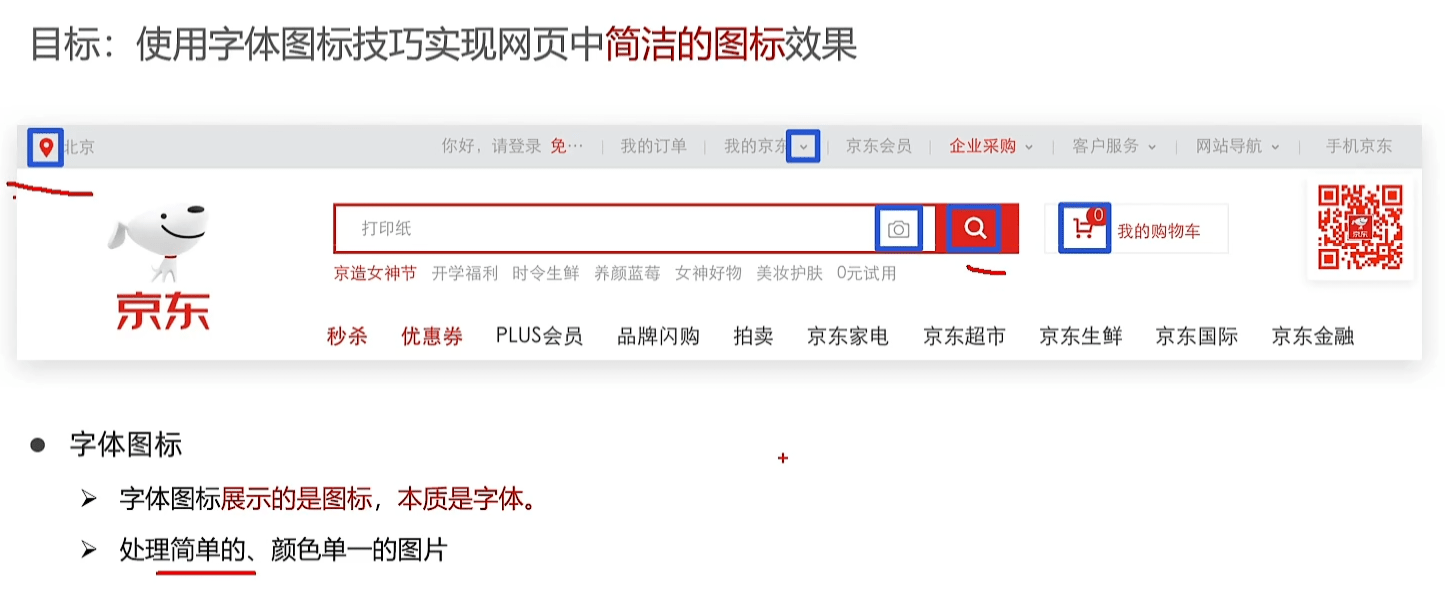
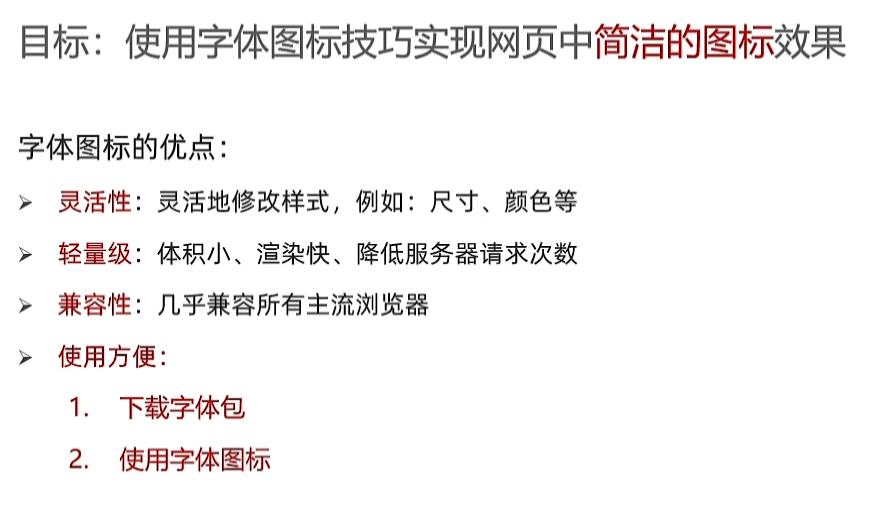
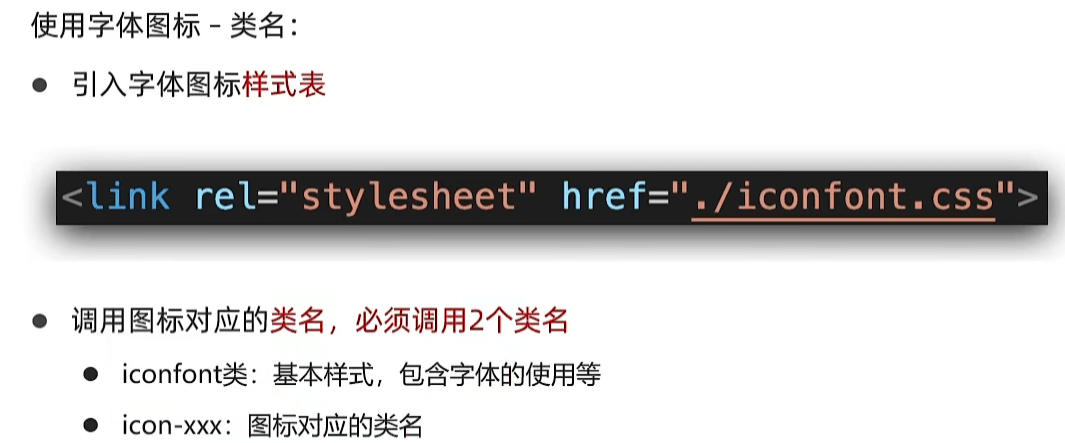
# 一、字体图标
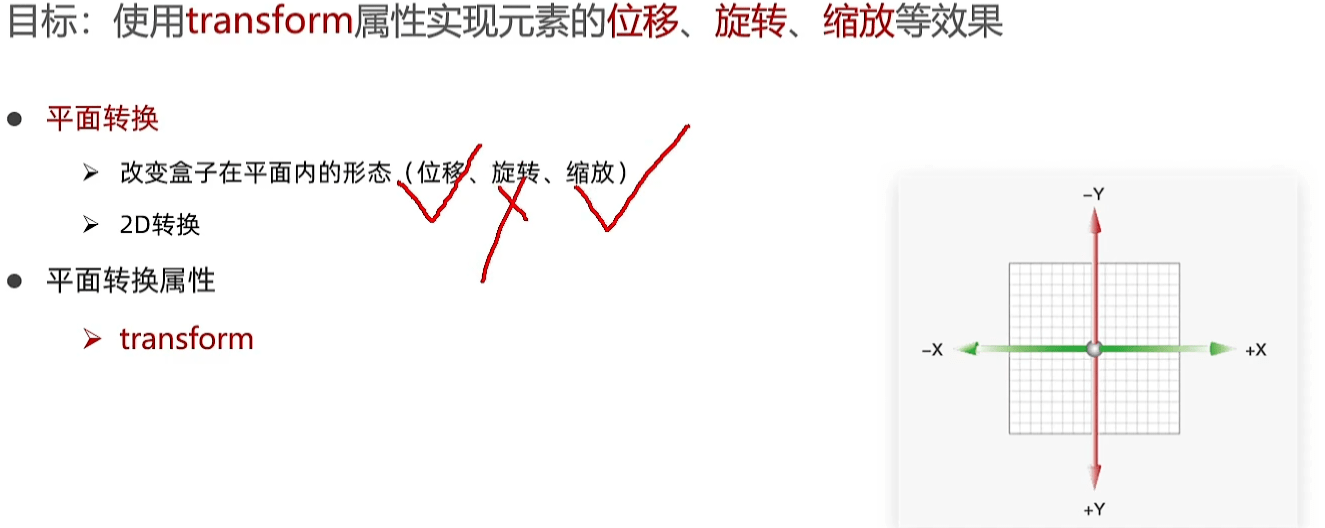
# 二、平面
# 1.平面转换概念
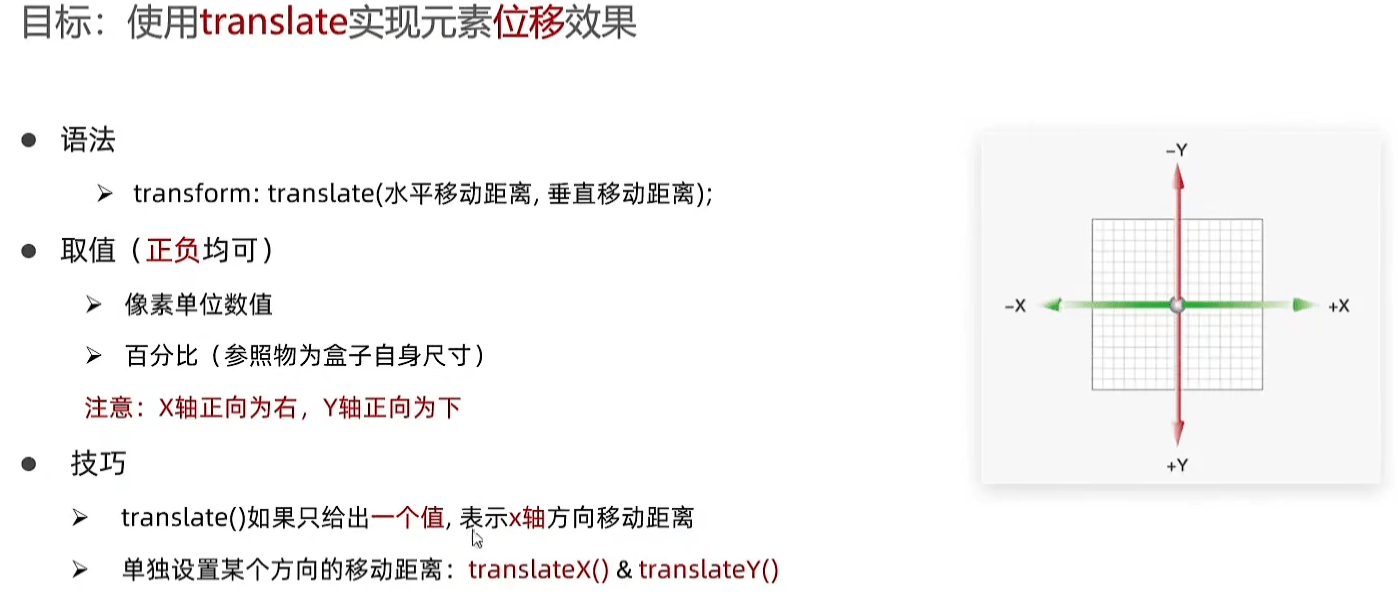
# 2.位移
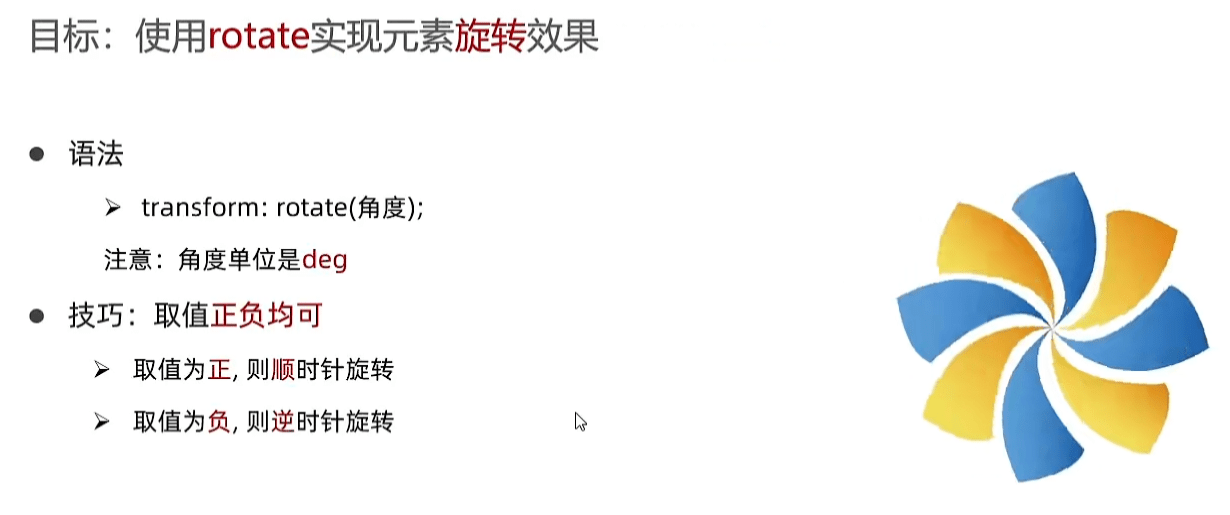
# 3.旋转
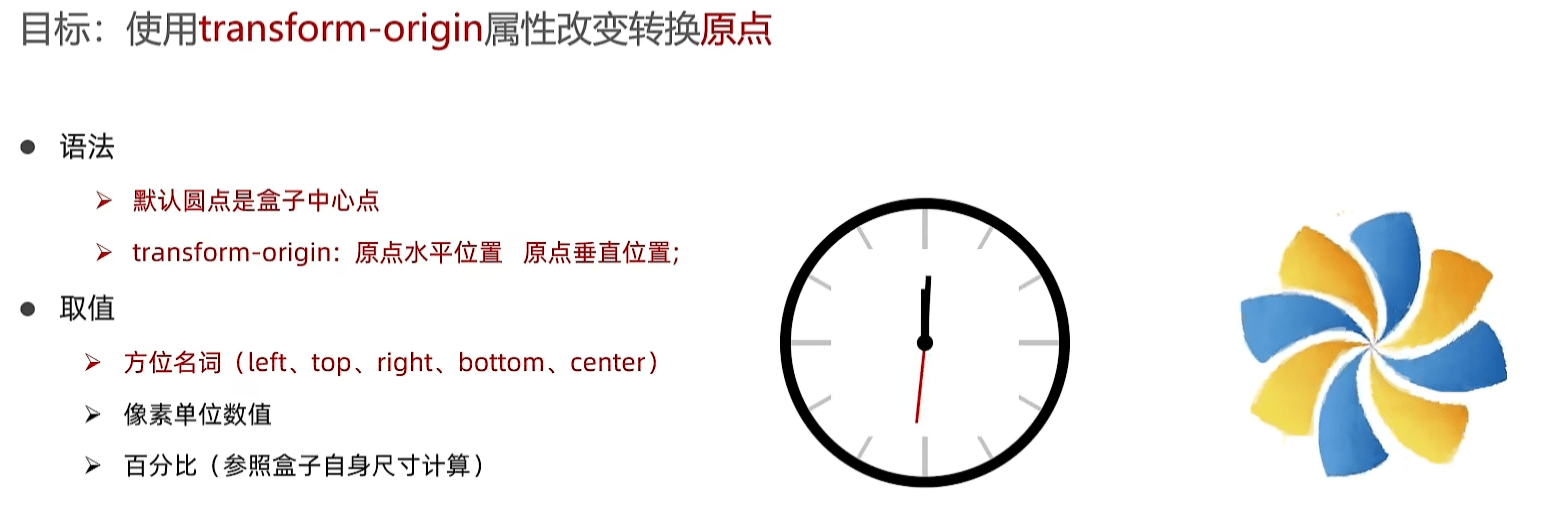
# 4.转换原点
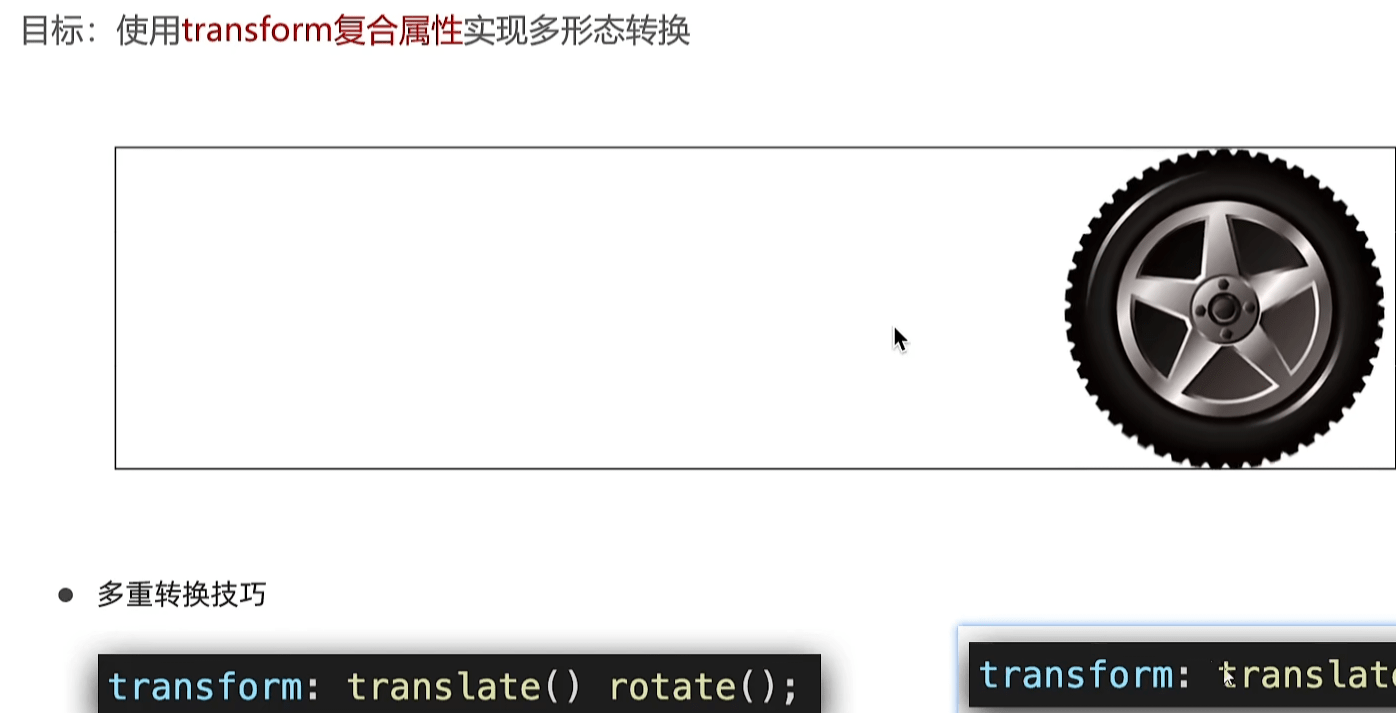
# 5.多重转换
# 6.缩放

# 三、渐变
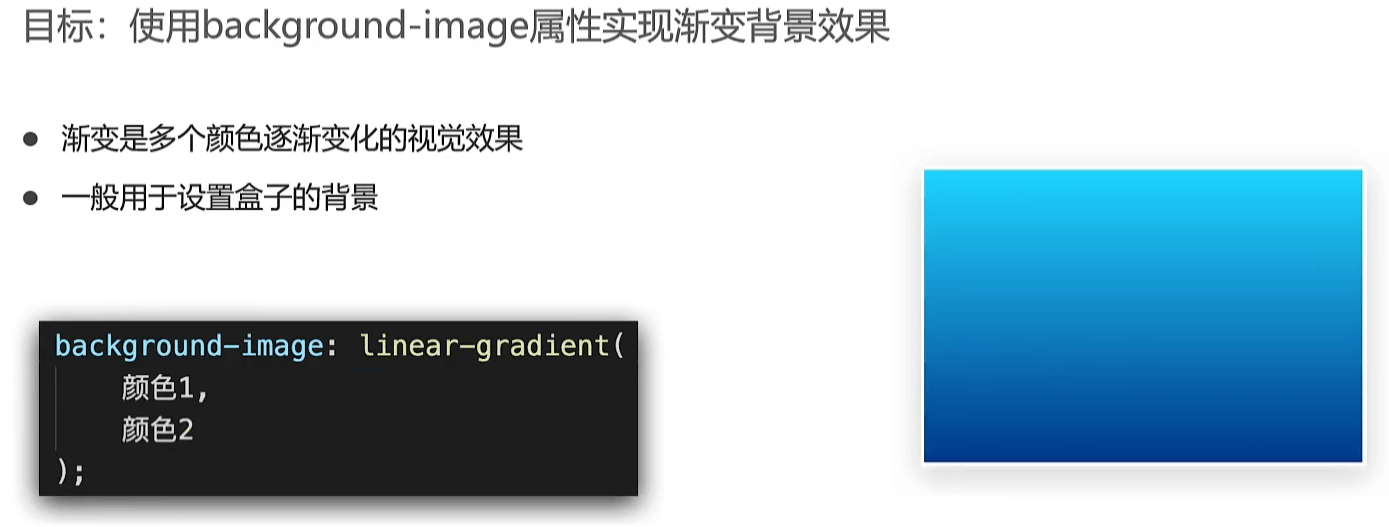
透明:transparent
# 四、空间转换
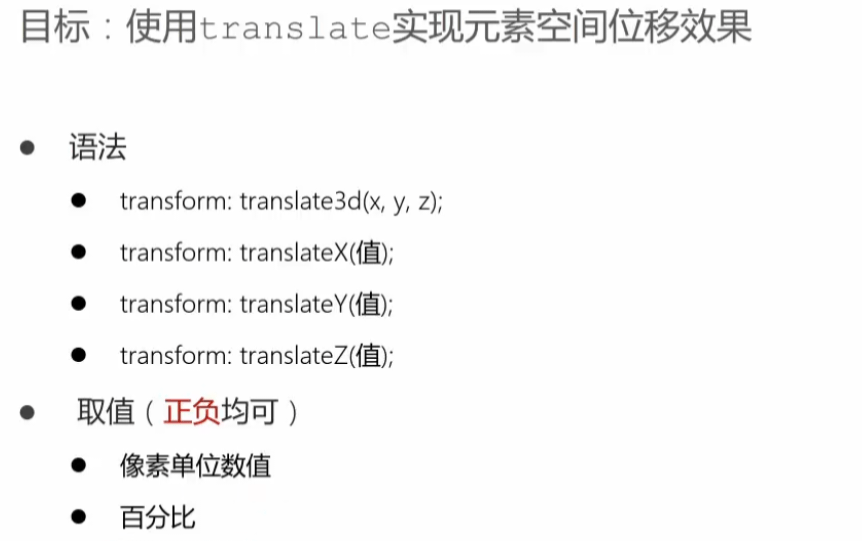
# 1.简介
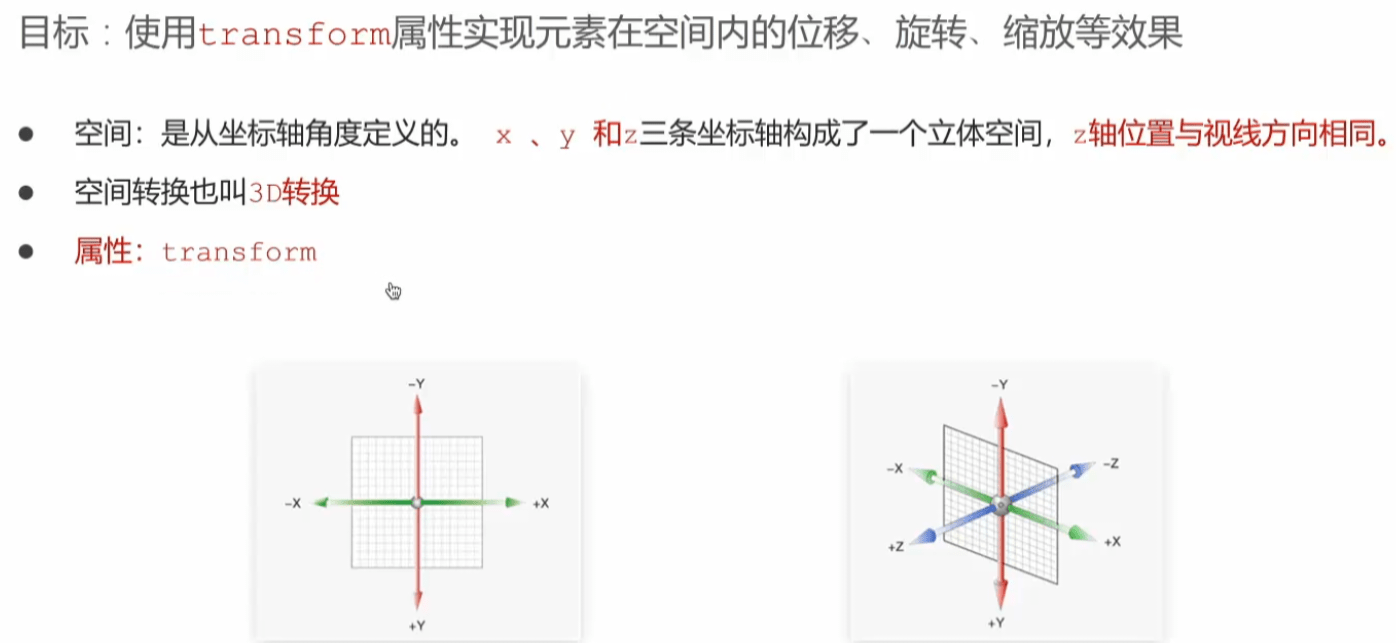
# 2.位移
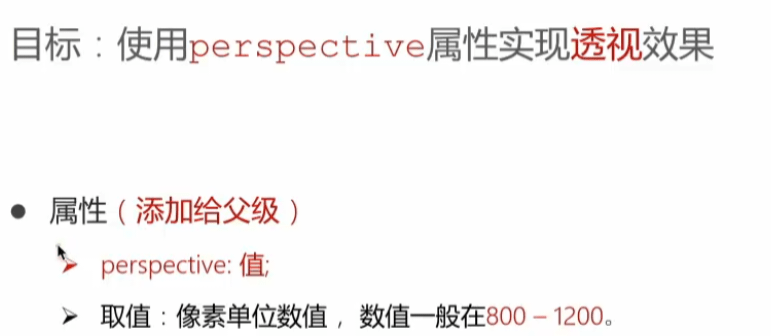
# 3.透视属性

# 4.原理

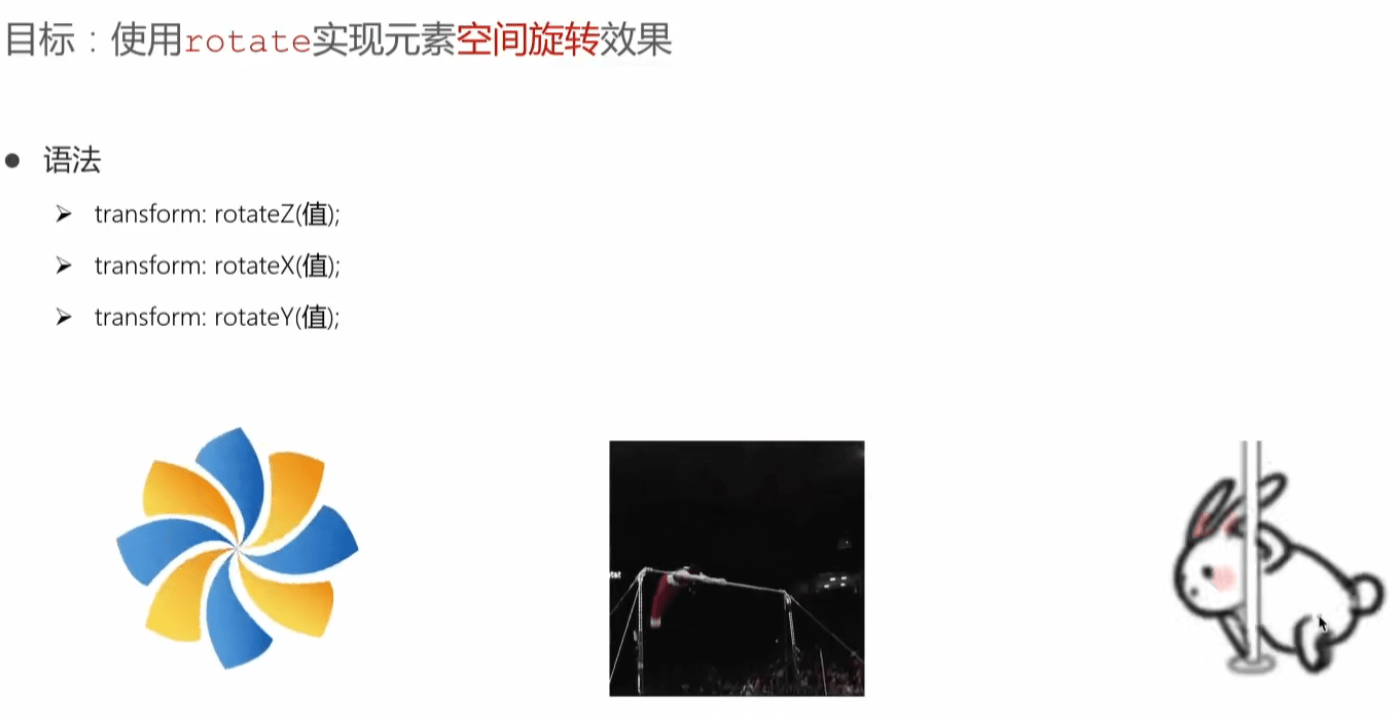
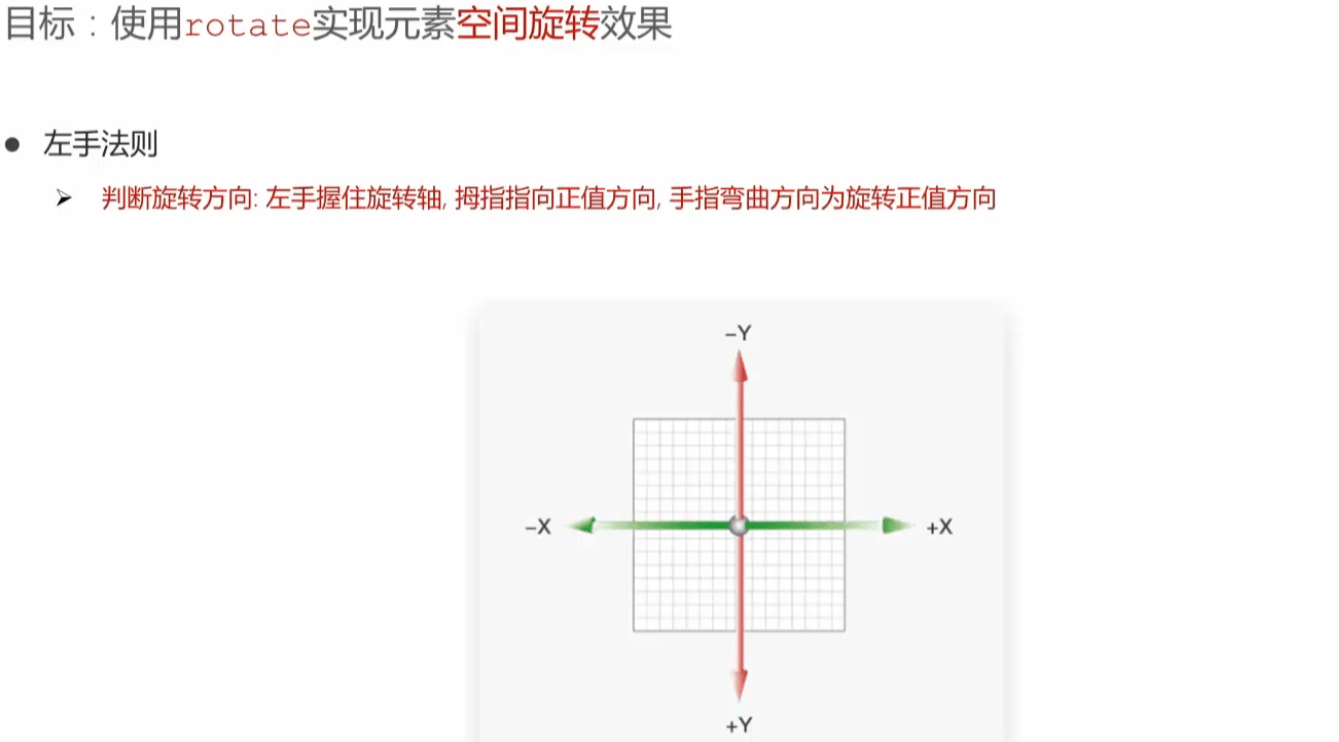
# 5.空间旋转
# 6.左手法则
# 拓展
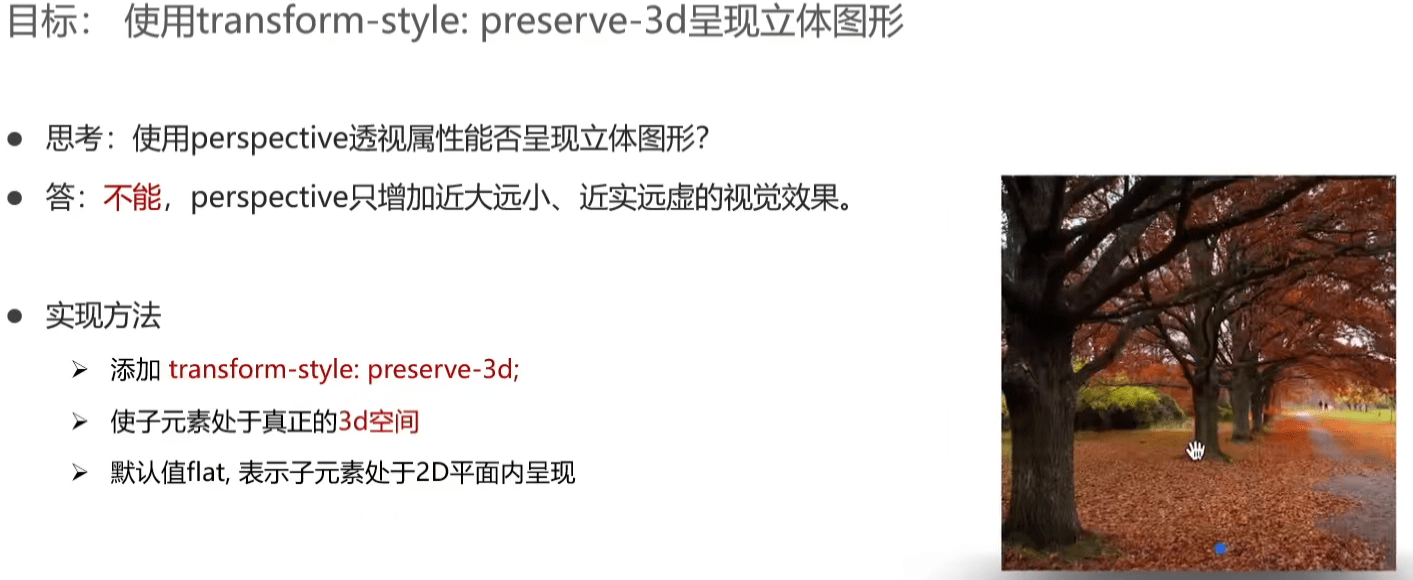
# 7.立体呈现
# 8.空间缩放
# 五、动画
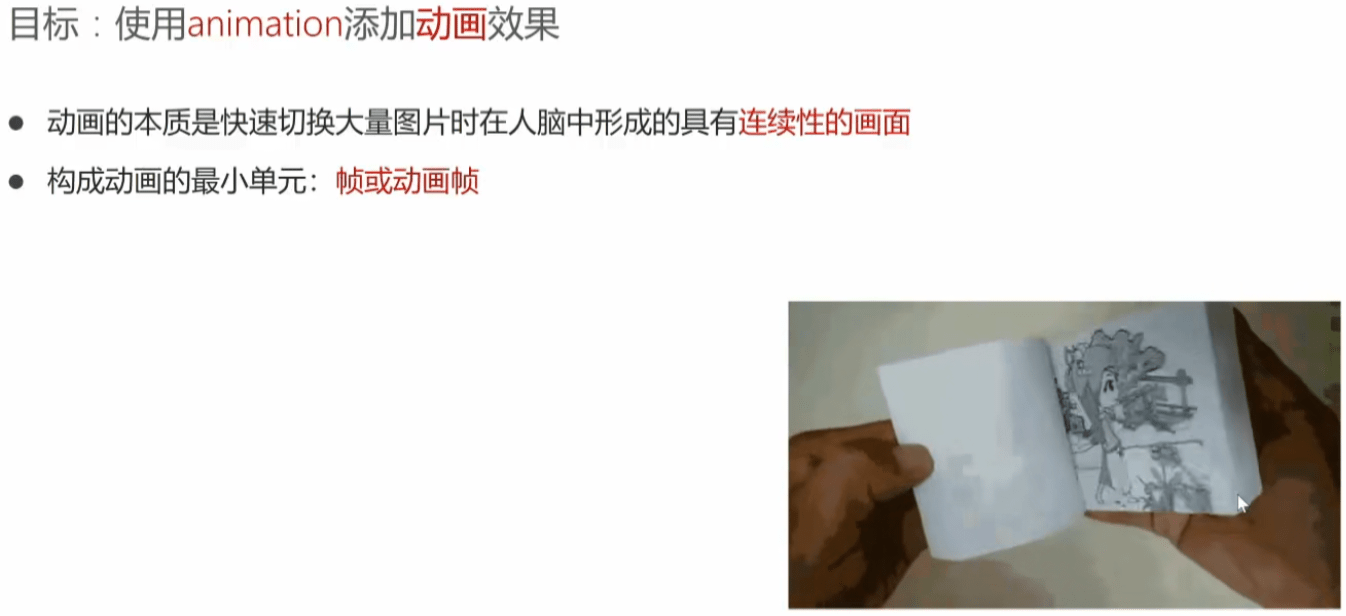
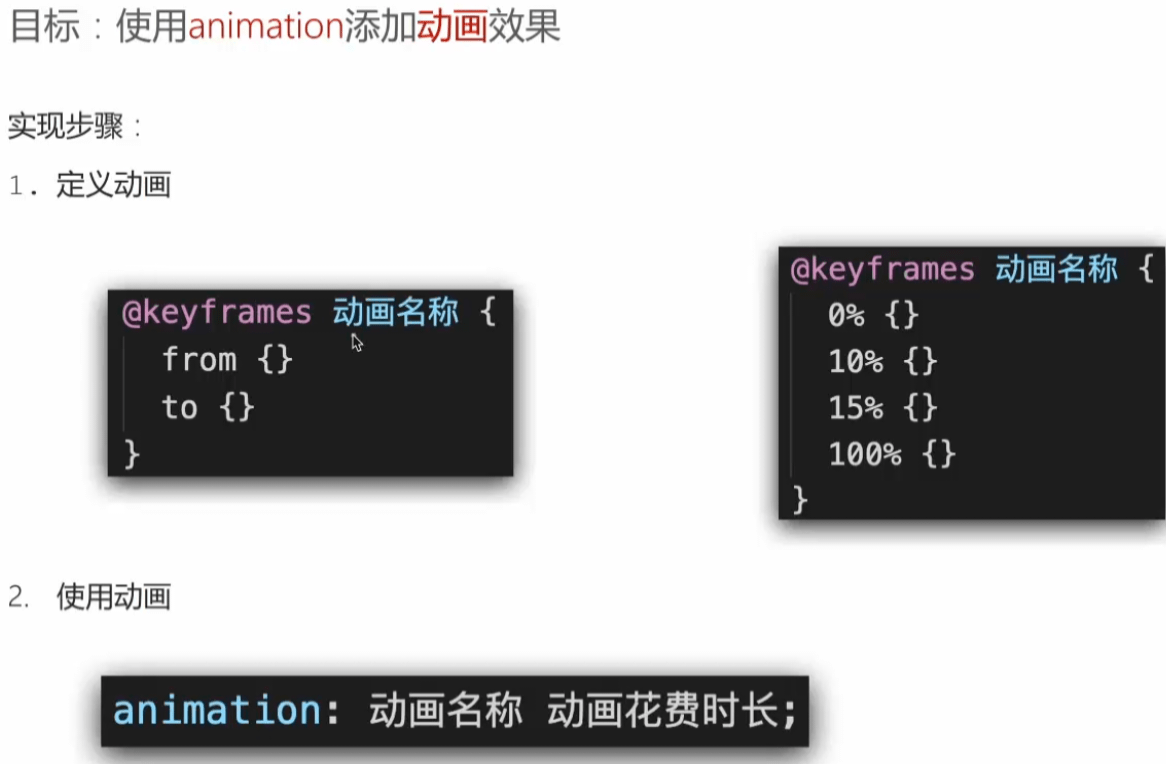
# 1.简介

# 2.实现步骤
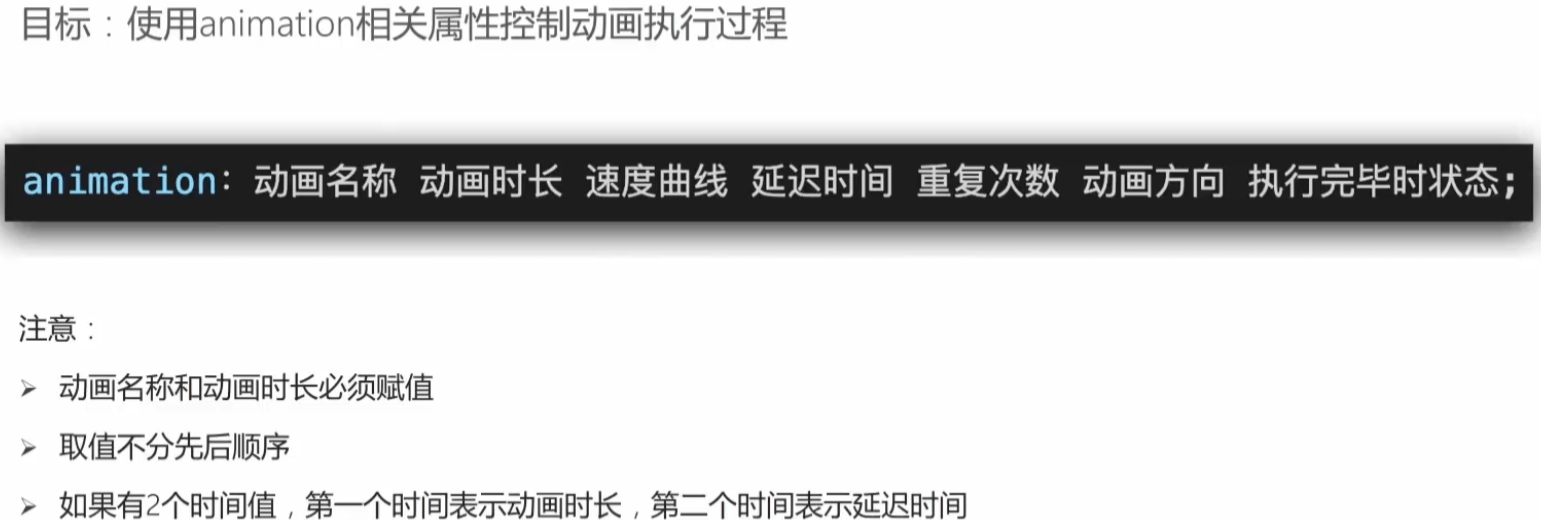
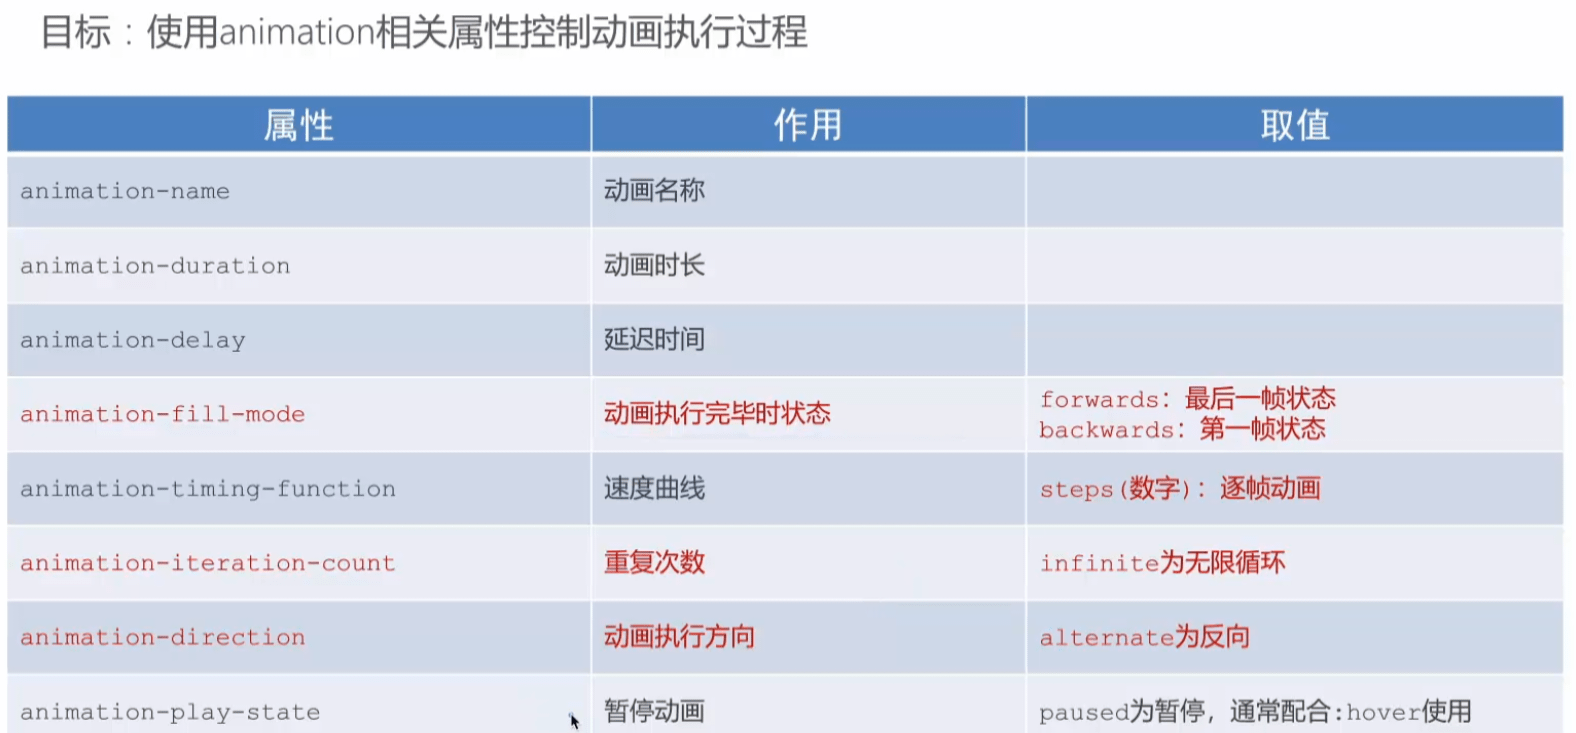
# 3.动画属性
# 4.animation拆分写法
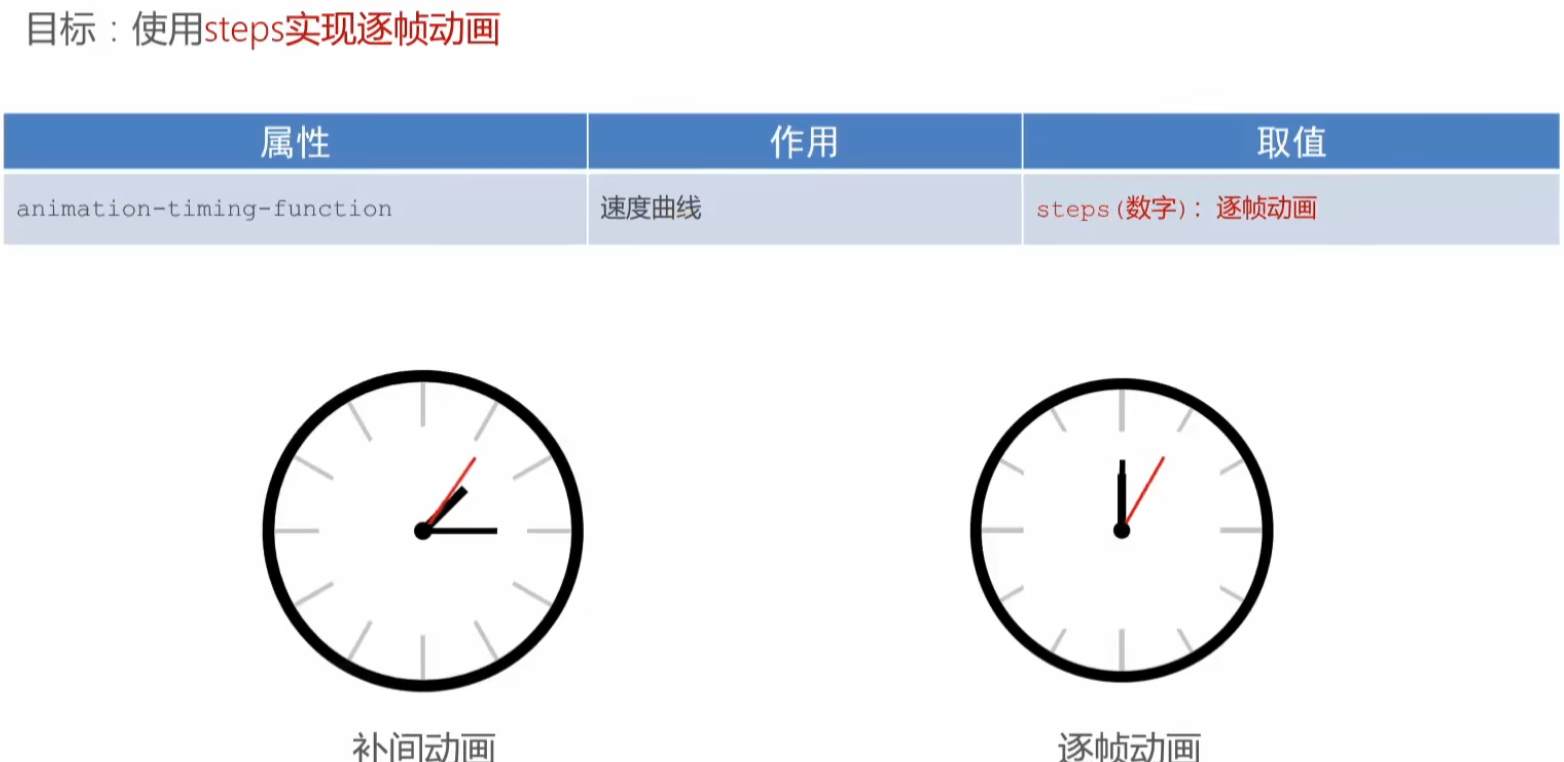
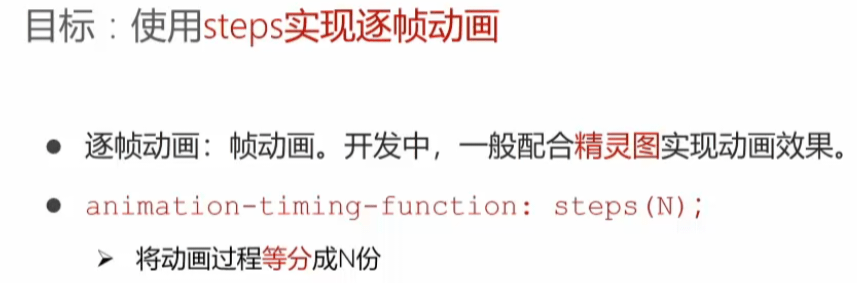
# 5.逐帧动画
# 1.简介
# 2.实现

# 6.多组动画

# 移动web开发实战
# 一、移动端特点
# 二、百分比布局
# 三、FLEX布局
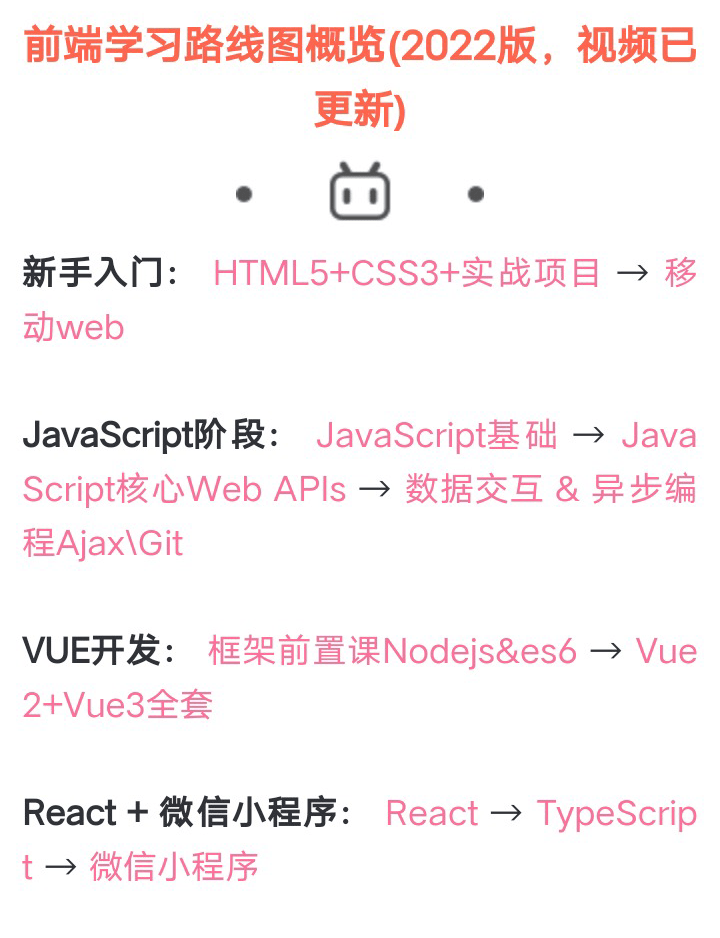
# JavaScript阶段:JavaScript基础JavaScript核心Web APIs→数据交互&异步编程Ajax\Git
# 第二阶段 技术进阶
# JavaScript深入浅出
# 劳资不学!!!!
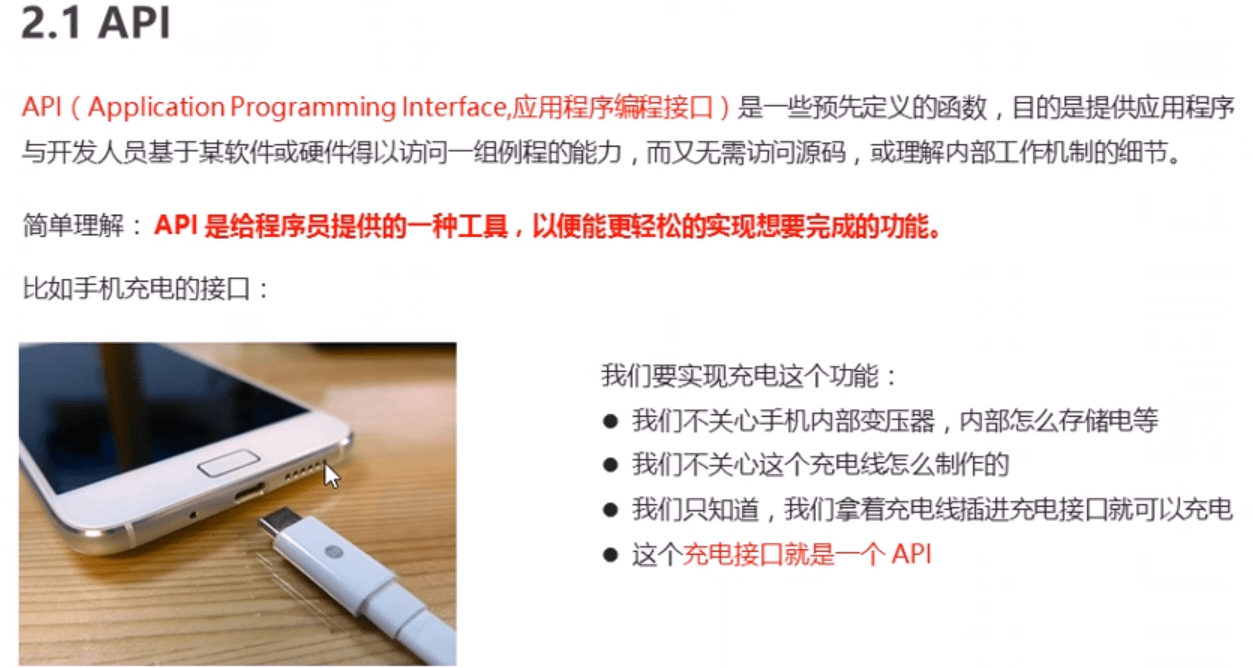
# JavaScript核心之web APIs

# 一、Web APIS导读
# 1.web apis 和 js 基础关联性
# 2.WebAPI 和 API
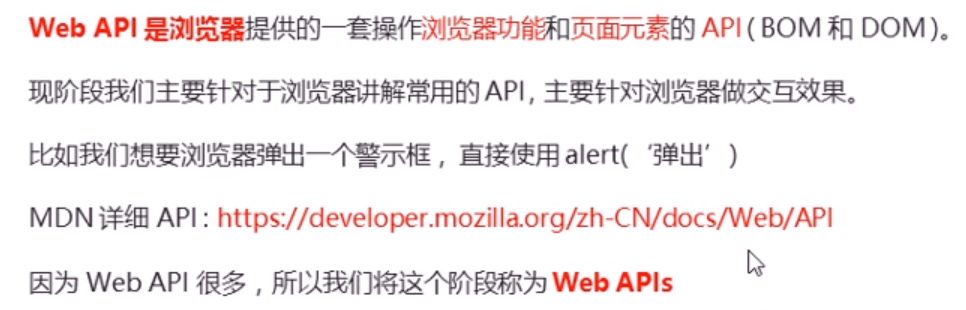
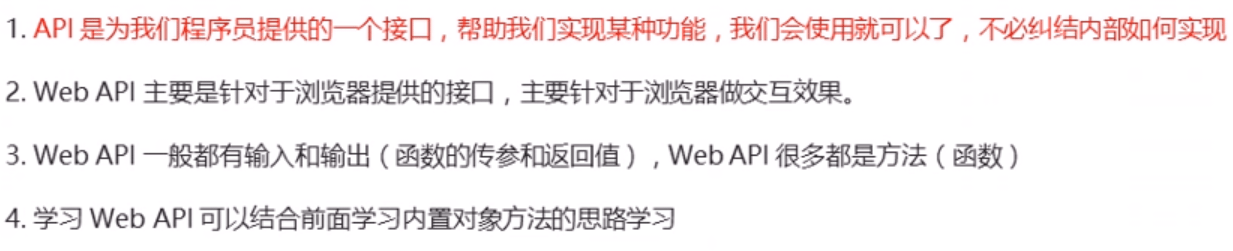
# 2.1 API
# 2.2 Web API
# 2.3 总结
# 二、DOM导读
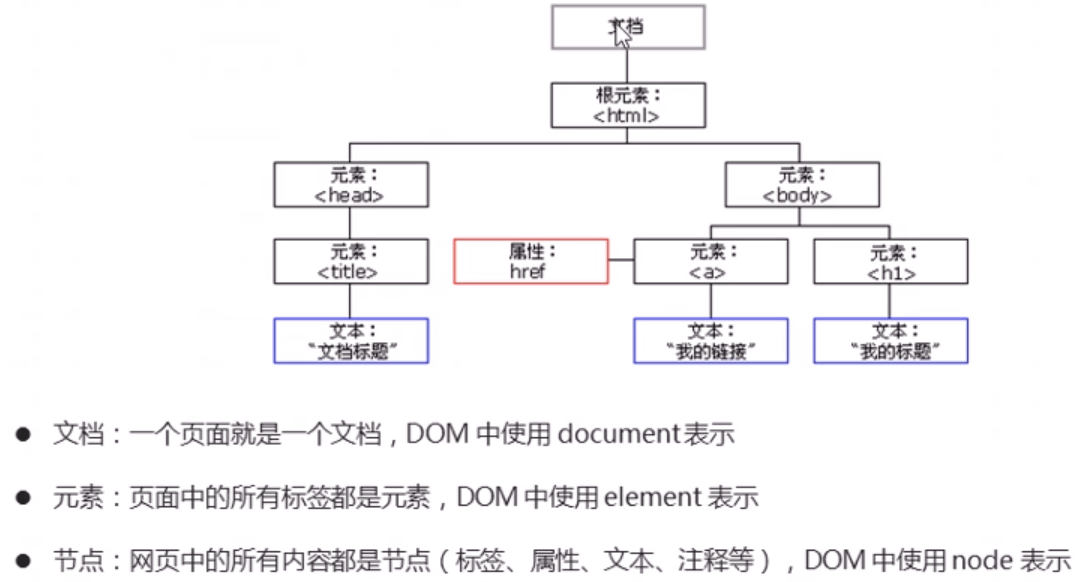
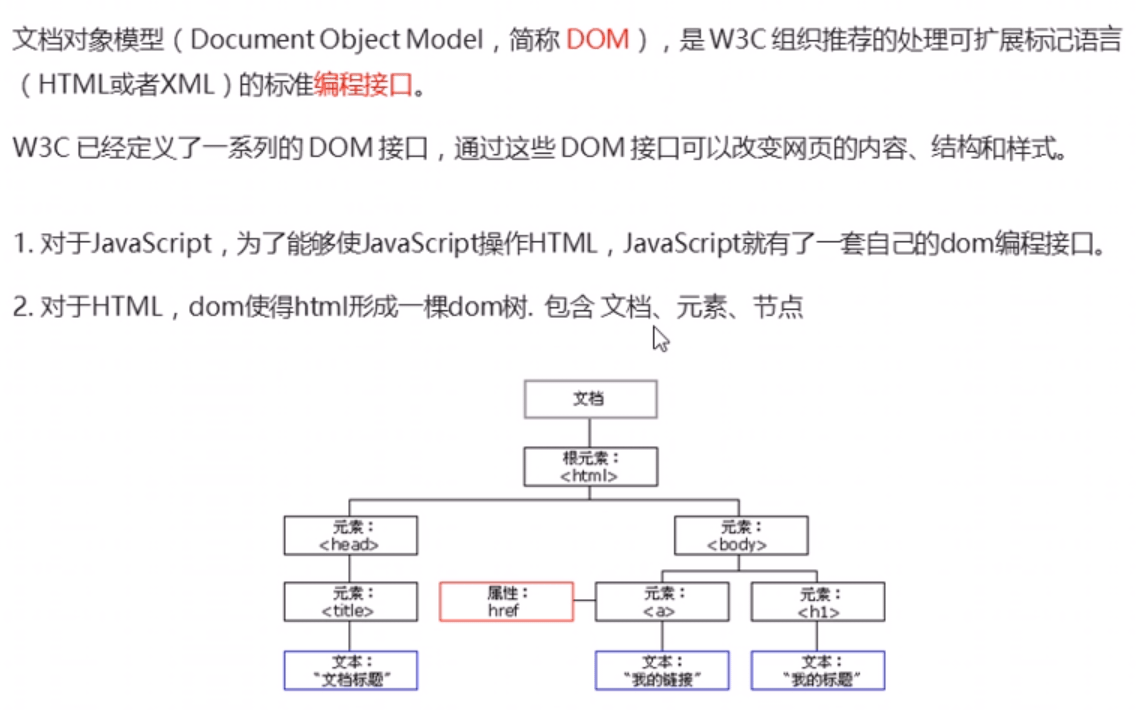
# 1.DOM简介
# 1.1什么是DOM

# 1.2 DOM树
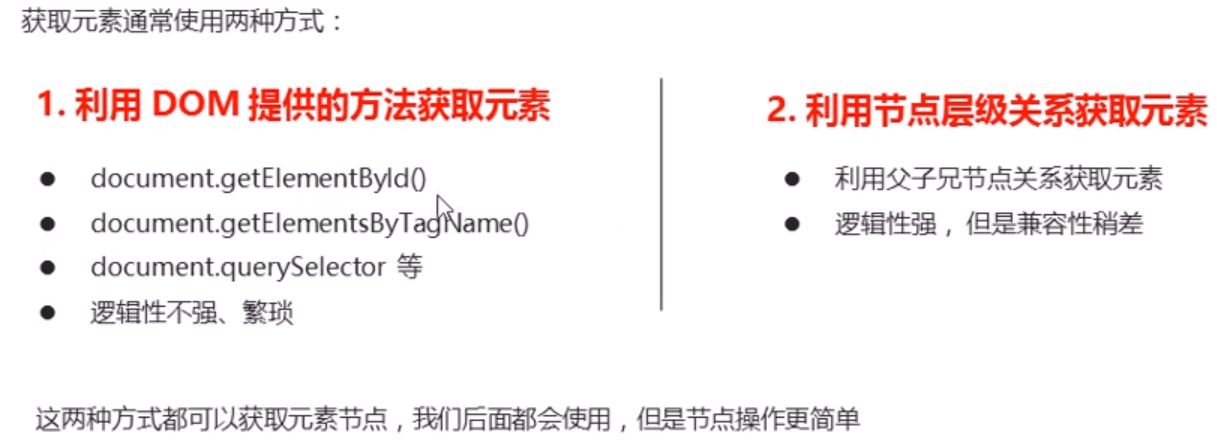
# 2.获取元素
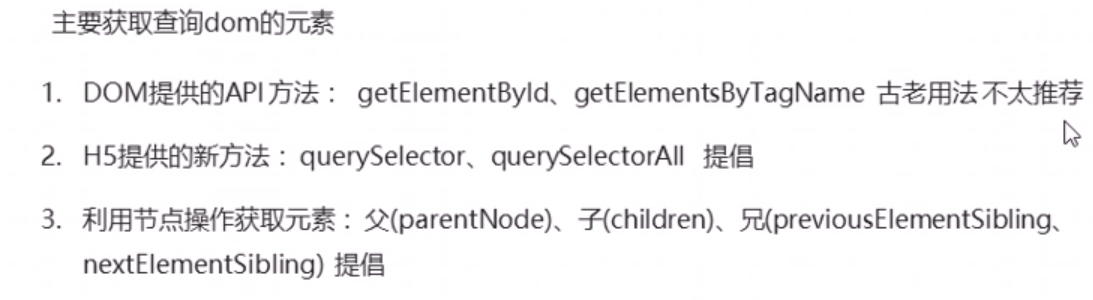
# 2.1 如何获取页面元素
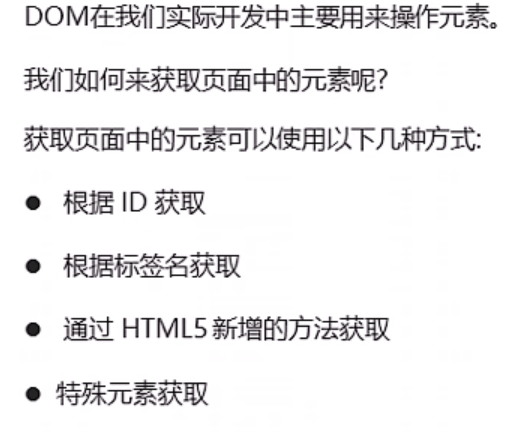
# 2.2 根据 ID 获取

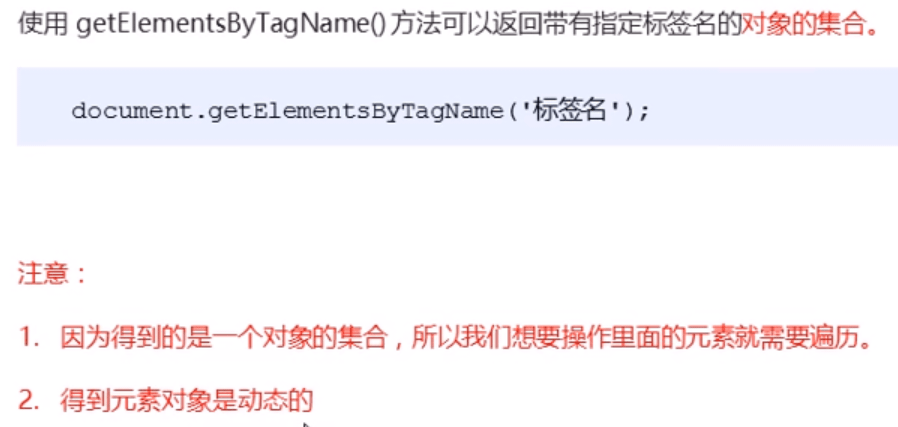
# 2.3 根据标签名获取
# 2.4 HTML新增获取元素方式

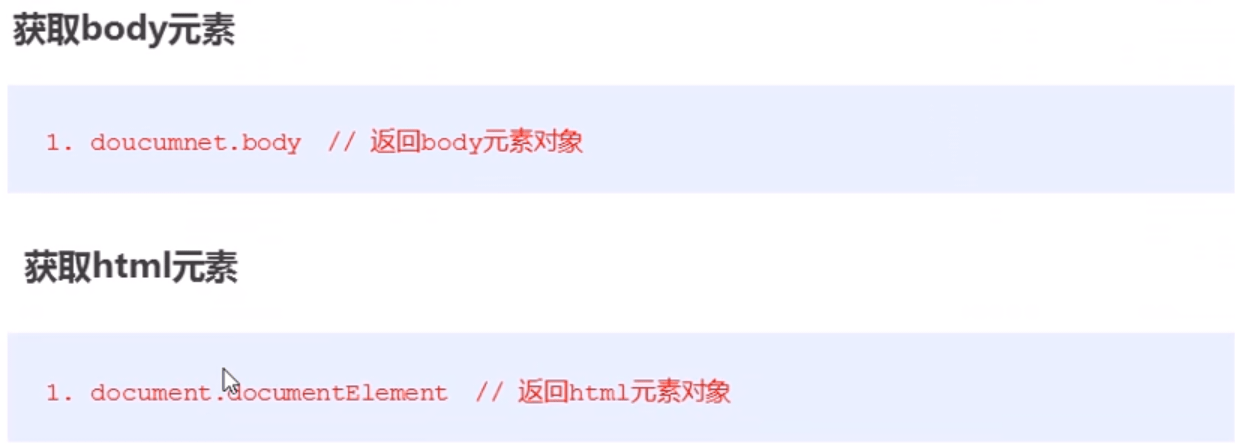
# 2.5 获取body和html标签
# 3.事件基础
# 3.1 事件概述

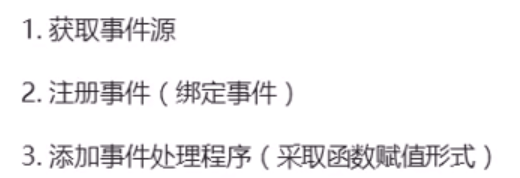
# 3.2 执行事件的步骤
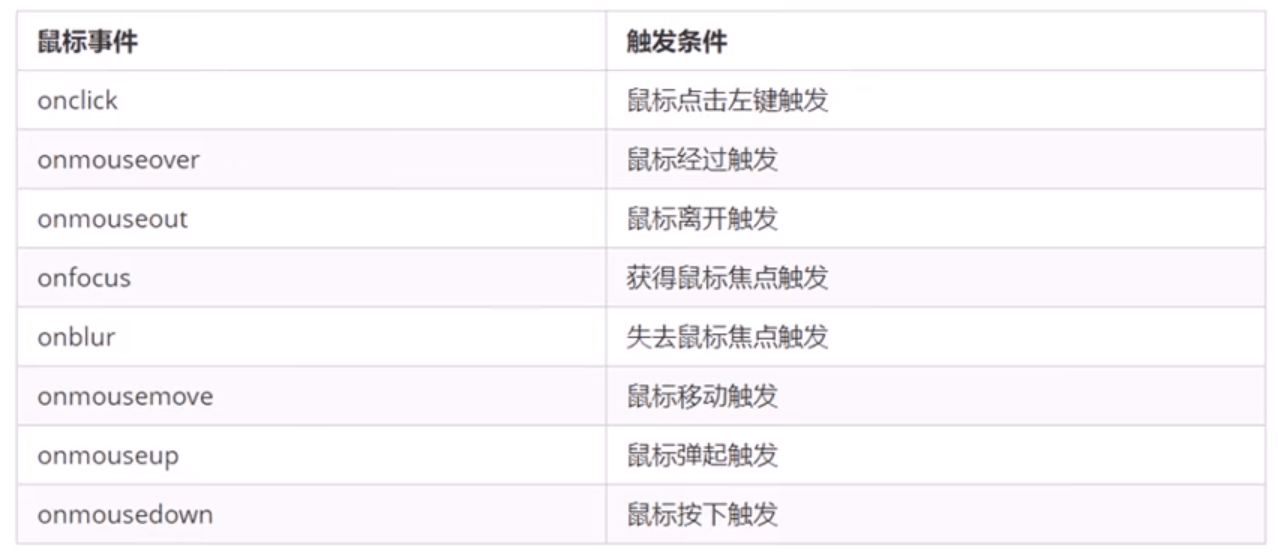
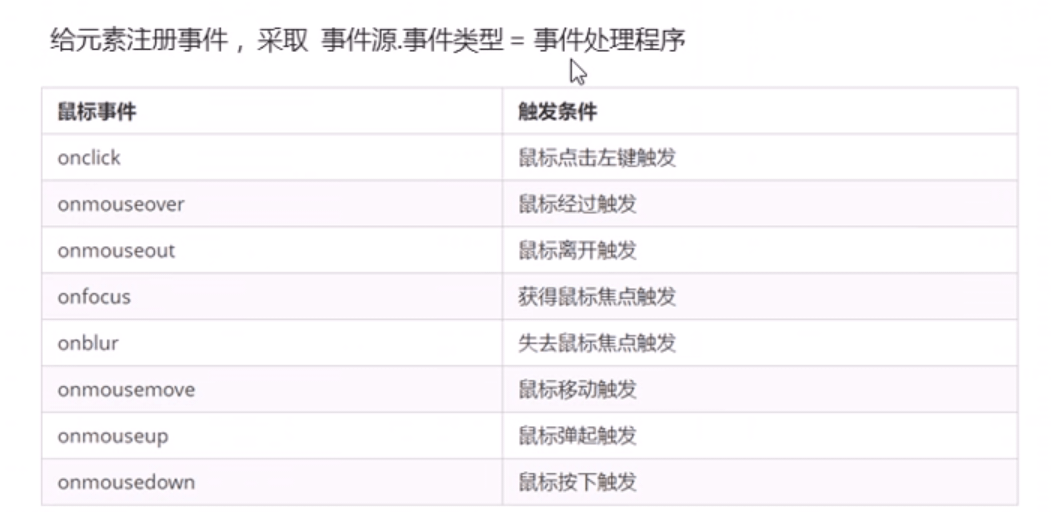
# 3.3 常见的鼠标事件
# 3.4 分析事件三要素

# 4.操作元素

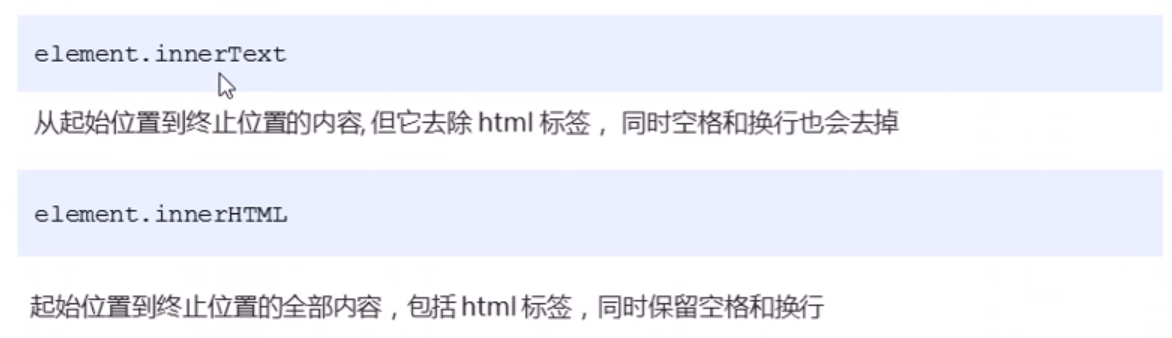
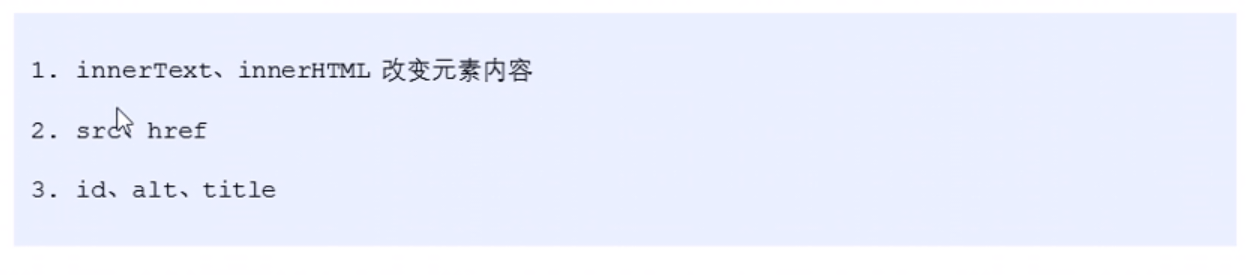
# 4.1 改变元素的内容
# 4.2 常用元素的属性操作
# 4.3 表单元素的属性操作

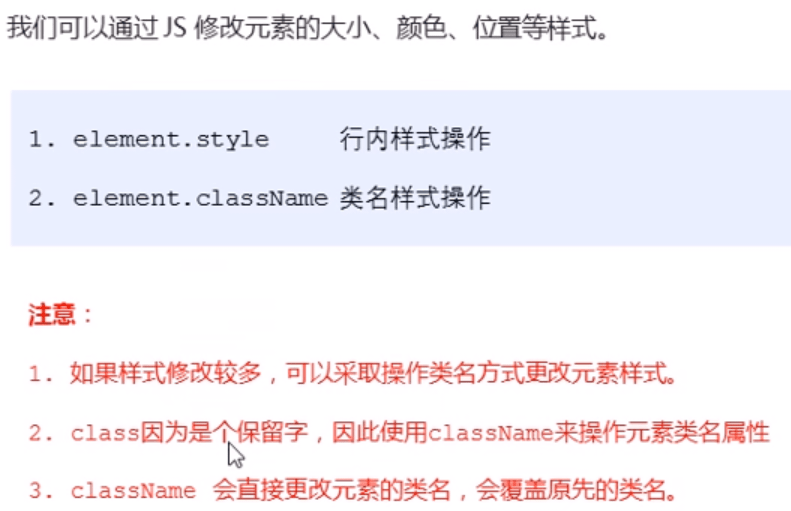
# 4.4 样式属性操作
# 4.5 排他思想
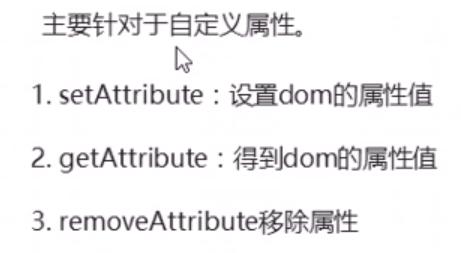
# 4.6 自定义属性的操作
# 4.6.1.获取属性值
# 4.6.2.设置属性值
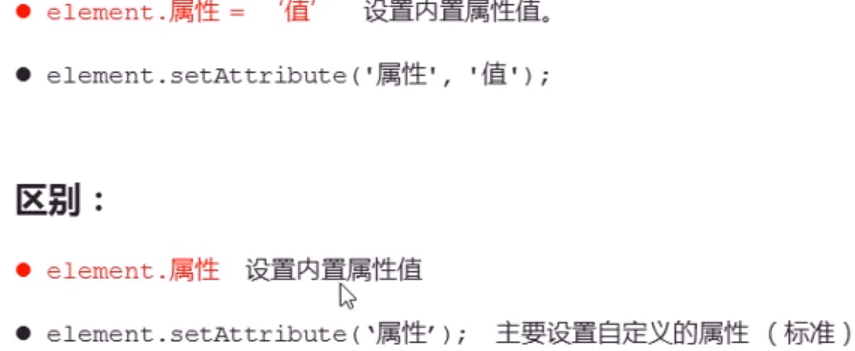
# 4.6.3.移除属性

# 4.7 H5自定义属性
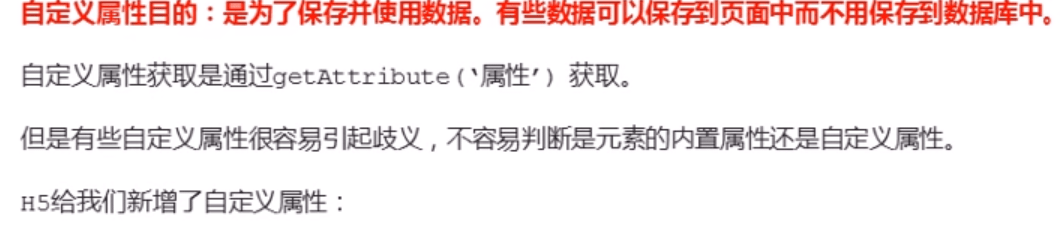
# 4.7.1 设置H5自定义属性

# 4.7.2 获取H5自定义属性

# 5.节点操作
# 5.1 为什么学节点操作
# 5.2 节点概述
# 5.3 节点层级

# 5.3.1 父级节点
 ‘
‘
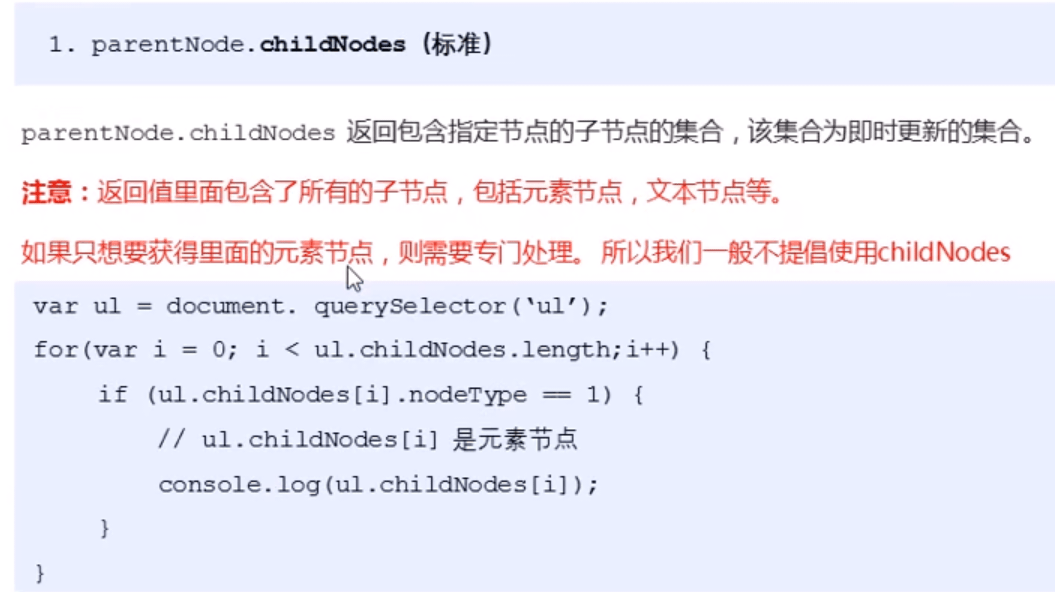
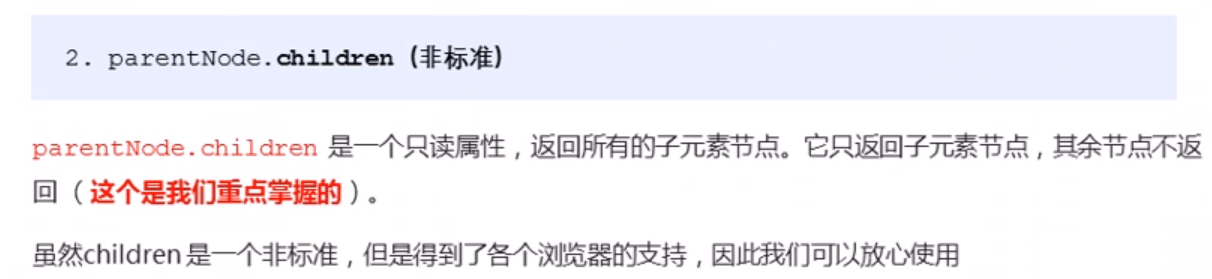
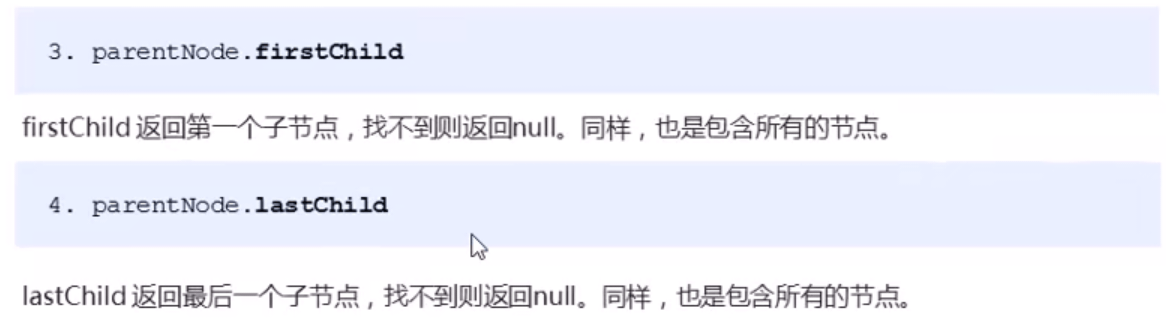
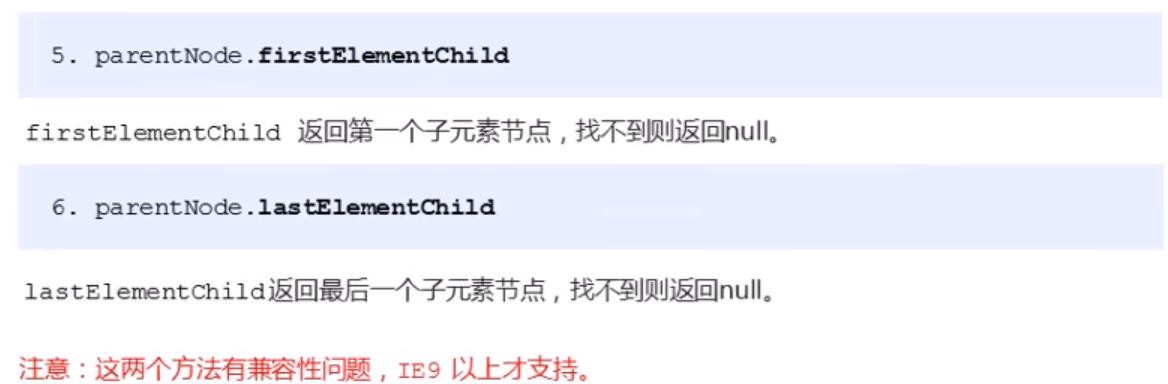
# 5.3.2 子节点
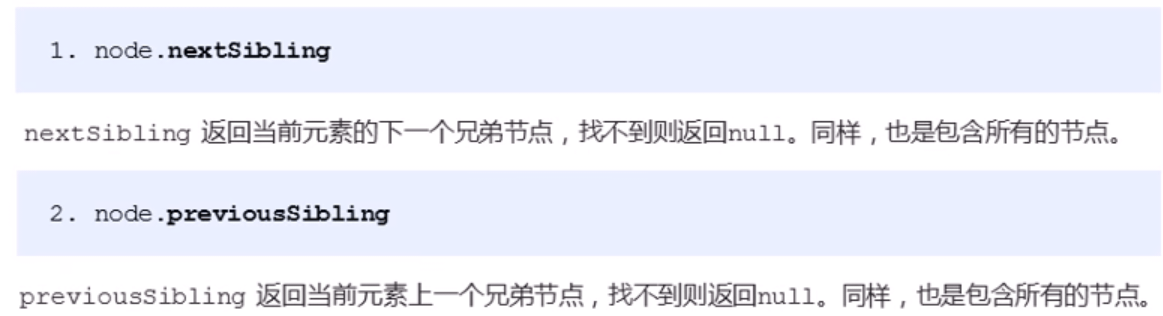
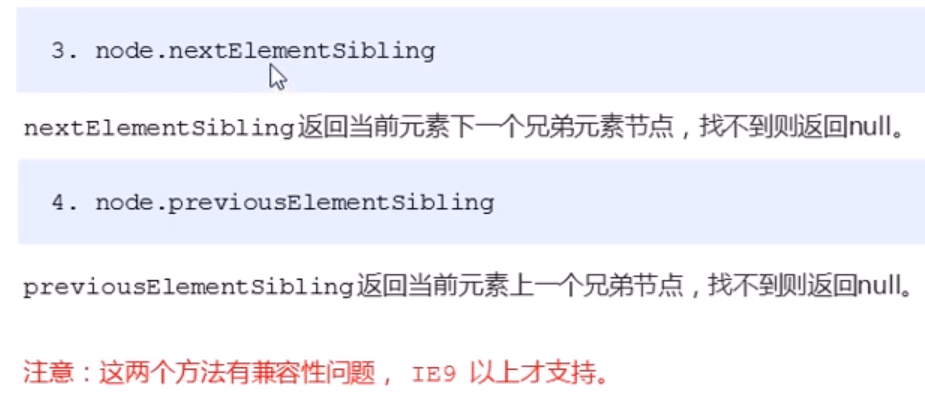
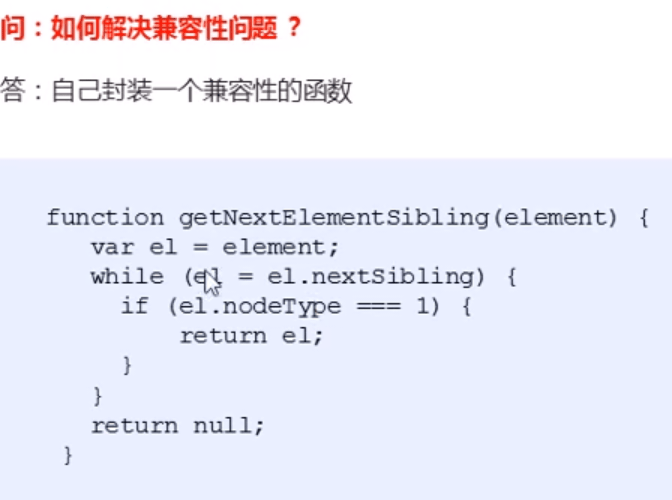
# 5.3.3 兄弟节点
# 5.4 创建节点

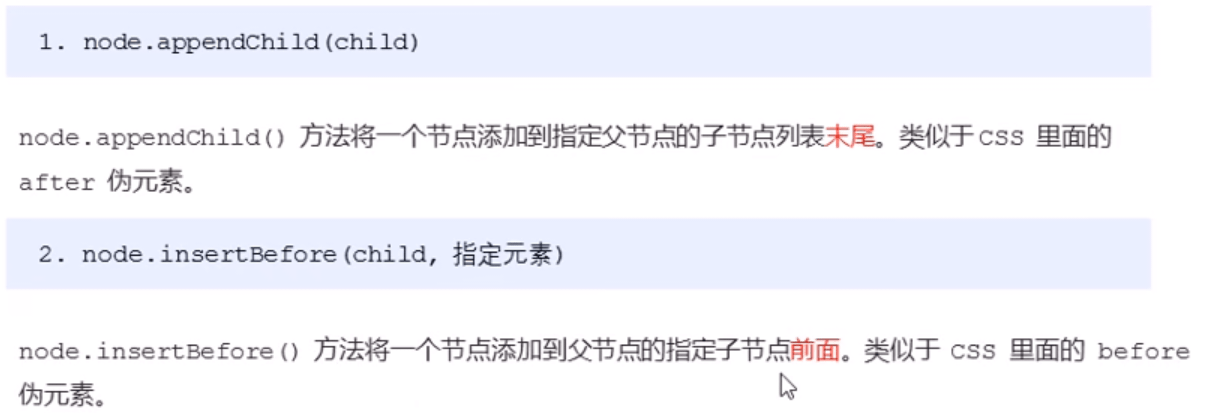
# 5.5 添加节点
# 5.6 删除节点

# 5.7 复制节点

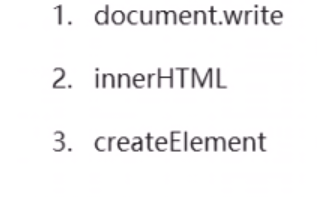
# 5.8 三种动态创建元素方法区别
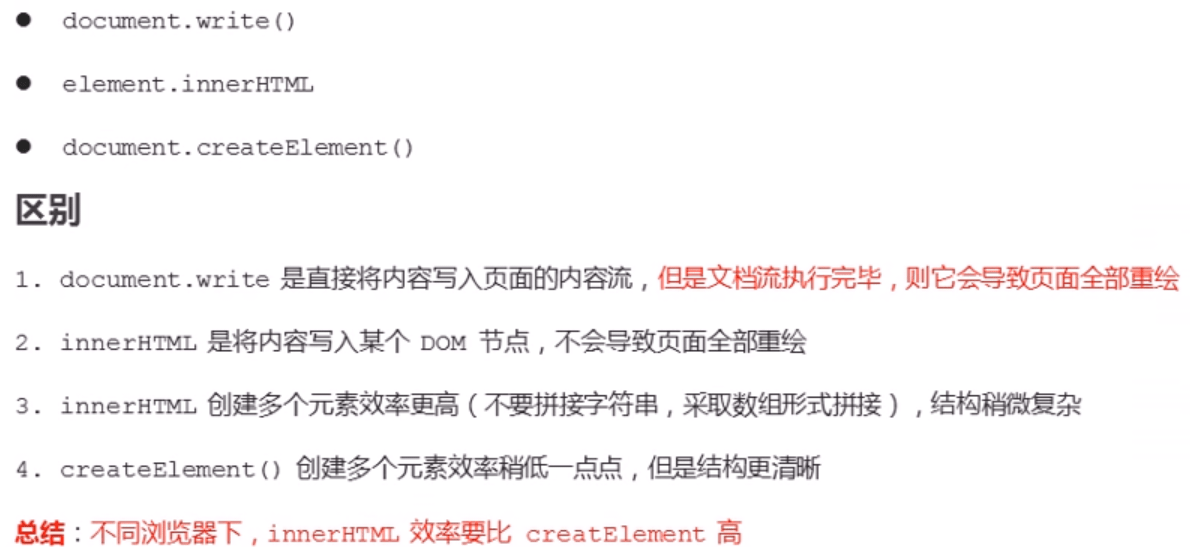
# 6.DOM重点核心

# 6.1 创建
# 6.2 增

# 6.3 删

# 6.4 改

# 6.5 查
# 6.6 属性操作
# 6.7 事件操作
# 三、事件高级导读
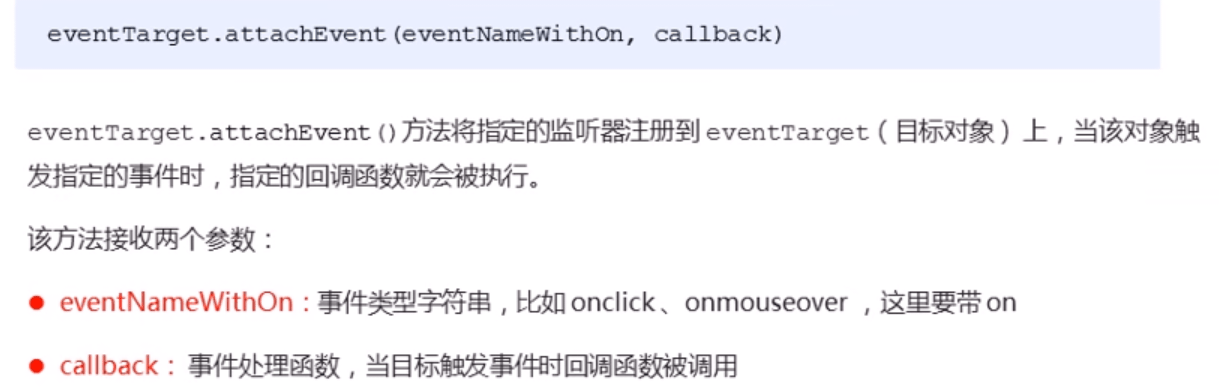
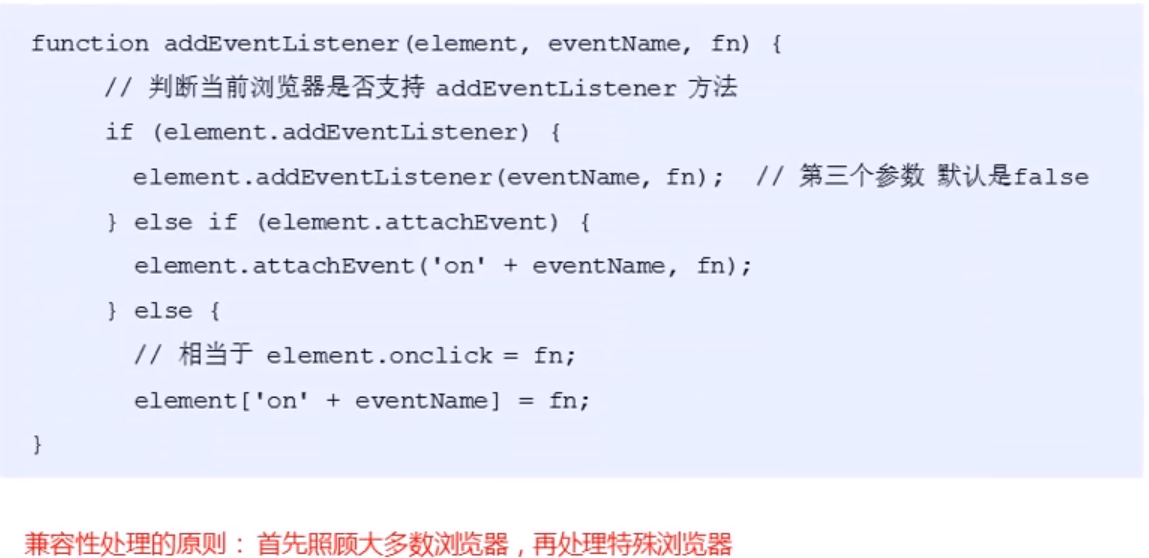
# 1.注册事件
# 1.1 注册事件概述
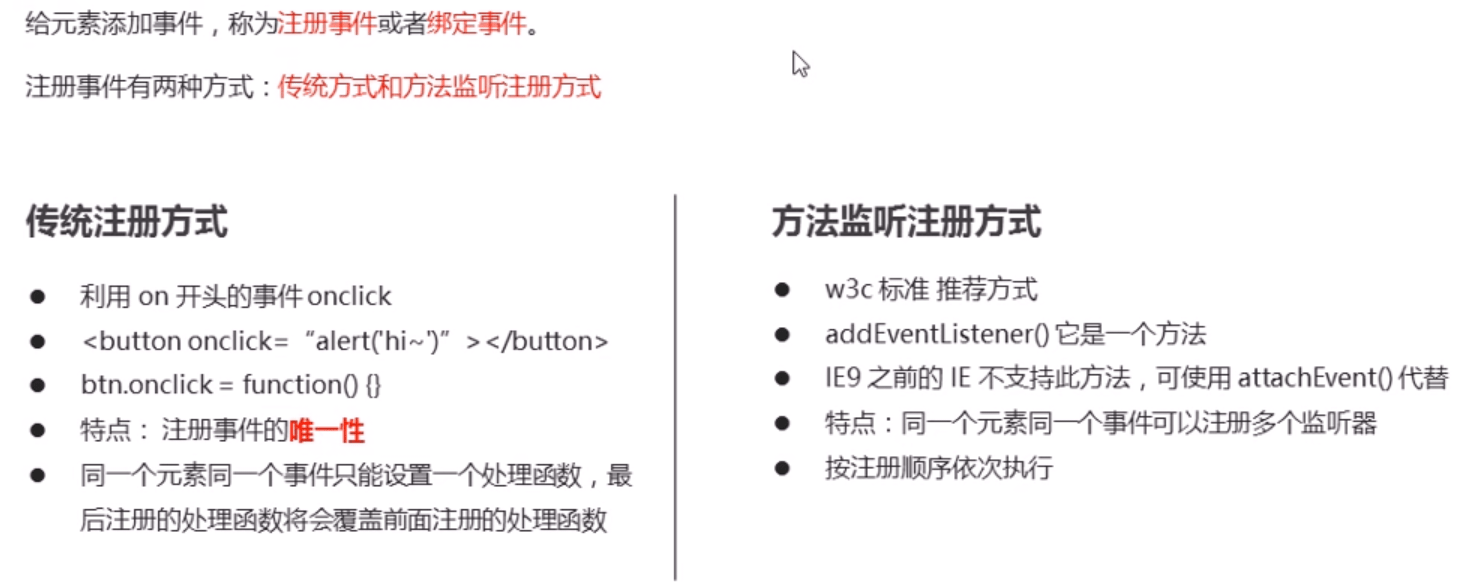
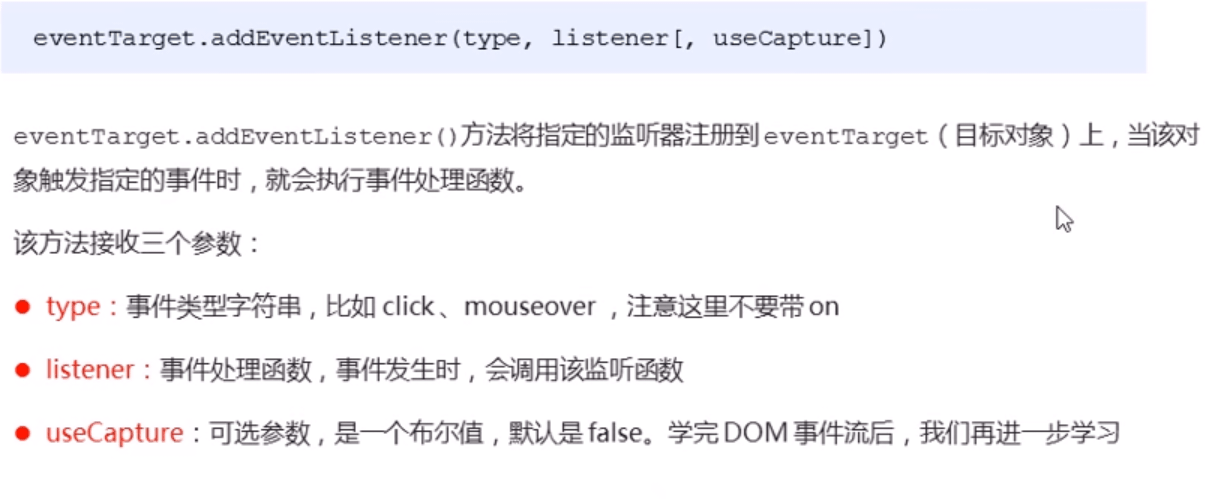
# 1.2 addEventListener 事件监听方式
# 1.3 attachEvent 事件监听方式(几乎不支持了)
# 1.4 注册事件兼容性解决问题
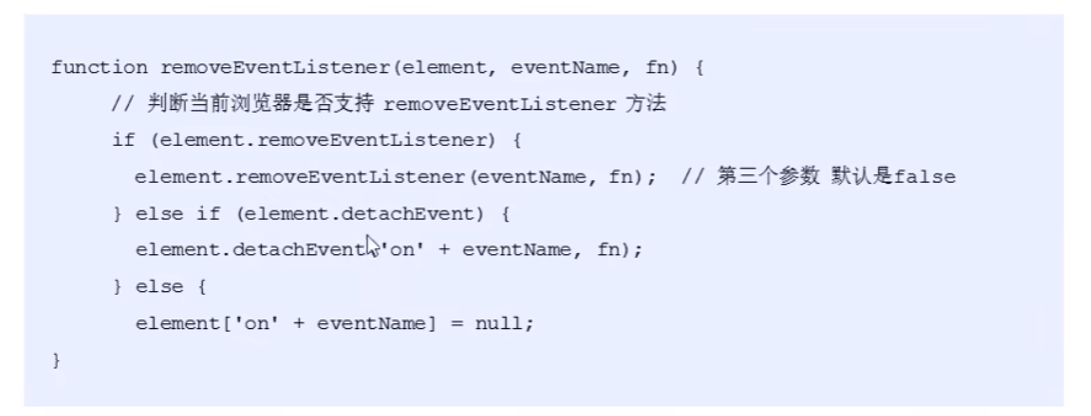
# 2.删除事件(解绑事件)
# 2.1 删除事件的方式
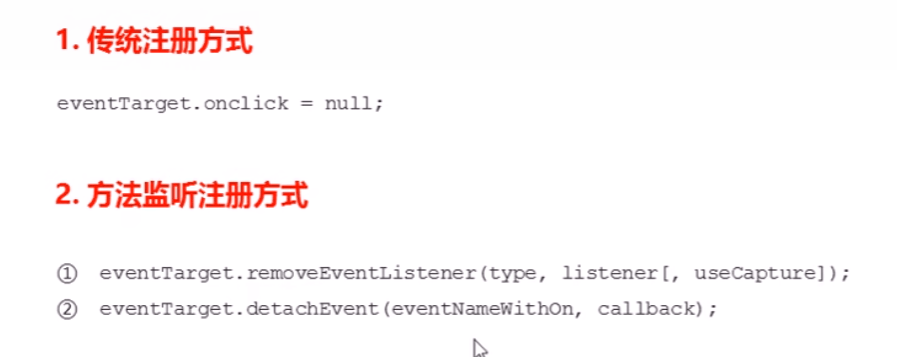
# 2.2 删除事件兼容性解决方案
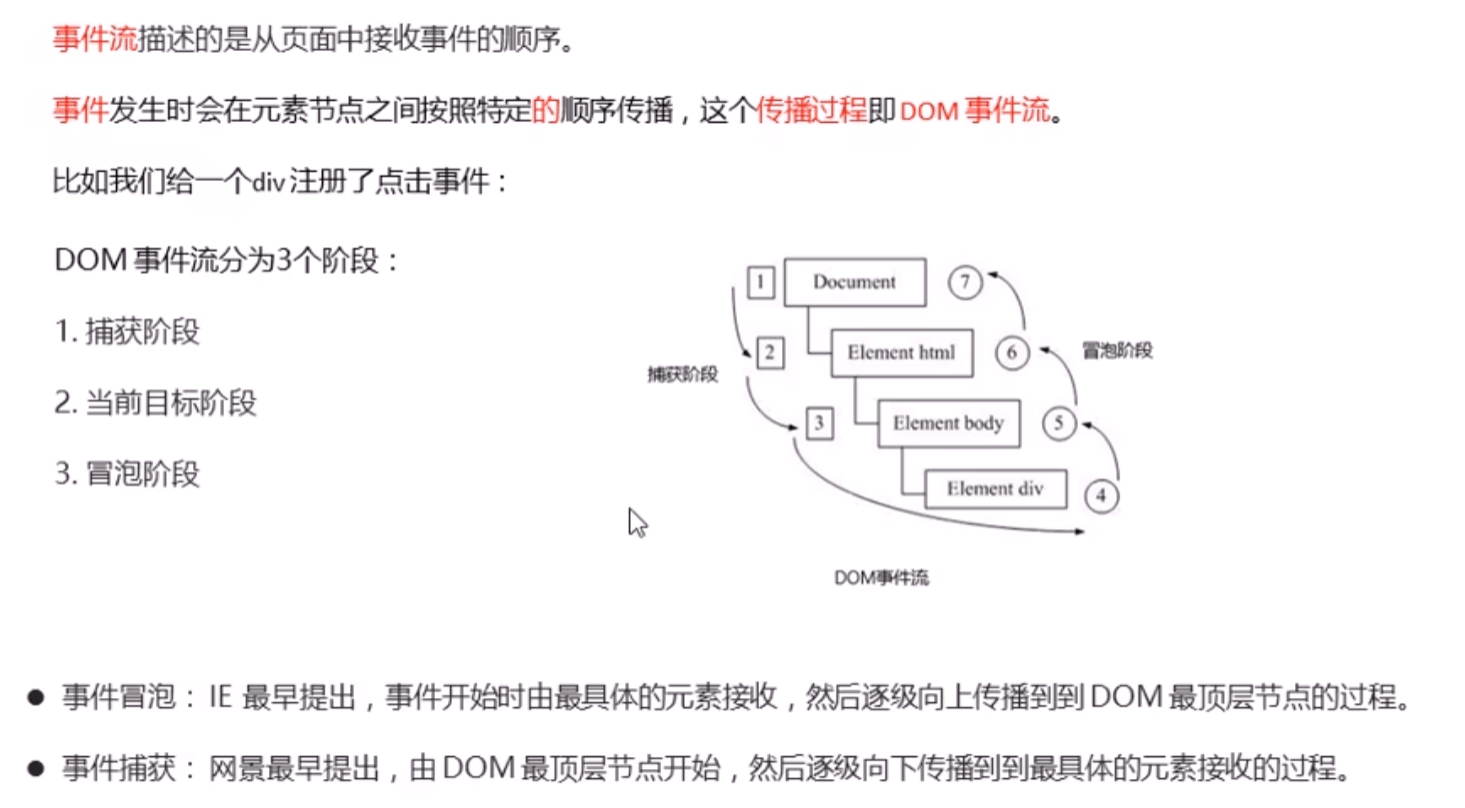
# 3.DOM 事件流

# 4.事件对象
# 4.1 什么是事件对象
# 4.2 事件对象的使用方法
# 4.3 兼容性问题
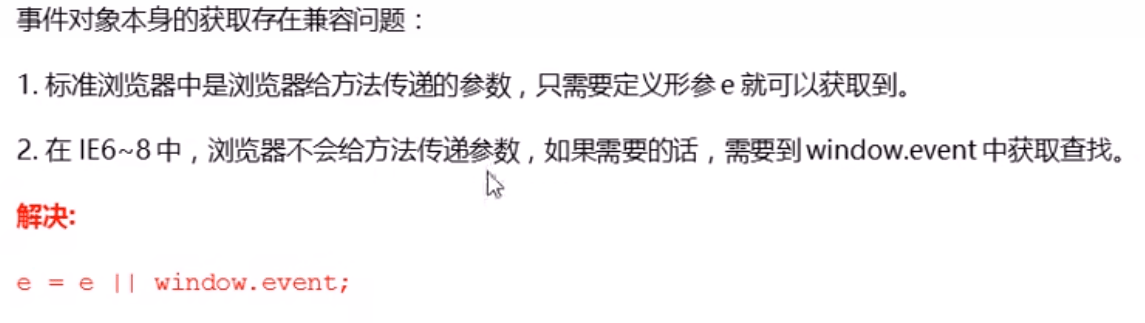
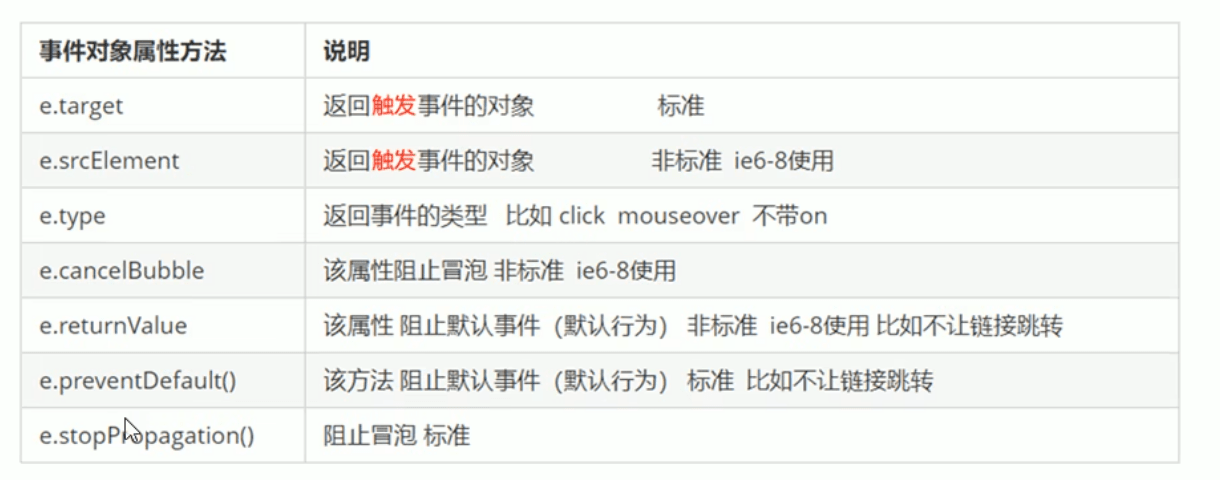
# 4.4 事件对象的常见属性和方法
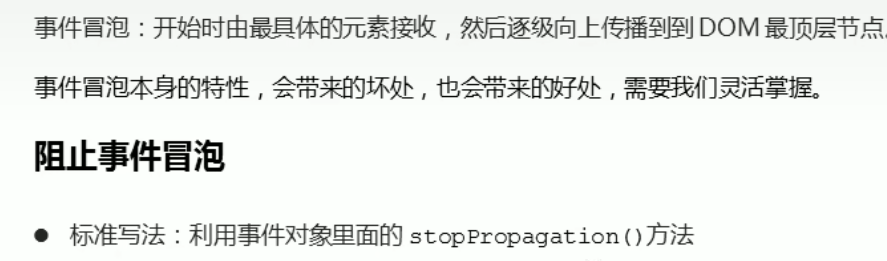
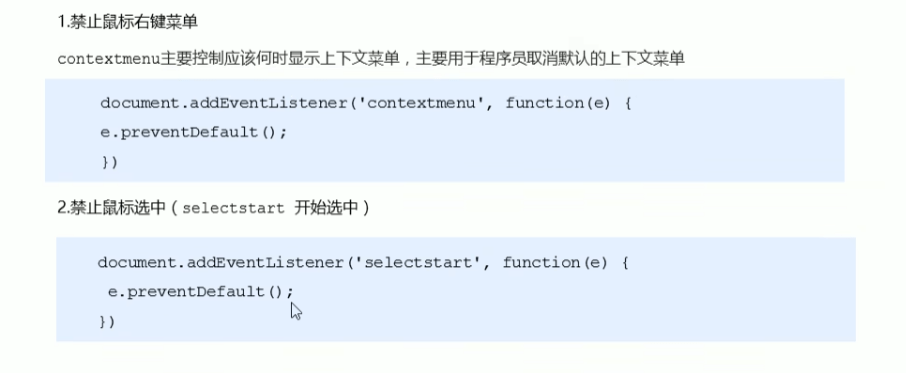
# 5.阻止事件冒泡
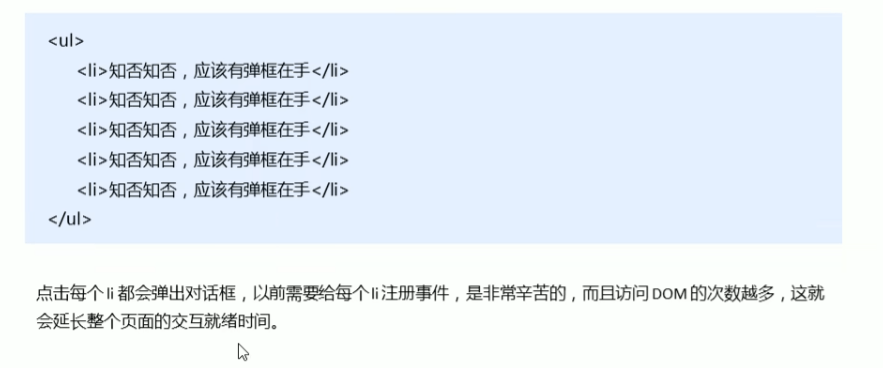
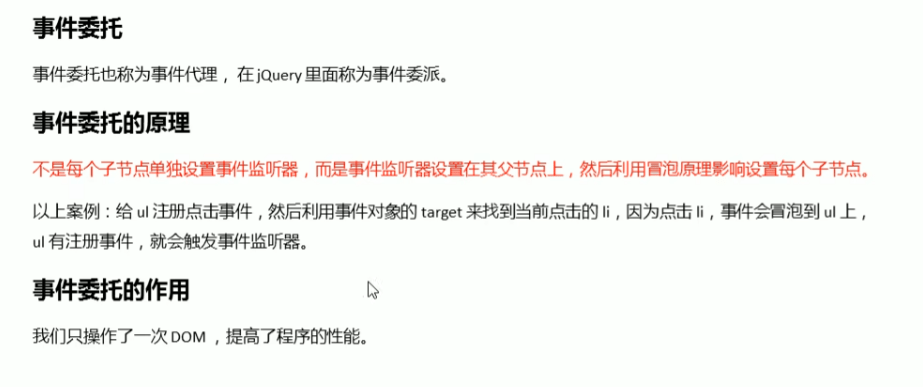
# 6.事件委托


# 7.常用的鼠标事件
# 7.1常用的鼠标事件
# 7.2鼠标事件对象

重点:page
# 8.常用的键盘事件
# 8.1常用键盘事件
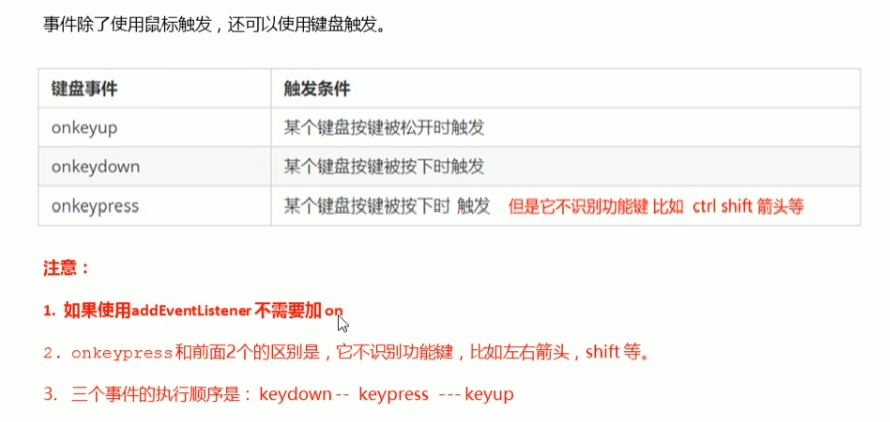
# 8.2键盘事件对象
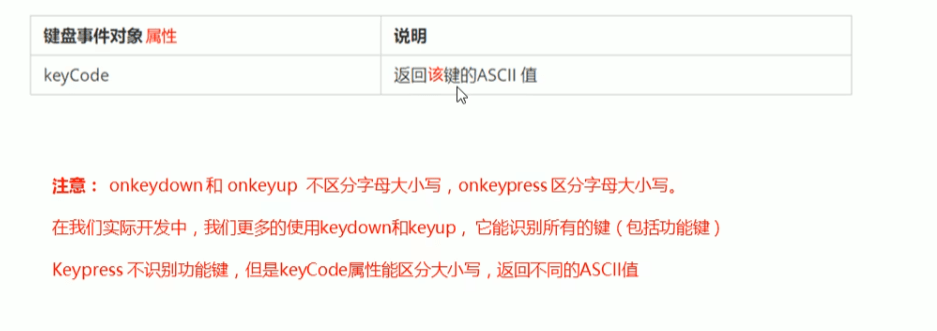
# 8.3ASCLL表

# 四、BOM导读
# 1.BOM概述
# 1.1什么是BOM

# 1.2BOM的构成

# 2.Windows对象的常见对象
# 2.1窗口加载事件
# 2.2 调整窗口大小事件
# 3.定时器
# 3.1两种定时器

# 3.2 setTimeout() 定时器
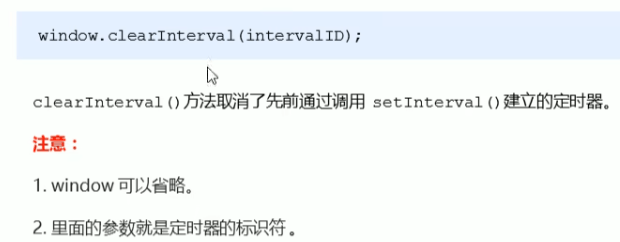
# 3.3 停止 setTimeout()定时器
# 3.4 setinterval() 定时器
# 3.5 停止 setinterval() 定时器
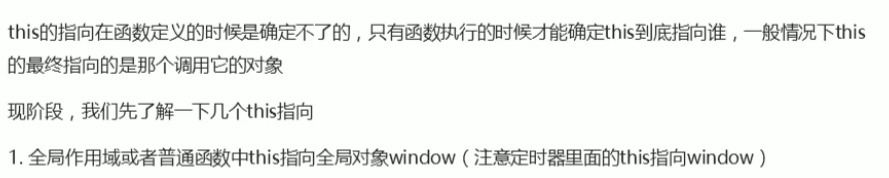
# 3.6 this
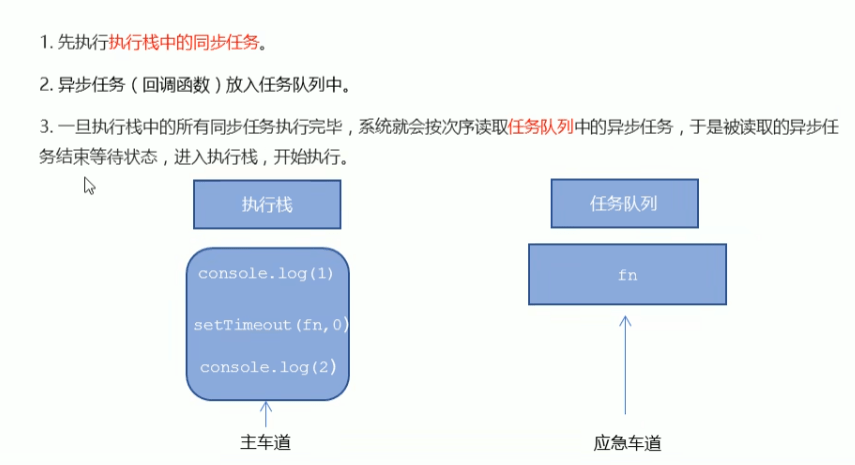
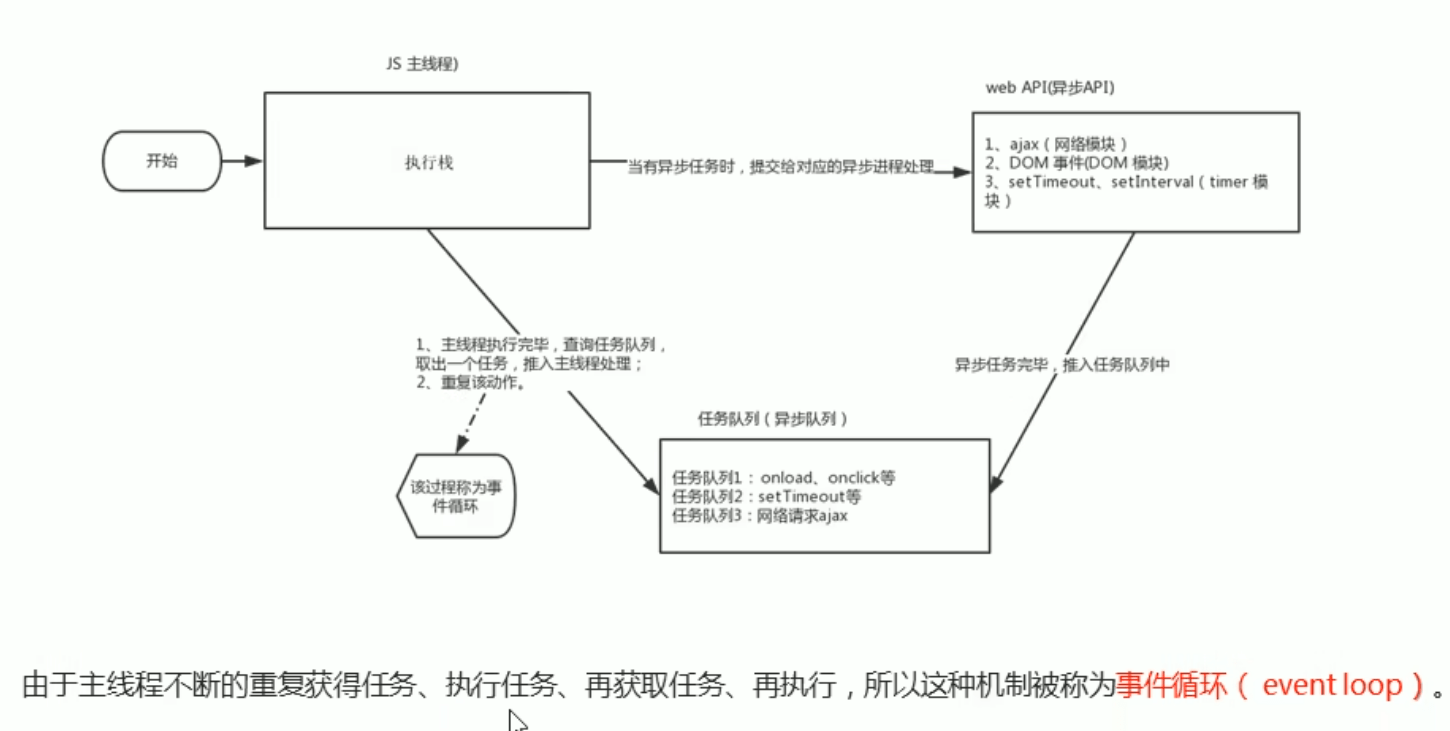
# 4. JS 执行机制
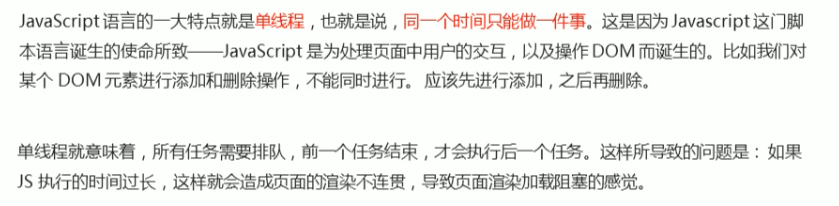
# 4.1 JS 是单线程
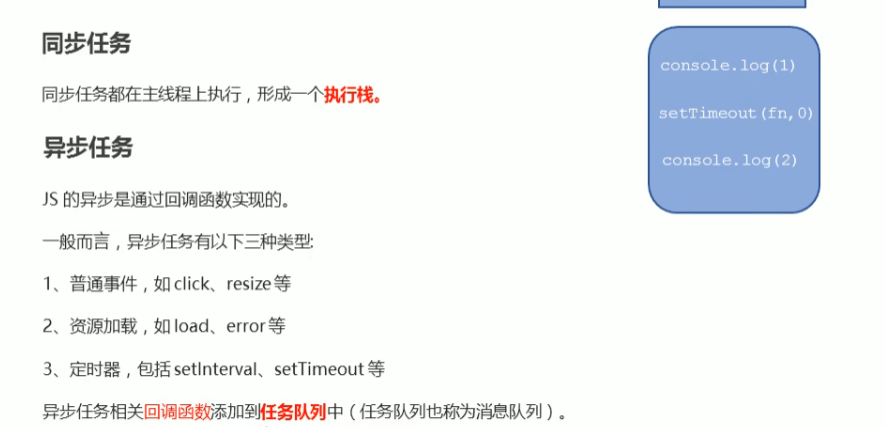
# 4.2 同步和异步

# 4.3 执行机制
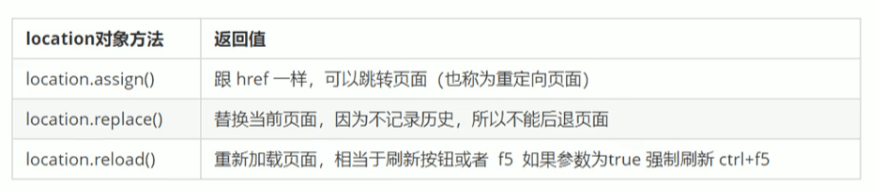
# 5.Location对象
# 5.1什么是Location对象

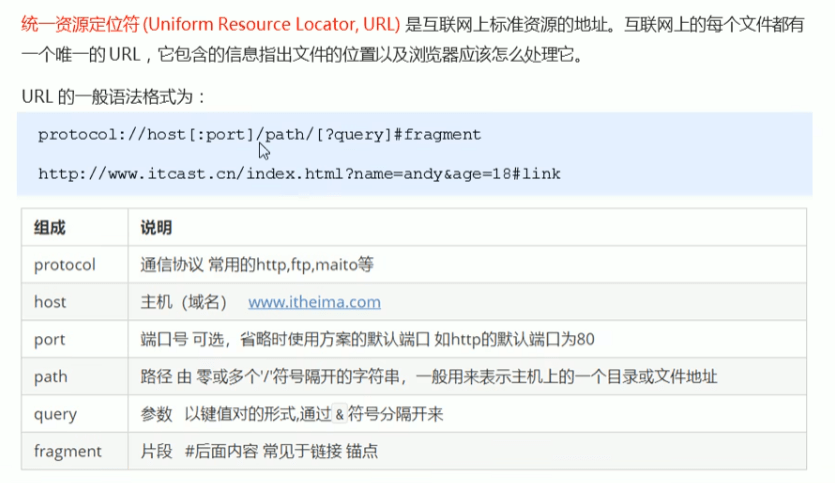
# 5.2URL
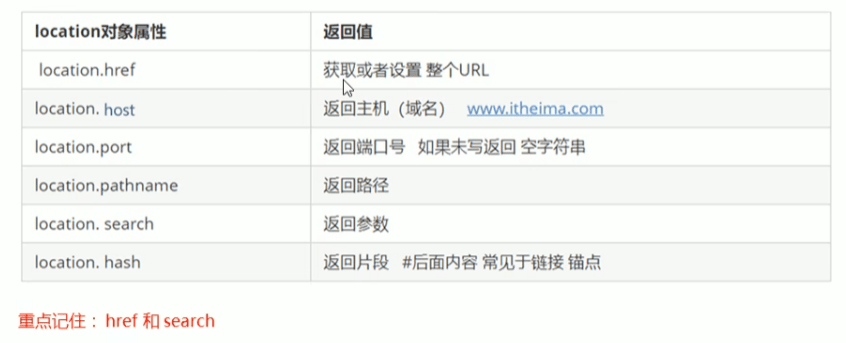
# 5.3 location对象的属性
# 5.4 location对象的方法
# 6.navigator对象

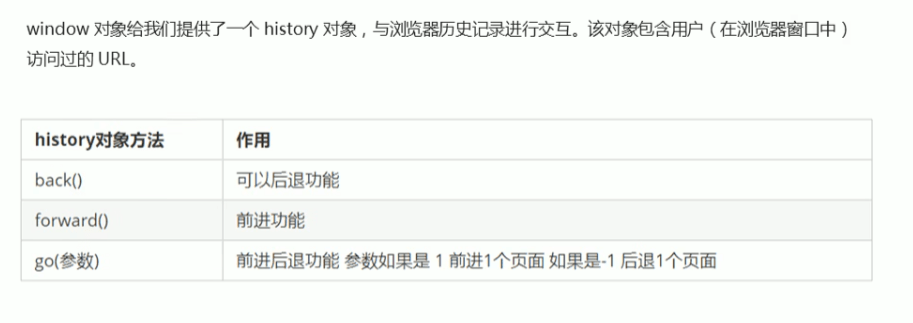
# 7.history对象
# 五、PC网页特效导读
# 六、移动端特效导读
# 七、本地存储导读
# 1.本地存储
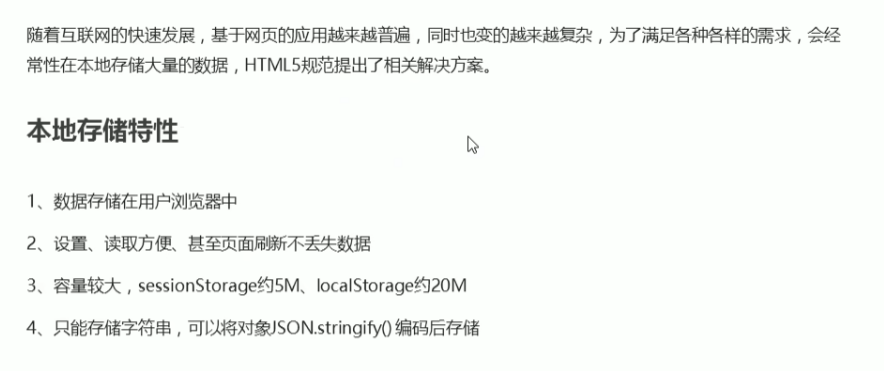
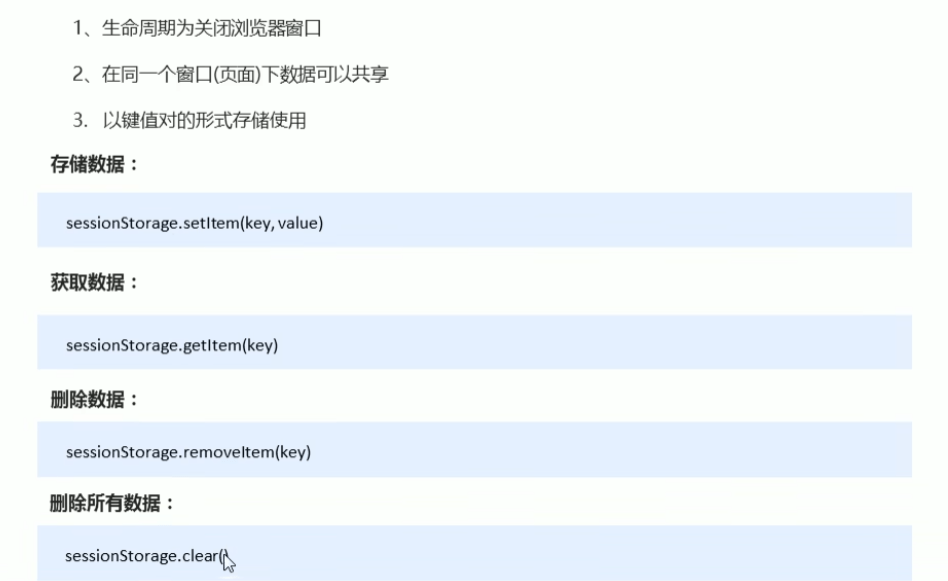
# 2.window.sessionStorage
# 3.window.localStorage
# jQuery入门导读
# 1.jQuery概述
# 1.1JavaScript库
# 1.2 jQuery的概念

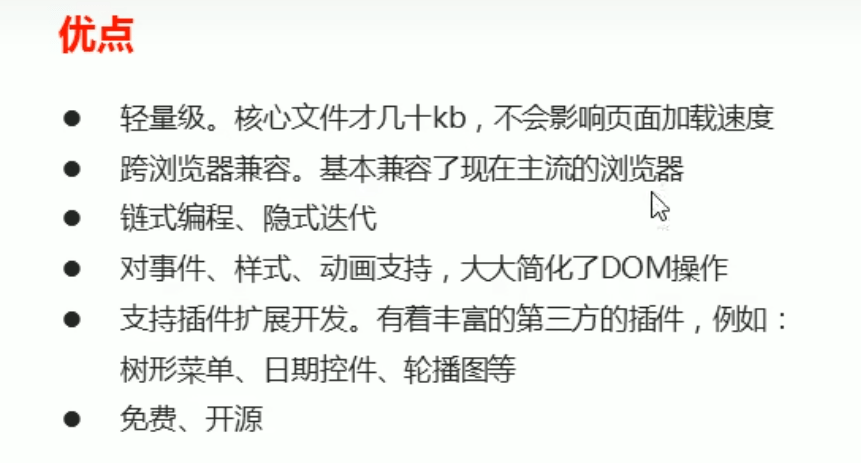
# 1.3jQuery的优点
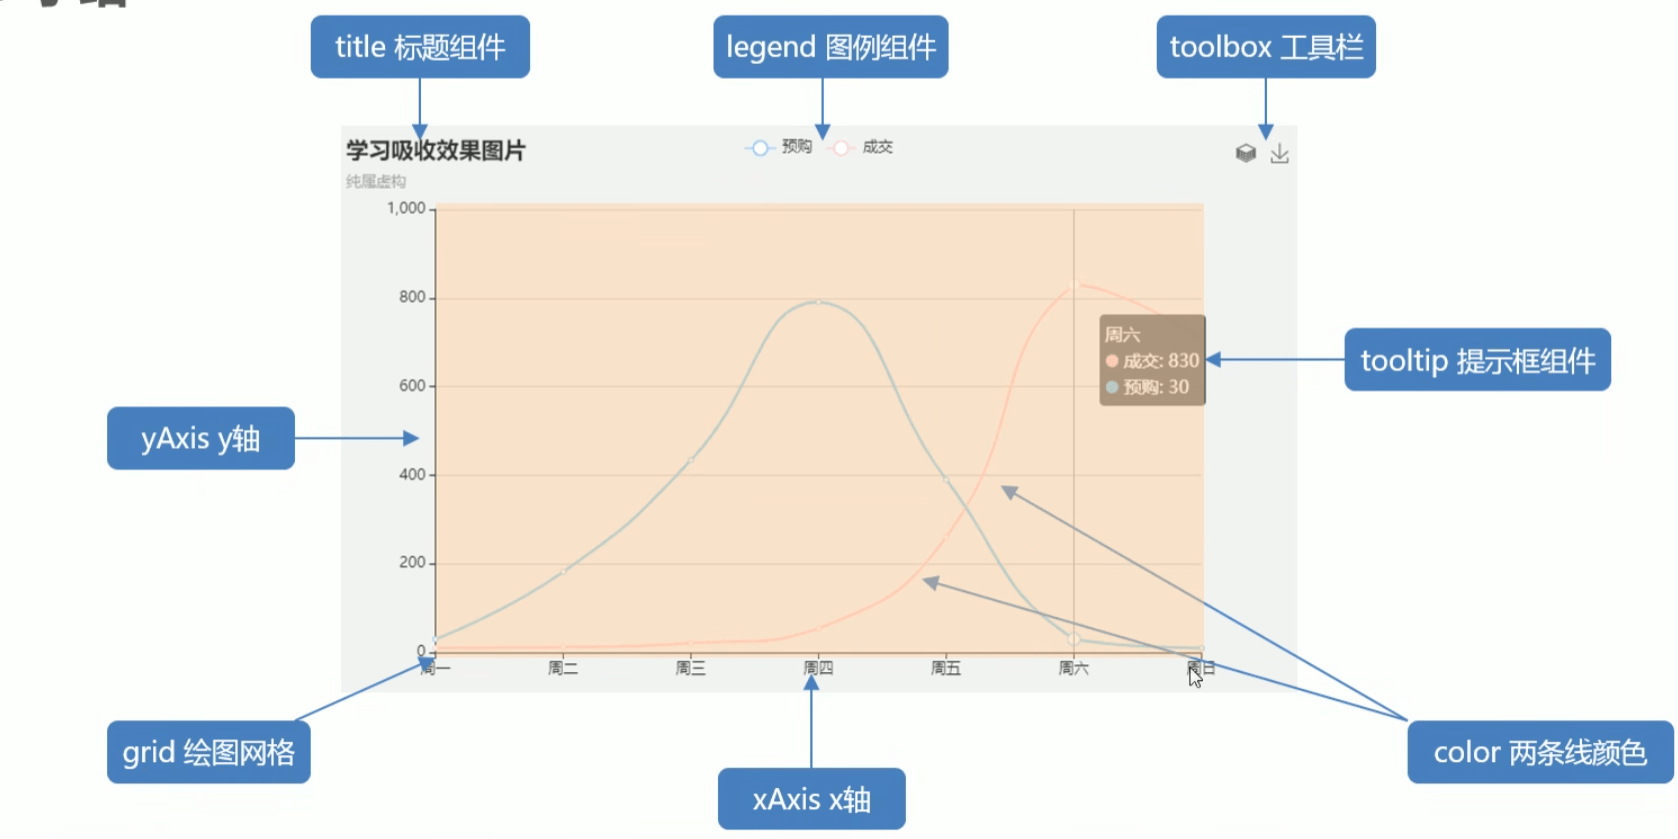
# 数据可视化项目导读
# 1.什么是数据可视化
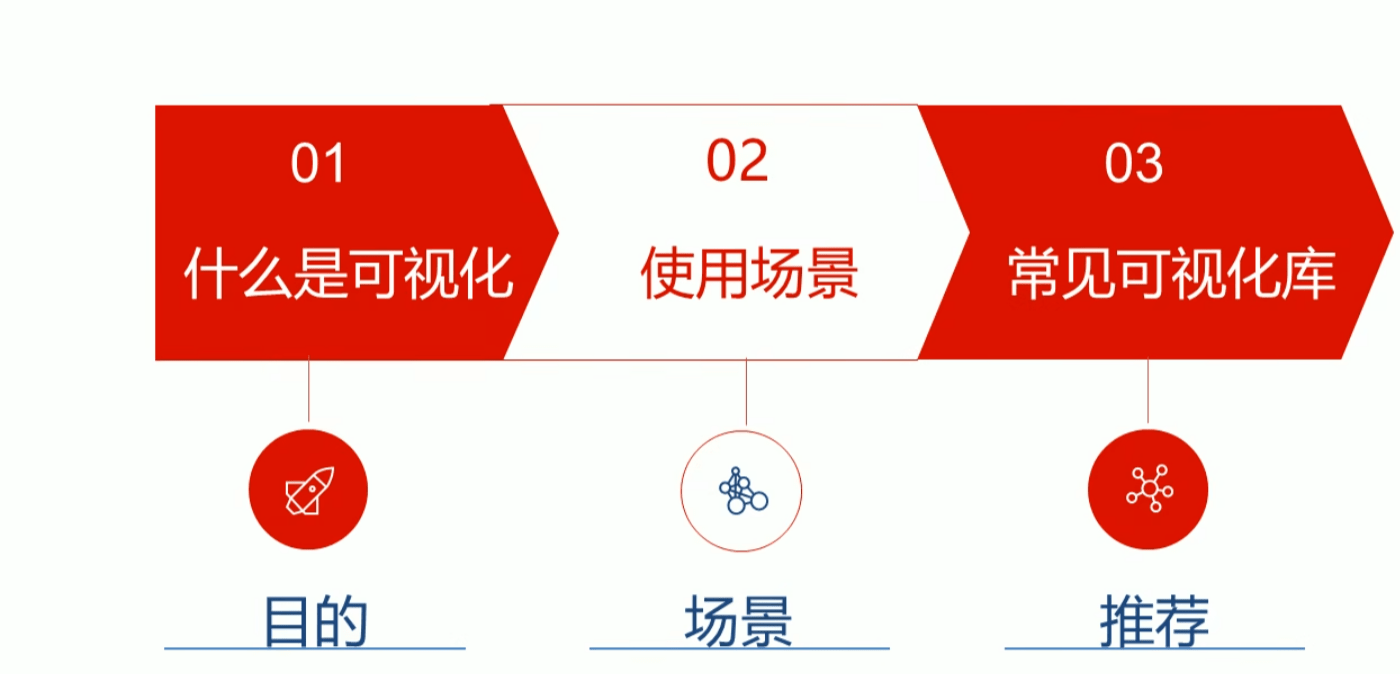
# 1.1数据可视化

# 1.2数据可视化的场景

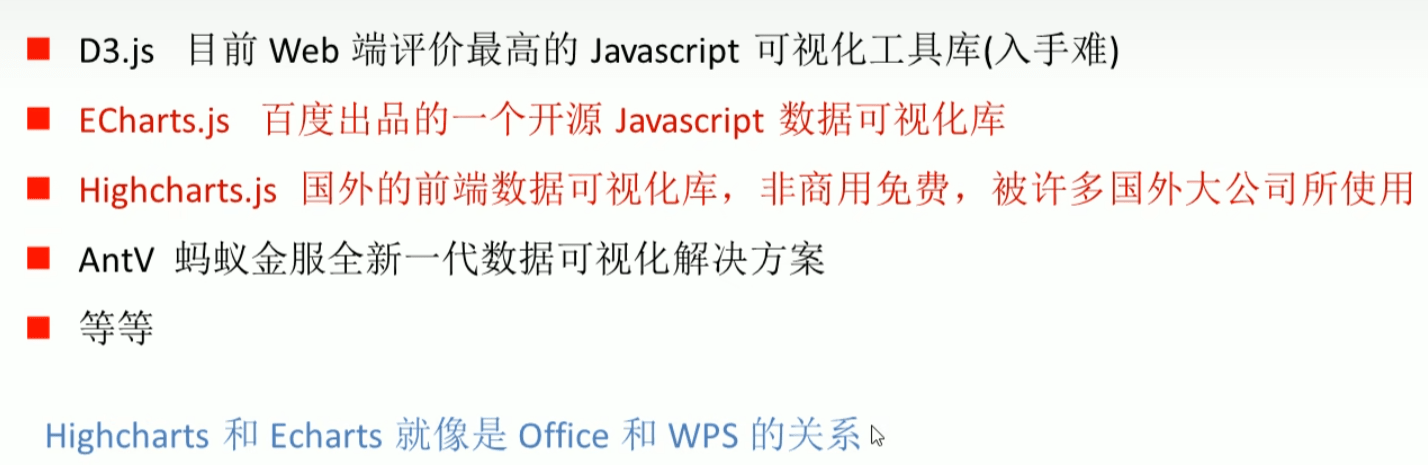
# 1.3常见的数据可视化库
# 1.4小结

# 2.数据可视化项目概述
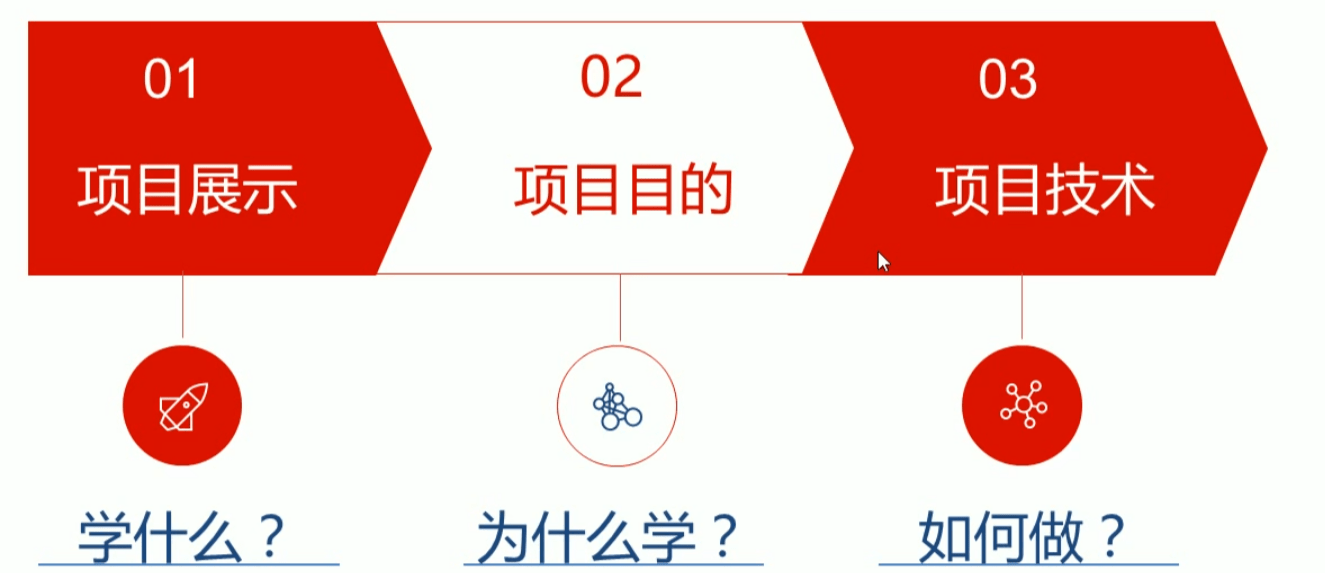
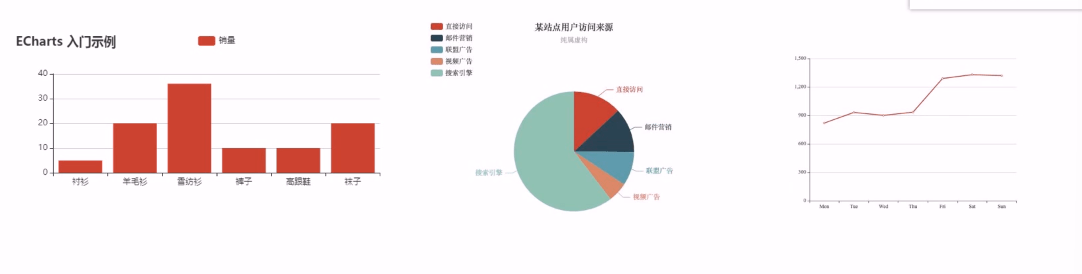
# 2.1项目展示

# 2.2项目的目的
# 2.3项目技术
# 2.4小结
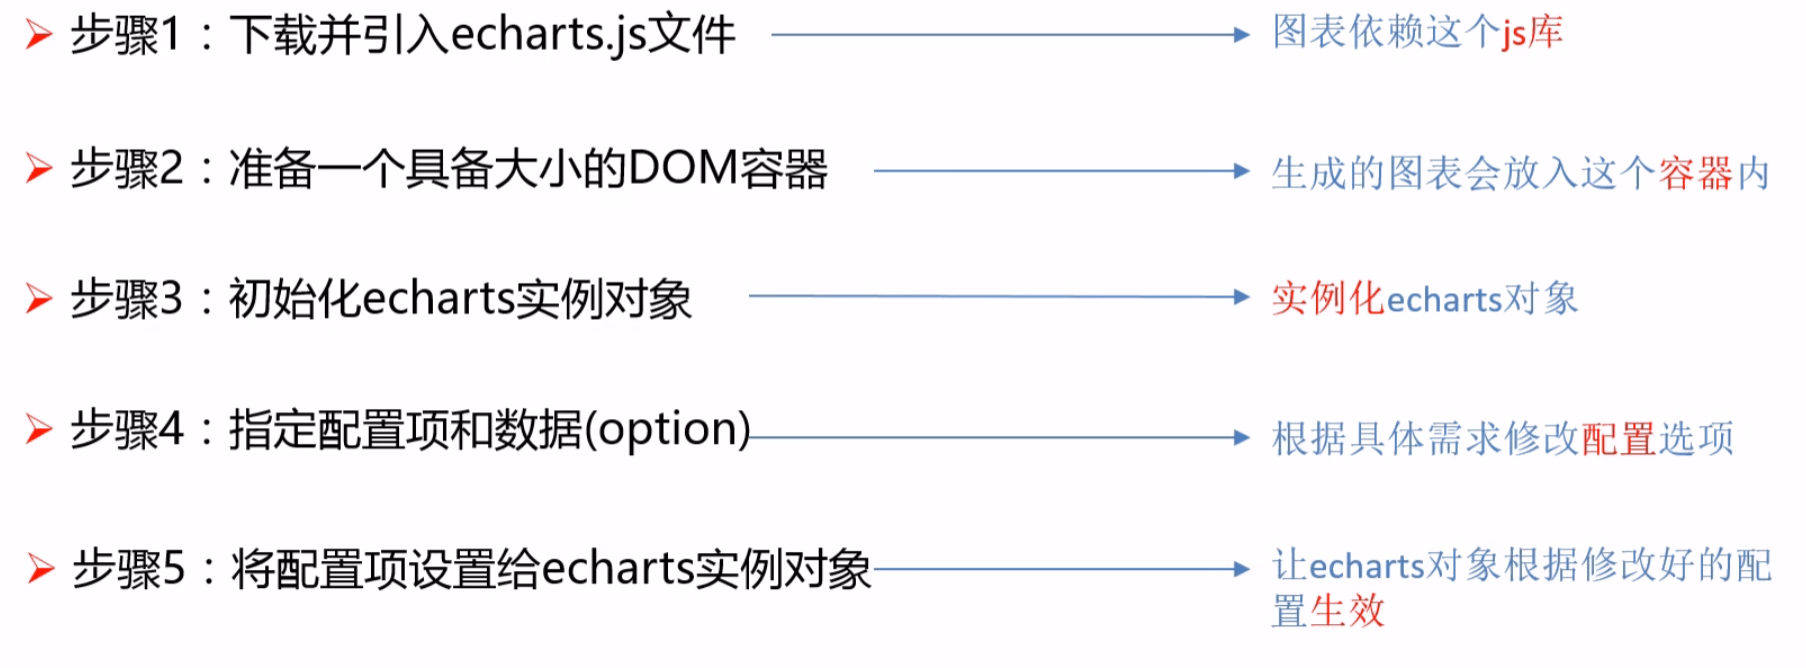
# 3.ECharts简介
# 4.ECharts的基本使用

# 4.1ECharts使用五部曲
# 4.2选择不同类型的图表
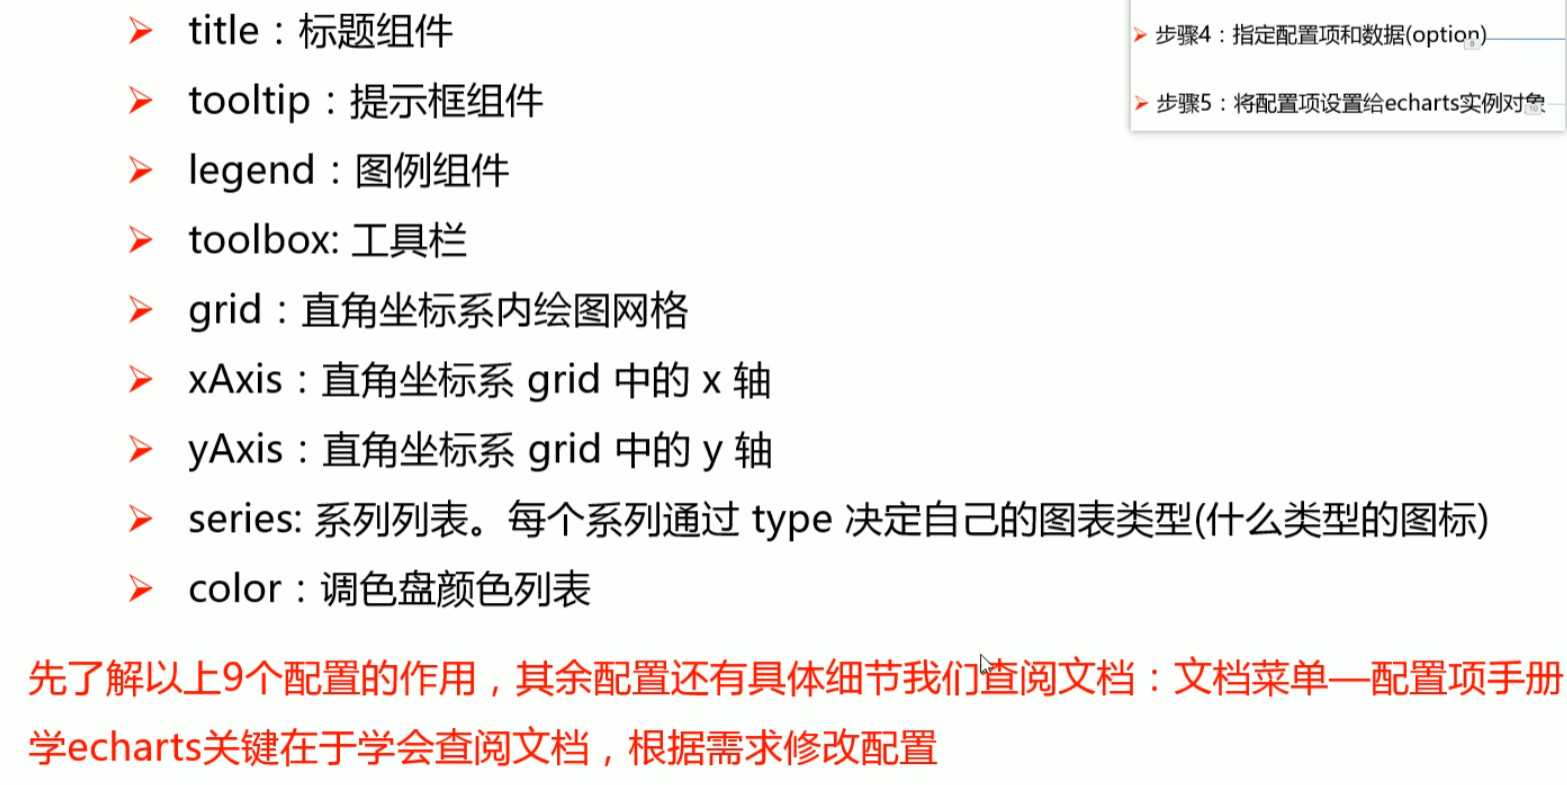
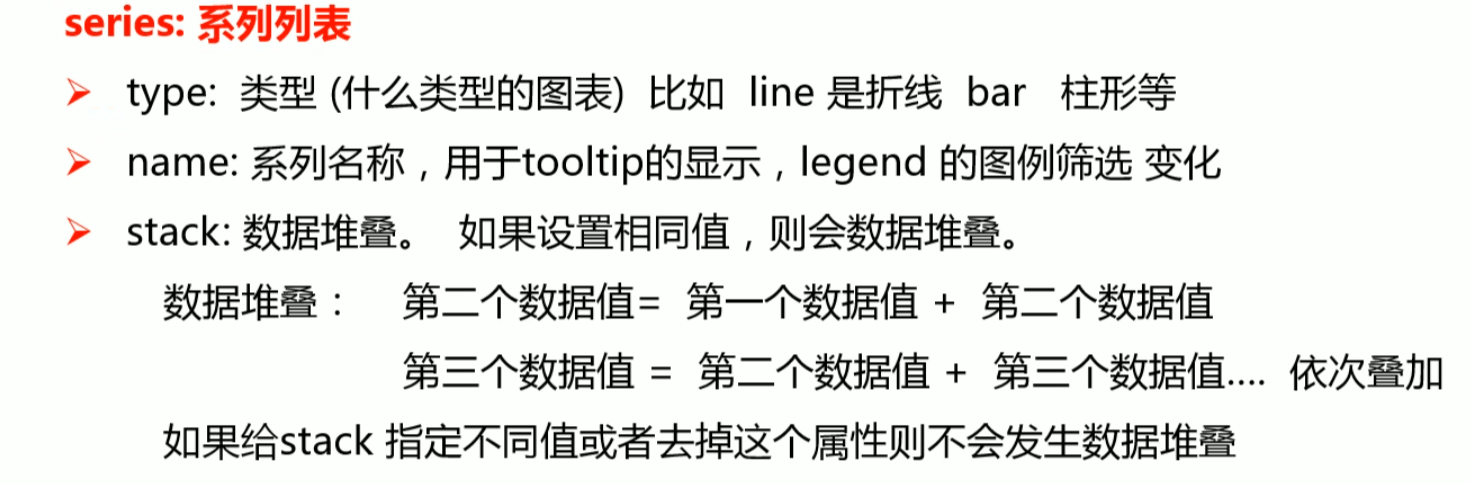
# 4.3相关配置讲解
# 4.4小结
# Node.js
# buffer(缓冲器)
1.创建buffer
// 有三种创建方式

//1.alloc
let buf = Buffer.alloc(10);
console.log(buf);

//2.allocUnsafe
let buf_2 = Buffer.allocUnsafe(10);
console.log(buf_2);

// 3.from
let buf_3 = Buffer.from('hello')
console.log(buf_3);
2.操作buffer
//buffer 与字符串的转换*

let buf_4 = Buffer.from([105,108,111,118,101,121,111,127])*

console.log(buf_4.toString()); //utf-8*

*//[]*

let buf = Buffer.from('hello')

console.log(buf[0]);

buf[0] = 95;

console.log(buf);


*//溢出*

let buf = Buffer.from('hello');

buf[0] = 361; //舍弃高位的数字

console.log(buf);


*//中文*

let buf = Buffer.from('你好')

console.log(buf);
# 计算机基础
1.计算机基本组成
内存
CPU
硬盘
# fs模块
# 1.写入文件
// 需求:
// 新建一个文件,座右铭.txt,写入内容:三人行,则必有我师

//1.导入fs模块
const fs = require('fs');

//2.写入文件
fs.writeFile('./座右铭.txt','三人行,则必有我师焉',err =>{
    //err 写入失败:错误对象 写入成功:null
    if (err) {
        console.log('写入失败');
        return;
    }
    console.log('写入成功');
})
# 2.异步与同步
异步:先打印1111,后打印写入成功
// 需求:
// 新建一个文件,座右铭.txt,写入内容:三人行,则必有我师

//1.导入fs模块
const fs = require('fs');

//2.写入文件
fs.writeFile('./座右铭.txt','三人行,则必有我师焉',err =>{
    //err 写入失败:错误对象 写入成功:null
    if (err) {
        console.log('写入失败');
        return;
    }
    console.log('写入成功');
})

console.log(1111);
同步:按代码顺序执行
//同步写入
const fs = require('fs');
fs.writeFileSync('./data.txt','test');
# 3.文件追加写入
//1.引入fs模块
const fs = require('fs')

//2.调用appendFile
fs.appendFile('./座右铭.txt',',择其善者而从之,其不善者而改之',err=>{
    //判断
    if (err) {
        console.log('写入失败~~');
        return;
    }
    console.log('追加写入成功');
})
//同步
fs.appendFileSync('./座右铭.txt','\r\n温故而知新,可以为师矣')

//增加flag:a进行追加写入
fs.writeFile('./座右铭.txt','love love',{flag:'a'},err=>{
    if(err){
        console.log('写入失败');
        return;
    }
    console.log('写入成功');
})
# 4.fs流式写入
// 观书有感

//1.导入fs模块
const fs = require('fs');


//2.创建写入流对象
const ws = fs.createWriteStream('./观书有感.txt');

//3.write
ws.write('你干嘛\r\n');
ws.write('哎哟');
ws.write('是不是有病\r\n');

//4.关闭通道
ws.close()
# 5.文件读取
// 1.引入fs模块
const fs = require('fs')

//2.异步读取
fs.readFile('./观书有感.txt', (err, data) => {
    if (err) {
        console.log('读取失败');
        return;
    }
    console.log(data.toString());
})

//3.同步读取
fs.readFileSync('./观书有感.txt')
console.log(data.toString());
# 6.流式读取
//引入 fs 模块
const fs = require('fs');

//2.创建读取流对象
const rs = fs.createReadStream('./static/img.png')

//3.绑定data事件 chunk 块儿
rs.on('data',chunk=>{
    console.log(chunk.length); //65536字节 =>64kb
})

//4.绑定end事件
rs.on('end',()=>{
    console.log('读取完成');
})
# 7.练习文件复制
// 需求: 复制图片

const fs = require('fs')
//方式一  readFile
//读取文件内容
let data = fs.readFileSync('./static/img.png');
//写入文件
fs.writeFileSync('./static/img2.png', data)


//方式二 流式操作
//创建读取流对象
const rs = fs.createReadStream('./static/img.png');
//创建写入流对象
const ws = fs.createWriteStream('./static/img3.png');

//绑定data事件
rs.on('data', chunk =>{
    ws.write(chunk)
});
# 8.文件移动与重命名
//1.导入fs 模块
const fs = require('fs');

//2.调用rename 方法
fs.rename('./座右铭.txt', './论语.txt', err => {
    if (err) {
        console.log('操作失败`');
        return;
    }
    console.log('操作成功');
})


//3文件的移动
fs.rename('./data.txt', './static/data.txt', err => {
    if (err) {
        console.log('操作失败`');
        return;
    }
    console.log('操作成功');
})
# 9.fs文件删除
//1.导入fs模块
const { log } = require('console')
const fs = require('fs')

//2.调用unlink 方法
fs.unlink('./观书有感.txt',err =>{
    if (err) {
        console.log('删除失败~~');
        return;
    }
     console.log('删除成功');
 })

//3.调用rm方法
fs.rm('./论语.txt',err =>{
    if (err) {
        console.log('删除失败');
        return;
    }
    console.log('删除成功');
})
# 10.文件夹操作
//1.导入fs模块
const fs = require('fs');

//2.创建文件夹 mk make制作 dir directory文件夹
fs.mkdir('./html',err=>{
    if (err) {
        console.log('创建失败');
        return;
    }
    console.log('创建成功');
})


//2.2递归创建
fs.mkdir('./a/b/c',{recursive: true},err=>{
    if (err) {
        console.log('创建失败');
        return;
    }
    console.log('创建成功');
})


//2.3读取文件夹
fs.readdir('./',(err,data)=>{
    if (err) {
        console.log('读取失败');
        return;
    }
    console.log(data);
})


//2.4删除文件夹
fs.rmdir('./html',err=>{
    if (err) {
        console.log('删除失败');
        return;
    }
    console.log('删除成功');
})

//递归删除 不建议使用
fs.rmdir('./a',{recursive:true},err=>{
    if (err) {
        console.log('删除失败');
        return;
    }
    console.log('删除成功');
})

//建议使用
fs.rmdir('./a', { recursive: true }, err => {
    if (err) {
        console.log('删除失败');
        return;
    }
    console.log('删除成功');
})
# 11.查看文件资源信息
//1.导入fs模块

const fs = require('fs');
//2.stat方法 status缩写 状态
fs.stat('./static/img.png',(err,data)=>{
    if (err) {
        console.log('操作失败');
        return
    }
    // console.log(data);
    //isFile
    console.log(data.isFile());
})
# 12.两种路径
//1.导入fs模块
const fs = require('fs');

//相对路径
// fs.writeFileSync('./index.html','love');
// fs.writeFileSync('index.html','love');

//绝对路径
fs.writeFileSync('D:/index.html','love')
# 13.fs练习--批量重命名
//1.导入 fs 模块
const fs = require('fs')

//读取code文件夹
const files = fs.readdirSync('./code')

//遍历数组
files.forEach(item => {
    //拆分文件名
    let data = item.split('-');
    let [num, name] = data;

    //判断
    if (Number(num) < 10) {
        num = '0' + num;
    }
    //创建新的文件夹
    let newName = num + '-' + name
    //重命名
    fs.renameSync(`./code/${item}`, `./code/${newName}`)
})
# path模块
//1.导入fs模块
const fs = require('fs')
const path = require('path')


//resolve 解决
console.log(path.resolve(__dirname,'./index.html'));

//sep 分隔符
console.log(path.sep);

//parse 方法 __dirname '全局变量'

console.log(__filename); //文件的绝对路径

let str = 'D:\\nodejs\\path.js'
console.log(path.parse(str));

//basename
console.log(path.basename(str));

//extname
console.log(path.extname(str));
# HTTP模块
# 1.创建http服务
//1.导入http模块
const http = require('http');

//2.创建服务对象
const server = http.createServer((request,response)=>{
    response.end('hello http server'); //设置响应体
})

//3.监听端口,启动服务
server.listen(9000,()=>{
    console.log('服务已启动');
})
# 2.提取http报文
//1.导入http模块
const http = require('http');

//2.创建服务对象
const server = http.createServer((request,response)=>{
    //获取请求方法
    // console.log(request.method);
    //获取请求的url
    // console.log(request.url); //只包含 url 中的另与查询字符串
    //获取http 协议的版本号
    // console.log(request.httpVersion);
    //获取1请求头
    // console.log(request.headers);
    response.setHeader('content-type', 'text/html;charset=utf-8');
    response.end('hello http server你干嘛'); //设置响应体
})

//3.监听端口,启动服务
server.listen(9000,()=>{
    console.log('服务已启动');
})
# 3.提取http报文的请求体
//1.导入http模块
const http = require('http');

//2.创建服务对象
const server = http.createServer((request,response)=>{
    //1.声明一个变量
    let body = ''
    //2.绑定事件
    request.on('data', chunk =>{
        body += chunk.toString
    })


    //3.绑定end事件
    response.on('end',()=>{
        console.log(body);
         //设置响应体
         response.end('hello http')
    });
})

//3.监听端口,启动服务
server.listen(9000,()=>{
    console.log('服务已启动');
})
# 4.提取http报文中的url路径与查询字符
//导入http模块
const http = require('http');
//导入url模块
const url = require('url');

//创建服务对象
const server = http.createServer((request, response) => {
    //1.解析 request.url
    // console.log(request.url);
    let res = url.parse(request.url,true)
    //路径
    let pathname = res.pathname;
    //查询字符串
    let keyword = res.query.keyword
    console.log(keyword);
    response.end('hello world');
})

//监听端口,启动服务
server.listen(9000, () => {
    console.log('服务已启动');
})
//导入http模块
const http = require('http');


//创建服务对象
const server = http.createServer((request, response) => {
    //实例化url对象
    // let url = new URL('http://127.0.0.1:9000')
    let url = new URL(request.url,'http:127.0.0.1:9000')
    //输出路径
    console.log(url.pathname);
    //输出 keyword 查询字符串
    console.log(url.searchParams.get('keyword'));
    response.end('hello world');
})

//监听端口,启动服务
server.listen(9000, () => {
    console.log('服务已启动');
})
# 5.练习-http服务
//导入http模块
const http = require('http');

//创建服务对象
const server = http.createServer((request,response)=>{
    //获取请求的方法
    let {method}  = request;
    //获取请求的url路径
    let {pathname} = new URL(request.url,'http://127.0.0.1:9000')
    //判断
    response.setHeader('content-type', 'text/html; charset=utf-8')
    if (method == 'GET' && pathname == '/login')  {
        //登录的情形
        response.end('登录页面')
    }else if (method == 'GET' && pathname == '/reg') {
        response.end('注册页面')
    }else{
        response.end('404')
    }
})

//监听端口,启动服务
server.listen(9000,()=>{
    console.log('server listening on');
})
# 6.设置http响应报文
//1.导入http模块
const http = require('http');

//2.创建服务对象
const server = http.createServer((request,response)=>{
    //设置响应状态码
    // response.statusCode = 200;
    //设置响应状态描述
    // response.statusMessage = 'OK';
    //设置响应头
    // response.setHeader('content-type', 'text/html;charset=utf-8')
    //响应体的设置
    // response.write('love')
    response.setHeader('content-type', 'text/html;charset=utf-8');
    response.end('hello http server你干嘛'); //设置响应体
})

//3.监听端口,启动服务
server.listen(9000,()=>{
    console.log('服务已启动');
})
# Express框架
# 1.express初体验
//1.导入express
const express = require('express')

//2.创建应用对象
const app = express();

//3.创建路由
app.get('/home', (req, res) => {
    res.end('Welcome');
});

//4.监听端口
app.listen(9000,()=>{
    console.log('服务已启动');
})
# 2.路由
//1.导入express
const express = require('express')

//2.创建应用对象
const app = express();

//3.创建路由
app.get('/home', (req, res) => {
    res.end('home');
});

app.get('/', (req, res) => {
    res.end('Welcome');
})

app.post('/login', (req, res) => {
    res.end('login')
})

app.all('/test',(req,res)=>{
    res.end('test')
})

app.all('*',(req,res)=>{
    res.end('*')
})


//4.监听端口
app.listen(9000,()=>{
    console.log('服务已启动');
})
# 3.获取请求参数
//1.导入express
const express = require('express')

//2.创建应用对象
const app = express();

//3.创建路由
app.get('/request', (req, res) => {
    //原生操作
    console.log(req.method);
    console.log(req.url);
    console.log(req.httpVersion);
    console.log(req.headers);


    //express 操作
    console.log(req.path);
    console.log(req.query);
    //获取ip
    console.log(req.ip);
    //获取请求头
    console.log(req.get('host'));
    res.end('Welcome');
});

//4.监听端口
app.listen(9000, () => {
    console.log('服务已启动');
})
# 4.获取路由参数
//1.导入express
const express = require('express')

//2.创建应用对象
const app = express();

//3.创建路由
app.get('/:id.html', (req, res) => {
    //获取url路由参数
    console.log(req.params.id);
    res.setHeader('Content-Type', 'text/html');
    res.end('商品详情');
});


//4.监听端口
app.listen(9000,()=>{
    console.log('服务已启动');
})
# 5.设置响应
//导入express
const express = require('express')

//创建应用对象
const app = express();

//创建路由
app.get('/response', (req, res) => {
    //原生响应
    // res.setStatus = 404;
    // res.statusMessage = 'love';
    // res.setHeader('xxx','yyy');
    // res.write('hello express');
    // res.end('response');

    //express响应
    // res.status(500);
    // res.set('xxx','ytyy');
    // res.send('hello express');
    //连贯操作
    res.status(500).set('abc','seere').send('hello express连贯');
});

//监听端口
app.listen(9000,()=>{
    console.log('服务已启动');
})
# 6.其他响应
//导入express
const express = require('express')

//创建应用对象
const app = express();

//创建路由
app.get('/other', (req, res) => {
    //跳转响应
    // res.redirect('http://www.luoguang.icu')
    //下载响应
    // res.download(__dirname+'/package.json')
    //json响应
    // res.json({
    //     name:'lg',
    //     password:'password'
    // })
    //响应文件内容
    res.sendFile(__dirname+'/index.html')
});

//监听端口
app.listen(9000,()=>{
    console.log('服务已启动');
})
# express中间件
# 1.express初体验
//1.导入express
const express = require('express')
const fs = require('fs')
const path = require('path')
//2.创建应用对象
const app = express();


//声明中间件函数
function recordMiddleware(req, res, next) {
    //获取url 和 ip
    let { url, ip } = req;
    //将信息保存在文件中 access.log
    fs.appendFileSync(path.resolve(__dirname, './access.log'), `${url} ${ip}\r\n`)
    //调用next
    next()
}

//使用中间件函数
app.use(recordMiddleware)

//3.创建路由L
app.get('/home', (req, res) => {
    res.end('home');
});

app.get('/admin', (req, res) => {
    res.send('admin');
})

app.all('*', (req, res) => {
    res.send('<h1>404</h1>');
})

//4.监听端口
app.listen(9000, () => {
    console.log('服务已启动');
})
# 2.路由中间件实践
//1.导入express
const express = require('express')

//2.创建应用对象
const app = express();

//3.创建路由
app.get('/home', (req, res) => {
    res.end('home');
});

//声明中间件
let checkCodeMIddleware = (req, res, next) => {
    //判断 url 中是否 code 参数 等于 521
    if (req.query.code === '521') {
        next();
    } else {
        res.send('错误')
    }
}

//后台
app.get('/admin', checkCodeMIddleware, (req, res) => {
    res.send('admin');
})


app.get('/setting', checkCodeMIddleware, (req, res) => {
    res.send('setting');
})

app.all('*', (req, res) => {
    res.send('<h1>404</h1>');
})


//4.监听端口
app.listen(9000, () => {
    console.log('服务已启动');
})
# 3.静态资源中间件
//导入express
const express = require('express')

//创建应用对象
const app = express();

//静态资源中间件设置
app.use(express.static(__dirname + '/public'))

//创建路由
app.get('/home', (req, res) => {
    res.end('Welcome');
});

//监听端口
app.listen(9000, () => {
    console.log('服务已启动');
})
# 4.获取请求体数据
/**
 * 按照要求搭建http服务
 *
 * get /login 显示表单网页
 * post /login 获取表单中的[用户名] 和 [密码]
 *
 */

//导入express
const express = require('express');
const bodyParser = require('body-parser');
//创建应用对象
const app = express();

//解析 json 格式的请求体的中间件
const jsonParser = bodyParser.json()

//解析queryString 格式的请求体的中间件
const queryStringParser = bodyParser.urlencoded({extended:false})

//常见路由规则
app.get('/login',(req,res)=>{
    res.send('Welcome')
})

app.post('/login',queryStringParser,(req,res)=>{
    //获取用户名和密码
    console.log(req.body);
    res.send('Welcome')
})

//启动服务
app.listen(9000,()=>{
    console.log('listening on http://localhost');
})
# 防盗链实践
//1.导入express
const express = require('express')

//2.创建应用对象
const app = express();

//声明中间件
app.use((req, res, next) => {
    //检测请求头中的 referer 是否为 127.0.0.1
    //获取referer
    let referer = req.get('referer');
    if (referer) {
        //实例化
        let url = new URL(referer);
        //获取hostman
        let hostname = url.hostname;
        //判断
        if (hostname === '127.0.0.1') {
            //响应 404
            res.status(404).send('<h1>404 Not Found</h1>')
            return;

        }
        console.log(hostname);
    }
    next()
})

//静态资源中间件设置
app.use(express.static(__dirname + '/public'))

//4.监听端口
app.listen(9000, () => {
    console.log('服务已启动');
})
# ejs模板引擎
# 1.ejs初体验
//1.安装 ejs
//2.导入ejs
const ejs = require('ejs');
const fs = require('fs')
//字符串
let china = '中国';
// let str = `我爱你${china}`
let weather  = '今天天气不错哦~'
//声明变量
// let str = '我爱你 <%= china %>'
let str = fs.readFileSync('./01index.html').toString()

//使用ejs渲染
let result = ejs.render(str,{china:china,weather:weather})

console.log(result);
<h2>我爱你 <%= china %></h2>
<h1><%= weather %></h1>
# 2.列表渲染
const ejs = require('ejs');

//西游记
const xiyou = ['唐僧', '孙悟空', '猪八戒', '沙僧'];

//原生js实现
// let str = '<ul>';

// xiyou.forEach(item =>{
//     str +=`<li>${item}</li>`;
// })

// //闭合ul
// str += '</ul>';

// console.log(str);

//ejs实现
const fs = require('fs');
let html = fs.readFileSync('./02_西游.html').toString();


let result = ejs.render(html, { xiyou: xiyou })

console.log(result);
<!DOCTYPE html>
<html lang="en">
<head>
    <meta charset="UTF-8">
    <meta http-equiv="X-UA-Compatible" content="IE=edge">
    <meta name="viewport" content="width=device-width, initial-scale=1.0">
    <title>Document</title>
</head>
<body>
    <ul>
        <% xiyou.forEach(item=>{%>
            <li>
                <%= item %>
            </li>
            <%}) %>
    </ul>
</body>
</html>
# 3.条件渲染
/**
 *
 * 通过 isLOgin 决定最终输出内容
 * true 输出 <span>欢迎回来</span>
 * false 输出 <button>登录</button>  <button>注册</button>
 *
 */
//导入ejs
const ejs = require('ejs');
const fs = require('fs')
//变量
let isLogin = false;


//原生Js
// if (isLogin) {
//     console.log('<span>欢迎回来</span>');
// }else{
//     console.log('<button>登录</button>  <button>注册</button>');
// }

//ejs实现
//读取html
let html = fs.readFileSync('./03_条件渲染.html').toString()
let result = ejs.render(html,{isLogin:isLogin})

console.log(result);
<!DOCTYPE html>
<html lang="en">
<head>
    <meta charset="UTF-8">
    <meta http-equiv="X-UA-Compatible" content="IE=edge">
    <meta name="viewport" content="width=device-width, initial-scale=1.0">
    <title>Document</title>
</head>
<body>
    <% if(isLogin) {%>
        <span>欢迎回来</span>
        <% }else{ %>
            <button>登录</button> <button>注册</button>
            <% } %>
</body>
</html>
# 4.在express中使用ejs
//导入express
const express = require('express')
//导入path
const path = require('path')
//创建应用对象
const app = express();
//1.设置模板引擎
app.set('view engine', 'ejs'); //pug twing
//2.设置模板文件存放位置
app.set('views',path.resolve(__dirname, './views'))


//创建路由
app.get('/home', (req, res) => {
    //3.render响应
    // res.render(模板文件名,数据)
    //声明变量
    let title = '你干嘛'
    res.render('home',{title})
    //4.创建模板文件
});

//监听端口
app.listen(9000,()=>{
    console.log('服务已启动');
})
<!DOCTYPE html>
<html lang="en">
<head>
    <meta charset="UTF-8">
    <meta http-equiv="X-UA-Compatible" content="IE=edge">
    <meta name="viewport" content="width=device-width, initial-scale=1.0">
    <title>Document</title>
</head>
<body>
    <h2><%= title %></h2>
</body>
</html>
# express-generator使用
npm i -g express-generator
express -e generator
npm i
npm start
# 文件上传
const express = require('express')


const app = express()
const formidable = require('formidable');

app.get('/portrait', (req, res) => {
    console.log('你干嘛');
})

app.post('/portrait', (req, res) => {

    //创建form对象
    const form = formidable({
        multiples: true,
        //设置上传文件的保存目录
        uploadDir: __dirname + '/../public/images',
        //保持文件后缀
        keepExtensions: true,
     });
    //解析请求报文
    form.parse(req, (err, fields, files) => {
        if (err) {
            next(err);
            return;
        }
        // console.log(fields); //text radio checkbox select
        // console.log(files); //file

        //服务器保存该图片的访问url
        // /img.png
        let url = '/images/'+files.portrait.newFilename; //将数据保存在数据库中
        res.send(url)
    });

})


app.listen(9000, () => {
    console.log('listening');
})
<!DOCTYPE html>
<html lang="en">

<head>
    <meta charset="UTF-8">
    <meta http-equiv="X-UA-Compatible" content="IE=edge">
    <meta name="viewport" content="width=device-width, initial-scale=1.0">
    <title>文件上传</title>
</head>

<body>
    <form action="http://127.0.0.1:9000/portrait" method="post" enctype="multipart/form-data">
        用户名:<input type="text" name="username"><br>
        头像:<input type="file" name="portrait">
        <button>点击提交</button>
    </form>
</body>

</html>
# Mongodb
1.插入文档
db.集合名.insert(文档对象)

2.查询文档
db.集合名.find(查询条件)

3.更新文档
db.集合名.uoodate(查询条件,新的文档)

4.删除文档
db.集合名.remove(查询条件)
# mongose
# 1.mongose链接数据库
//1.安装 mongoose
//2.导入 mongoose
const mongoose = require('mongoose')

//3.连接 mongodb 服务
mongoose.connect('mongodb://127.0.0.1:27017/bilibili')

//4.设置回调
mongoose.connection.once('open',()=>{
    console.log('连接成功');
    //app.listen(8080)
})//设置连接成功的回调 once 一次
mongoose.connection.on('error',()=>{
    console.log('连接失败');
})//设置连接错误的回调
mongoose.connection.on('close',()=>{
    console.log('连接关闭');
})//设置连接关闭的回调

//关闭mongodb的连接
setTimeout(()=>{
    mongoose.disconnect();
},2000)
# 2.mongoose操作数据库
//1.安装 mongoose
//2.导入 mongoose
const mongoose = require('mongoose')

//3.连接 mongodb 服务
mongoose.connect('mongodb://127.0.0.1:27017/bilibili')

//4.设置回调
mongoose.connection.on('open', () => {
    // console.log('连接成功');
    //5.创建文档的结构对象
    //设置集合中文档的属性以及属性值的类型
    let BookSchema = new mongoose.Schema({
        name: String,
        author: String,
        price: Number,
    })

    //6.创建模型对象 对文档操作的封装对象
    let BookModel = mongoose.model('books', BookSchema)

    //7.新增
    BookModel.create({
        name: '西游记',
        author: '吴承恩',
        price: 19.9
    }).then((err, data) => {
        //判断是否有误
        if (err) {
            console.log(err);
            return;
        }
        //如果没有错误
        console.log(data);
    })


})//设置连接成功的回调
mongoose.connection.on('error', () => {
    console.log('连接失败');
})//设置连接错误的回调
mongoose.connection.on('close', () => {
    console.log('连接关闭');
})//设置连接关闭的回调

//关闭mongodb的连接
// setTimeout(()=>{
//     mongoose.disconnect();
// },2000)
# 3.字段类型
//1.安装 mongoose
//2.导入 mongoose
const mongoose = require('mongoose')

//3.连接 mongodb 服务
mongoose.connect('mongodb://127.0.0.1:27017/bilibili')

//4.设置回调
mongoose.connection.on('open', () => {
    // console.log('连接成功');
    //5.创建文档的结构对象
    //设置集合中文档的属性以及属性值的类型
    let BookSchema = new mongoose.Schema({
        name: String,
        author: String,
        price: Number,
        is_Hot: Boolean,
        tags: Array,
        pub_time: Date,
    })

    //6.创建模型对象 对文档操作的封装对象
    let BookModel = mongoose.model('books', BookSchema)

    //7.新增
    BookModel.create({
        name: '西游记',
        author: '吴承恩',
        price: 19.9,
        is_Hot: true,
        tags: ['鬼怪', '励志', '社会'],
        pub_time: new Date()
    }).then((err, data) => {
        //判断是否有误
        if (err) {
            console.log(err);
            return;
        }
        //如果没有错误
        console.log(data);
    })


})//设置连接成功的回调
mongoose.connection.on('error', () => {
    console.log('连接失败');
})//设置连接错误的回调
mongoose.connection.on('close', () => {
    console.log('连接关闭');
})//设置连接关闭的回调

//关闭mongodb的连接
// setTimeout(()=>{
//     mongoose.disconnect();
// },2000)
# 4.字段值验证
//1.安装 mongoose
//2.导入 mongoose
const mongoose = require('mongoose')

//3.连接 mongodb 服务
mongoose.connect('mongodb://127.0.0.1:27017/bilibili')

//4.设置回调
mongoose.connection.on('open', () => {
    // console.log('连接成功');
    //5.创建文档的结构对象
    //设置集合中文档的属性以及属性值的类型
    let BookSchema = new mongoose.Schema({
        name:{
            type: String,
            required: true, //表明该属性必须不为空
            unique: true,//设置独一无二
        },
        author: {
            type: String,
            default:'匿名',
        },
        price: Number,
        is_Hot: Boolean,
        tags: Array,
        pub_time: Date,
    })

    //6.创建模型对象 对文档操作的封装对象
    let BookModel = mongoose.model('books', BookSchema)

    //7.新增
    BookModel.create({
        name: '西游记',
        author: '吴承恩',
        price: 19.9,
        is_Hot: true,
        tags: ['鬼怪', '励志', '社会'],
        pub_time: new Date()
    }).then((err, data) => {
        //判断是否有误
        if (err) {
            console.log(err);
            return;
        }
        //如果没有错误
        console.log(data);
    })


})//设置连接成功的回调
mongoose.connection.on('error', () => {
    console.log('连接失败');
})//设置连接错误的回调
mongoose.connection.on('close', () => {
    console.log('连接关闭');
})//设置连接关闭的回调

//关闭mongodb的连接
// setTimeout(()=>{
//     mongoose.disconnect();
// },2000)
# Ajax
//1.创建对象
const xhr = new XMLHttpRequest();
//2.初始化 设置请求方法和 url
xhr.open('GET','http://127.0.0.1:8000/server?a=1&b=2');
//3.发送
xhr.send():
//4.事件绑定 处理服务器端返回的结果
//on when
// readystate 是xhr对象中的属性,表示状态 0 1 2 3 4
//change 改变
xhr.onreadystatechange = function(){
    //判断(服务端返回了所有结果)
    if(xhr.readystate === 4){
        //判断响应状态码 200 404 403 401 500
        // 2xx 成功
        if(xhr.status >= 200 && xhr.status <= 300){
            //处理结果 行 头 空行 体
            //1.响应行
            console.log(xhr.status);//状态码
            console.log(xhr.statusText);//状态字符串
            console.log(xhr.getAllResponseHeaders());//所有响应头
            console.log(xhr.response);//响应体
        }else{

        }
    }
}
# post请求设置请求体
//1.创建对象
const xhr = new XMLHttpRequest();
//2.初始化 设置请求方法和 url
xhr.open('POST','http://127.0.0.1:8000/server');
//3.发送
//xhr.send('a=1&b=2');
xhr.send('a:1&b:2')
//4.事件绑定 处理服务器端返回的结果
//on when
// readystate 是xhr对象中的属性,表示状态 0 1 2 3 4
//change 改变
xhr.onreadystatechange = function(){
    //判断(服务端返回了所有结果)
    if(xhr.readystate === 4){
        //判断响应状态码 200 404 403 401 500
        // 2xx 成功
        if(xhr.status >= 200 && xhr.status <= 300){
            //处理结果 行 头 空行 体
            //1.响应行
            console.log(xhr.status);//状态码
            console.log(xhr.statusText);//状态字符串
            console.log(xhr.getAllResponseHeaders());//所有响应头
            console.log(xhr.response);//响应体
        }else{

        }
    }
}
# 设置请求头
//1.创建对象
const xhr = new XMLHttpRequest();
//设置响应体数据类型
xhr.responseType = 'json
//超时设置2s
xhr.timeout = 2000;
//超时回调
xhr.ontimeout = function(){
    alert('超时了')
}
//网络异常回调
xhr.onerror = function(){
    alert('网络异常')
}
///2.始化 设置请求方法和 url
xhr.open('POST','http://127.0.0.1:8000/server');
//设置请求头
xhr.setRequestHeader('Content-Type','application/x-www-form-urlencoded')
//3.发送
//xhr.send('a=1&b=2');
xhr.send('a:1&b:2')
//4.事件绑定 处理服务器端返回的结果
//on when
// readystate 是xhr对象中的属性,表示状态 0 1 2 3 4
//change 改变
xhr.onreadystatechange = function(){
    //判断(服务端返回了所有结果)
    if(xhr.readystate === 4){
        //判断响应状态码 200 404 403 401 500
        // 2xx 成功
        if(xhr.status >= 200 && xhr.status <= 300){
            //处理结果 行 头 空行 体
            //1.响应行
            console.log(xhr.status);//状态码
            console.log(xhr.statusText);//状态字符串
            console.log(xhr.getAllResponseHeaders());//所有响应头
            console.log(xhr.response);//响应体
        }else{

        }
    }
}
# Jquery中使用ajax
//四个参数 url 参数 回调函数 数据格式
//get请求
$.get('http://127.0.0.1:9000/server',{a:100,b:200},function(data){
	console.log(data)
},'json')
//post请求
$.post('http://127.0.0.1:9000/server',{a:100,b:200},function(data){
	console.log(data)
})
//jquery通用方法
$.ajax({
    //url
    url:'http:127.0.0.1:9000/server',
    //参数
    data:{a:100,b:200},
    //请求类型
    type:'GET',
    //响应体结果设置
    dataType:'json'
    //成功的回调
    success:function(data){
        console.log(data)
    }
	//超时事件
	timeout:2000
    //失败回调
	error:function(){
        console.log('出错了')
    }
    //	头信息
	headers:{
        c:100,
        d:200
    }

})
# Axios发送Ajax请求
//配置baseURL
axios.defaults.baseURL = 'http://127.0.0.1:9000'


//get请求
axios.get('/server',{
    //url参数
    params:{
        id:100,
        vip:7
    },
    //请求头信息
    headers:{
    name:'lg',
    age:20
	}
}).then(value=>{
    console.log(value)
})

//post请求
axios.post('/server',
    {
    username:'admin',
    password:'admin'
	},
    {
    //url参数
    params:{
        id:100,
        vip:7
    },
    //请求头信息
    headers:{
    name:'lg',
    age:20
	}
}).then(value=>{
    console.log(value)
})
# Axios函数发送ajax请求
axios({
    //请求方法
    method:'POST',
    //url
    url:'/axios-server',
    //url参数
    params:{
        id:100,
        vip:7
    },
    //请求头信息
    headers:{
    name:'lg',
    age:20
	},
    //请求头参数
    data:{
        username:'admin',
        password:'admin'
    }
}).then(res=>{
    console.log(res)
})
# 使用fetch函数发送ajax请求
fetch('http:127.0.0.1:9000/server',{
    //请求方法
    method:'POST',
    //请求头
    headers:{
        name:'lg'
    },
    //请求体
    body:'username=admin&password=admin'
}).then(res=>{
   //return res.text();
    return res.json()
}).then(res=>{
    console.log(res)
})
# Promise
//声明构造函数
function Promise(executor) {
    //添加属性
    this.PromiseState = 'pending';
    this.PromiseResult = null;
    //保存实例对象的this 的值
    const self = this; //self _this that

    //resolve函数
    function resolve(data) {
        //1.修改对象的状态(promiseState)
        self.PromiseState = 'fulfilled'; //resolved

        //2.设置对象结果值(promiseResult)
        self.PromiseResult = data;
    }
    //reject函数
    function reject(data) {
        //1.修改对象的状态(promiseState)
        self.PromiseState = 'rejected';

        //2.设置对象结果值(promiseResult)
        self.PromiseResult = data;
    }

    //同步调用【执行器函数】
    executor(resolve,reject);
}

//添加then方法
Promise.prototype.then = function(onResolved,onRejected) {

}